

- Resources
- Manuals
Product manual
StartupSend, from the office.
Everything an admin or the office does in StartupSend: set up the company, build the jobs, shape the reports, follow the work, review it and send it to the commissioning provider. Each part says what to tap, in order, with a picture of the real screen.
Getting started #
StartupSend replaces the paper startup sheet. The office sets up each job and its equipment list, the tech fills one startup report per unit on a phone, and every report prints as a clean PDF in your company's design for the commissioning provider.
Who does what
Everyone in your company has one role. The role decides which screens they see and what they can change.
| Role | What they do | Tabs they see |
|---|---|---|
| Admin | Everything: projects, templates, review, sending, the brand and report design, the Checks console, people, billing and the Trash. | Projects, Templates, Team, Company |
| Office | Projects, equipment lists, templates, filling, review and sending. Views the Checks console. | Projects, Templates, Team, Checks |
| Field | Fills reports, adds units and finishes visits. The simplest screens, made for a phone. | My work |
| Reviewer | Reads reports, comments, approves or returns them, and sends. | Projects, Templates, Team |
The commissioning provider is not a role: they review through a link and need no account. See Sending to the Cx provider.
Signing in
- Open startupsend.com and choose Sign in, or open the sign-in link your admin sent.
- Type your email and password and choose Sign in. No password yet? Type your email and choose No password? Email me a sign-in link.
- A sign-in link works once and lasts 7 days. If your admin gave you a temporary password, StartupSend asks you to choose your own the first time: at least 8 characters, with letters and a number.
The bar at the top and your menu
The bar shows your company's name (and logo once it is set), the tabs for your role, and three small things on the right:
- Saved, Saving or Offline, kept here: whether your last change has reached StartupSend. Nothing you type is lost while it says Saving or Offline.
- The sun button: Sun mode, black on white for a phone in bright sun.
- The person button opens your menu: My name on reports (the name printed on the technician line), Change password, PT chart, What's new, Connect Claude or ChatGPT, Light or dark, Problem or idea? and Sign out.
On a phone the tabs sit along the bottom of the screen.
Setting up your company #
An admin does this once, on the Company tab. Every report and every new project follows it.
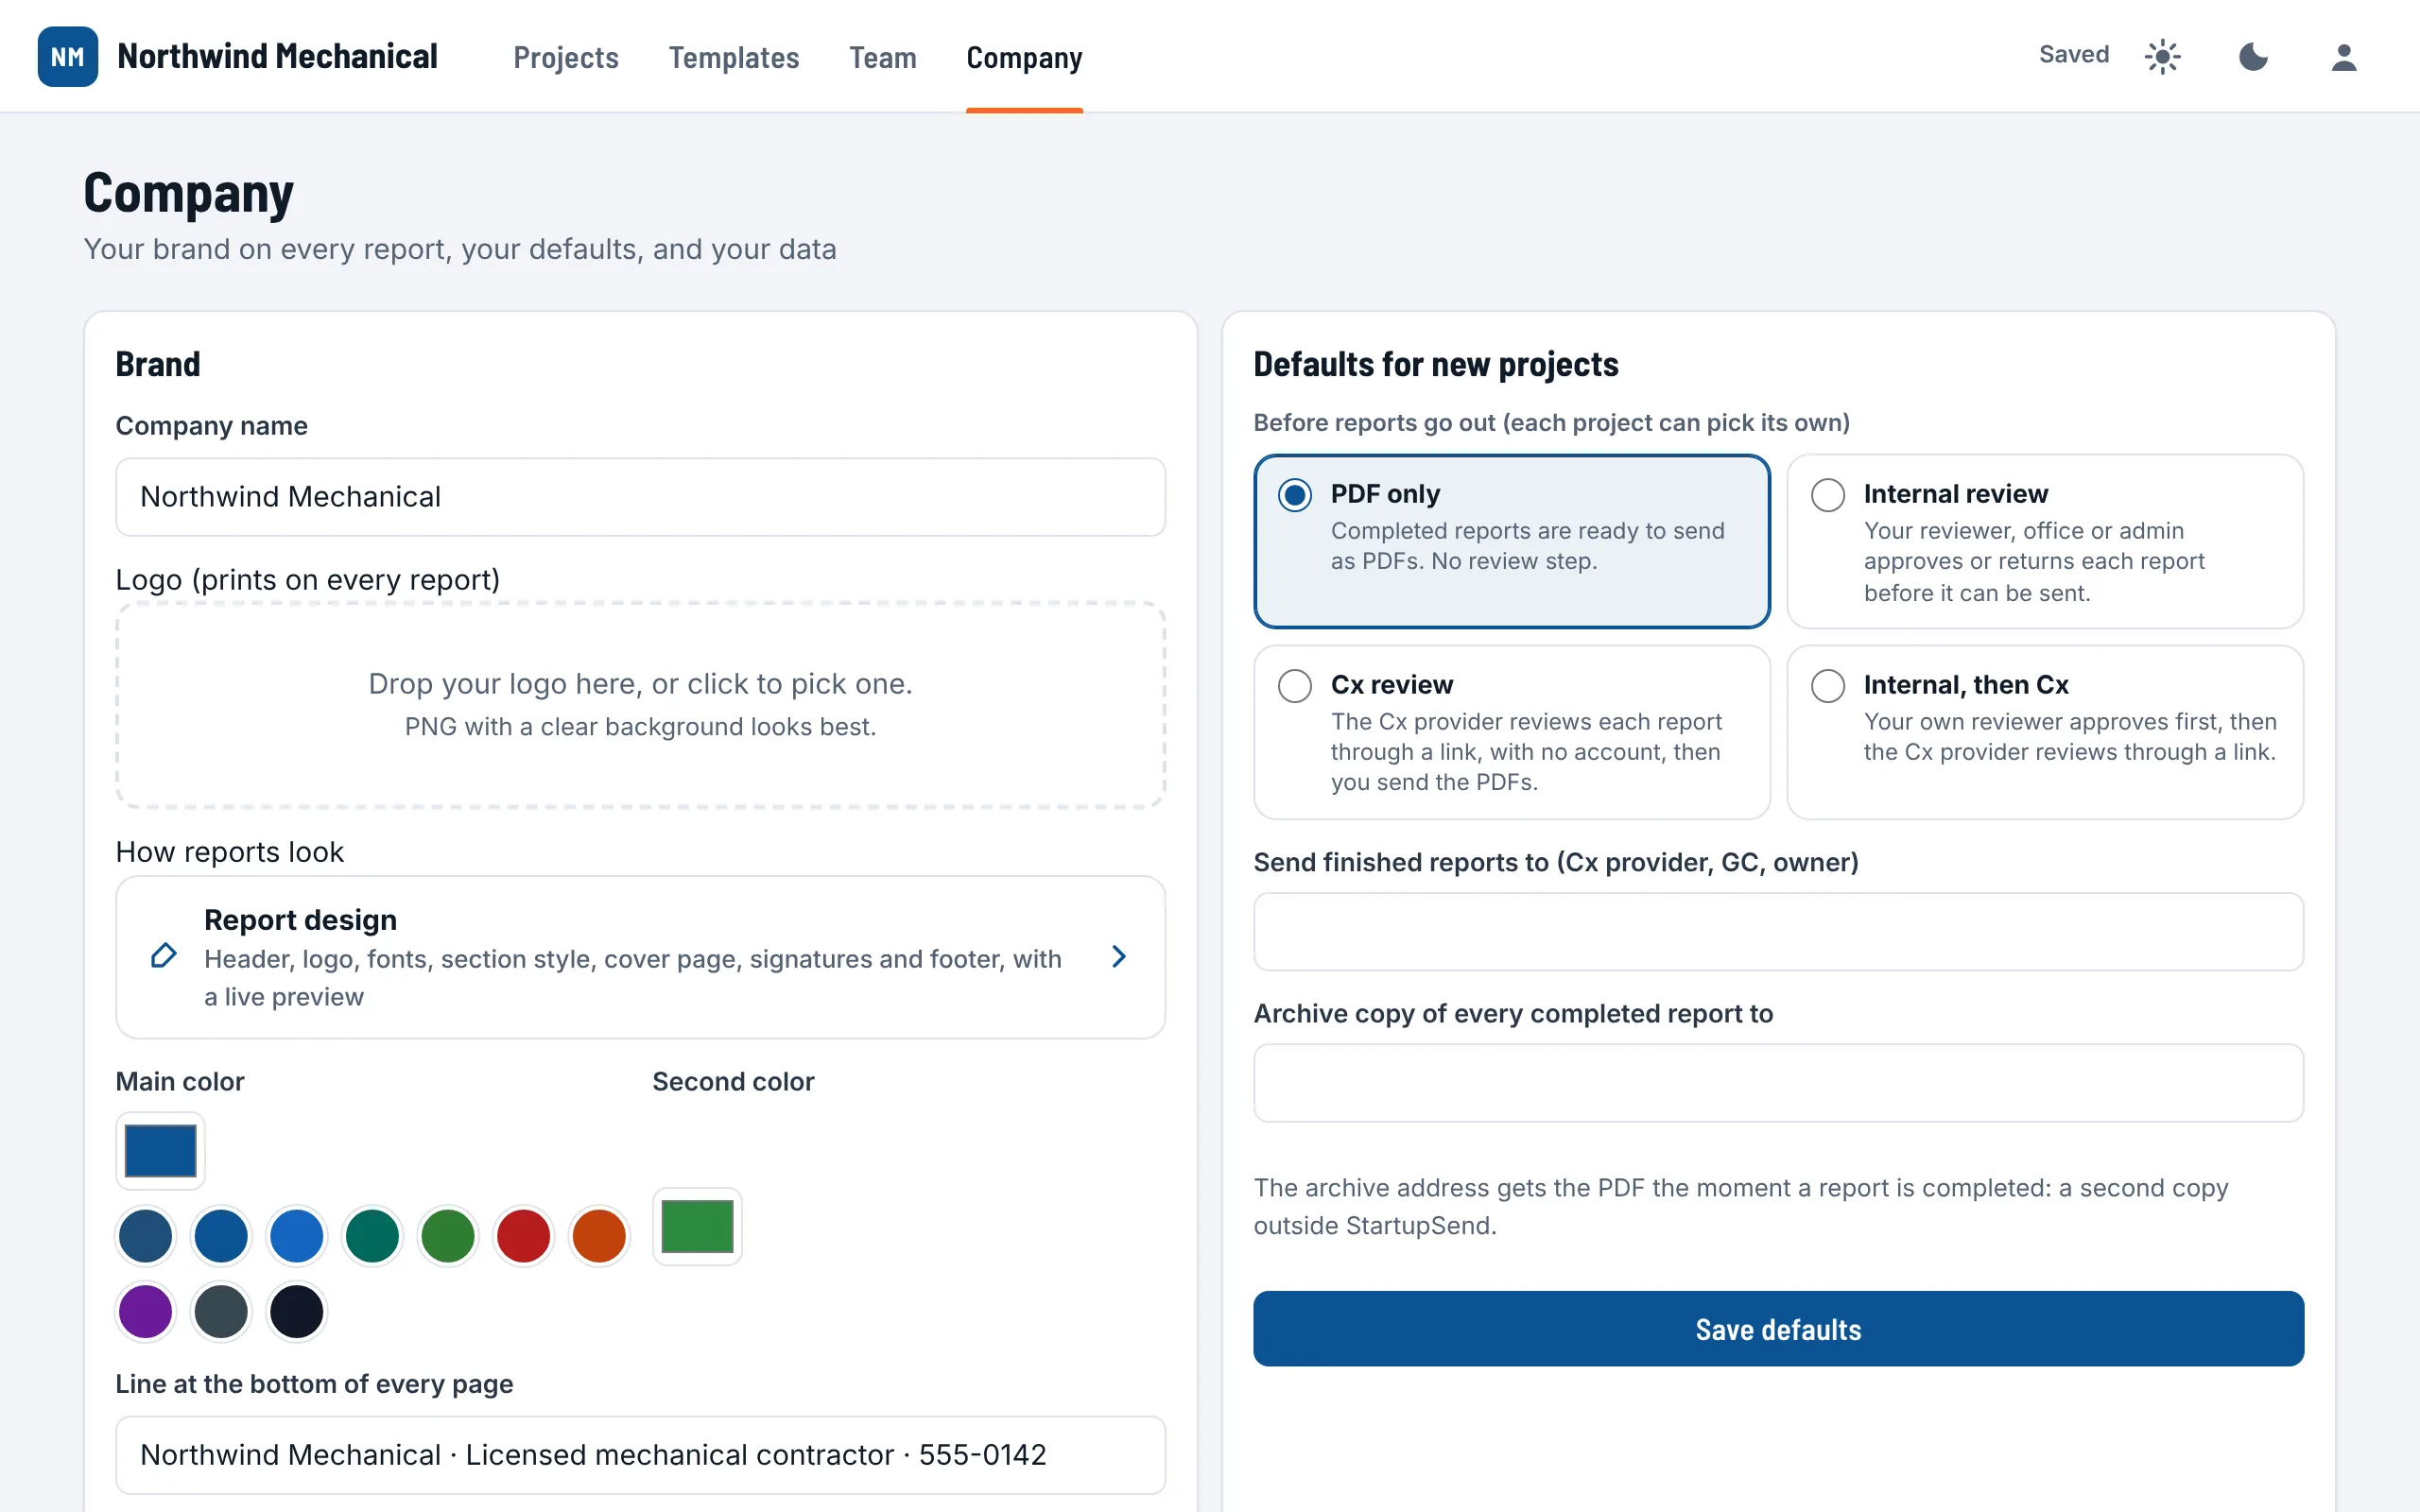
Your brand
- Open Company. Check the Company name: it prints on every report.
- Drop your logo on the Logo box, or click it to pick a file. A PNG with a clear background looks best. Remove logo takes it off.
- Pick the Main color (tap a swatch or choose your own) and a Second color. The screens change color as you pick, so you can see it.
- Type the Line at the bottom of every page, if you want one (a license number, a phone number).
- Choose Save brand. Sample PDF shows an RTU report in your brand.
For everything else about how reports look (header, fonts, section style, cover page, signatures), choose Report design. See Report design and branding.
Defaults for new projects
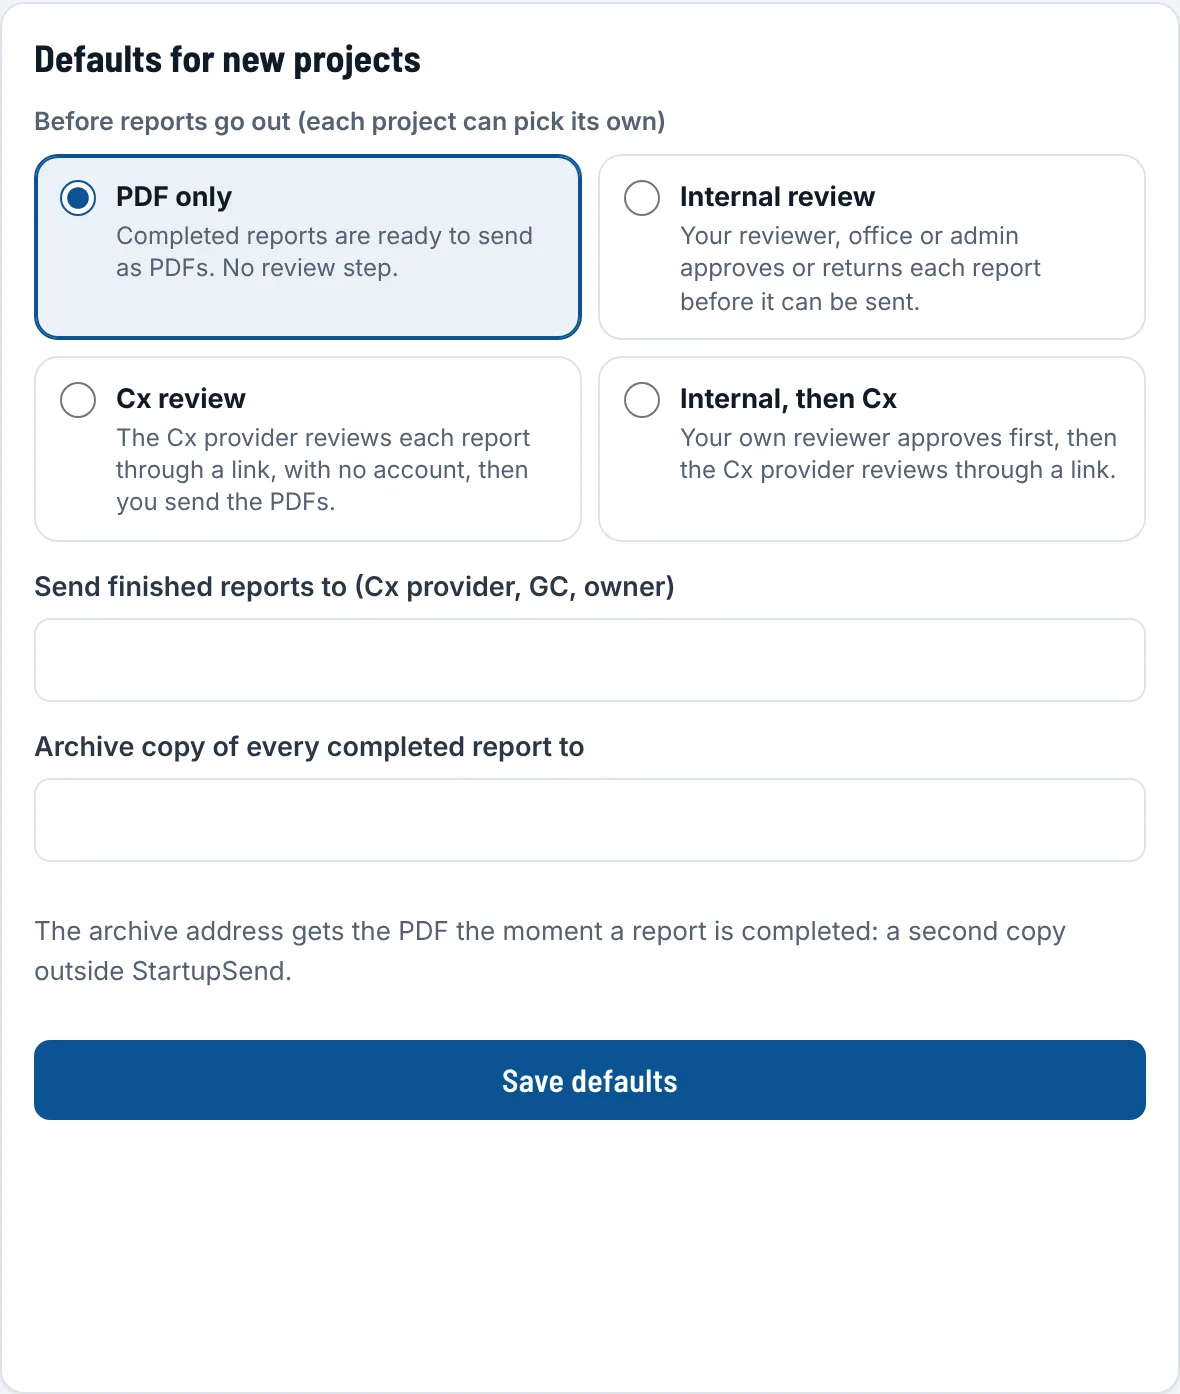
- Before reports go out: the review your projects use unless a project picks its own. PDF only is the default. The four choices are explained in Review before it goes out.
- Send finished reports to: the addresses new projects start with (the commissioning provider, the general contractor, the owner). Separate them with commas.
- Archive copy of every completed report to: an address that gets the PDF the moment a report is completed, so you keep a second copy outside StartupSend.
Choose Save defaults. Each project can still change these in its own Settings.
In the field: outdoor temperature from the weather
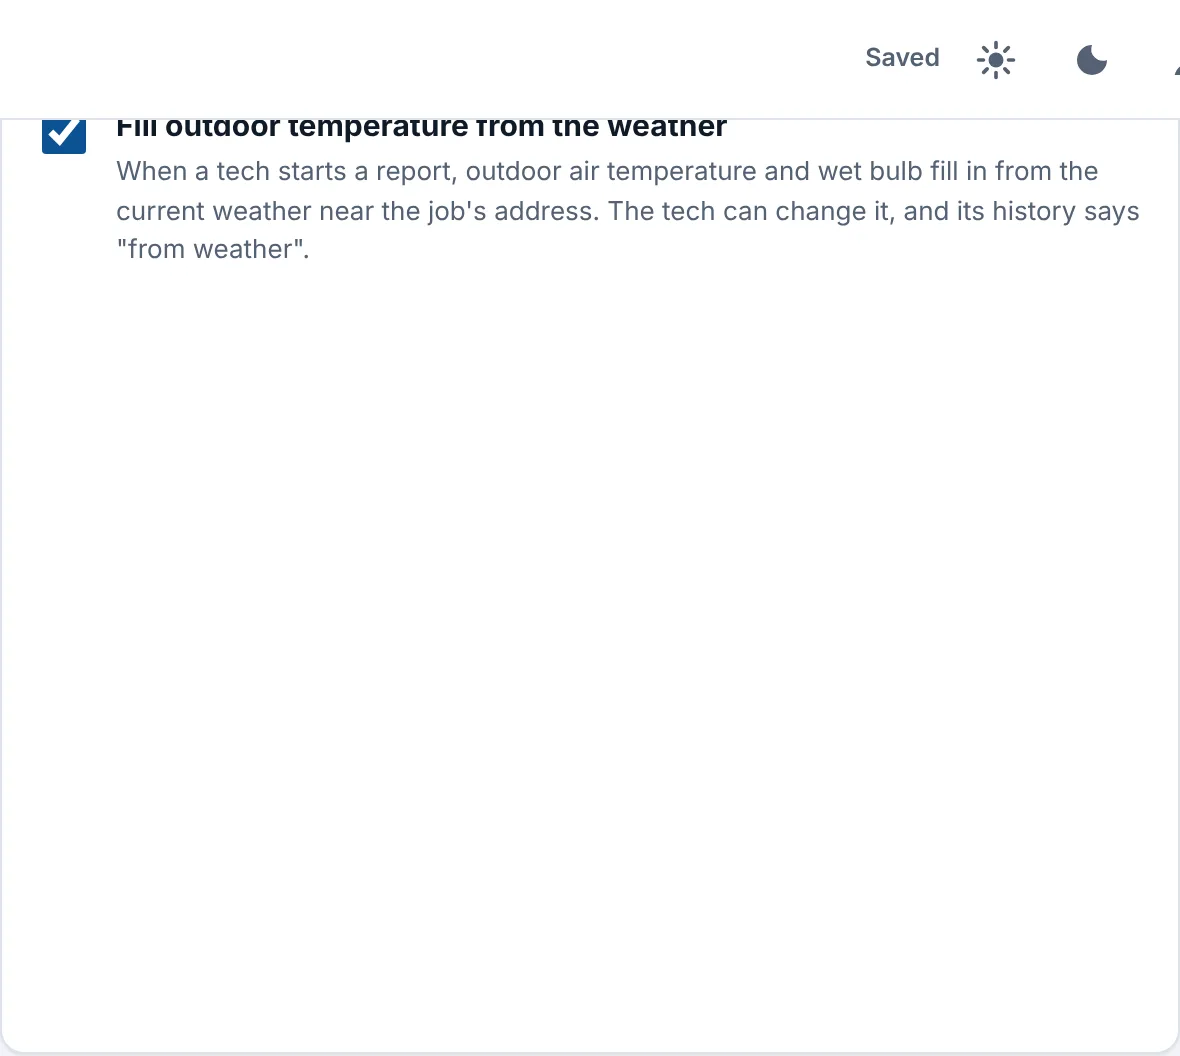
With Fill outdoor temperature from the weather on (it is on unless you turn it off), the outdoor air temperature fills itself from the current weather near the job's address when the tech reaches that part of the report. The tech can change it, and its history says "from weather". Turn it off and techs type the temperature themselves.
The other cards on the Company page
- Checks: what StartupSend checks on every report. See The Checks console.
- Billing: your plan and card. See Billing and your plan.
- Connect Claude or ChatGPT: see Claude or ChatGPT.
- AI included: this month's AI tag reads against your plan's allowance, and pay as you go. See AI included.
- Your data: Download all data and the Trash. See Your data and privacy.
Projects and units #
A project is one job. It holds the customer, the address, the equipment list (the units) and one startup report per unit.
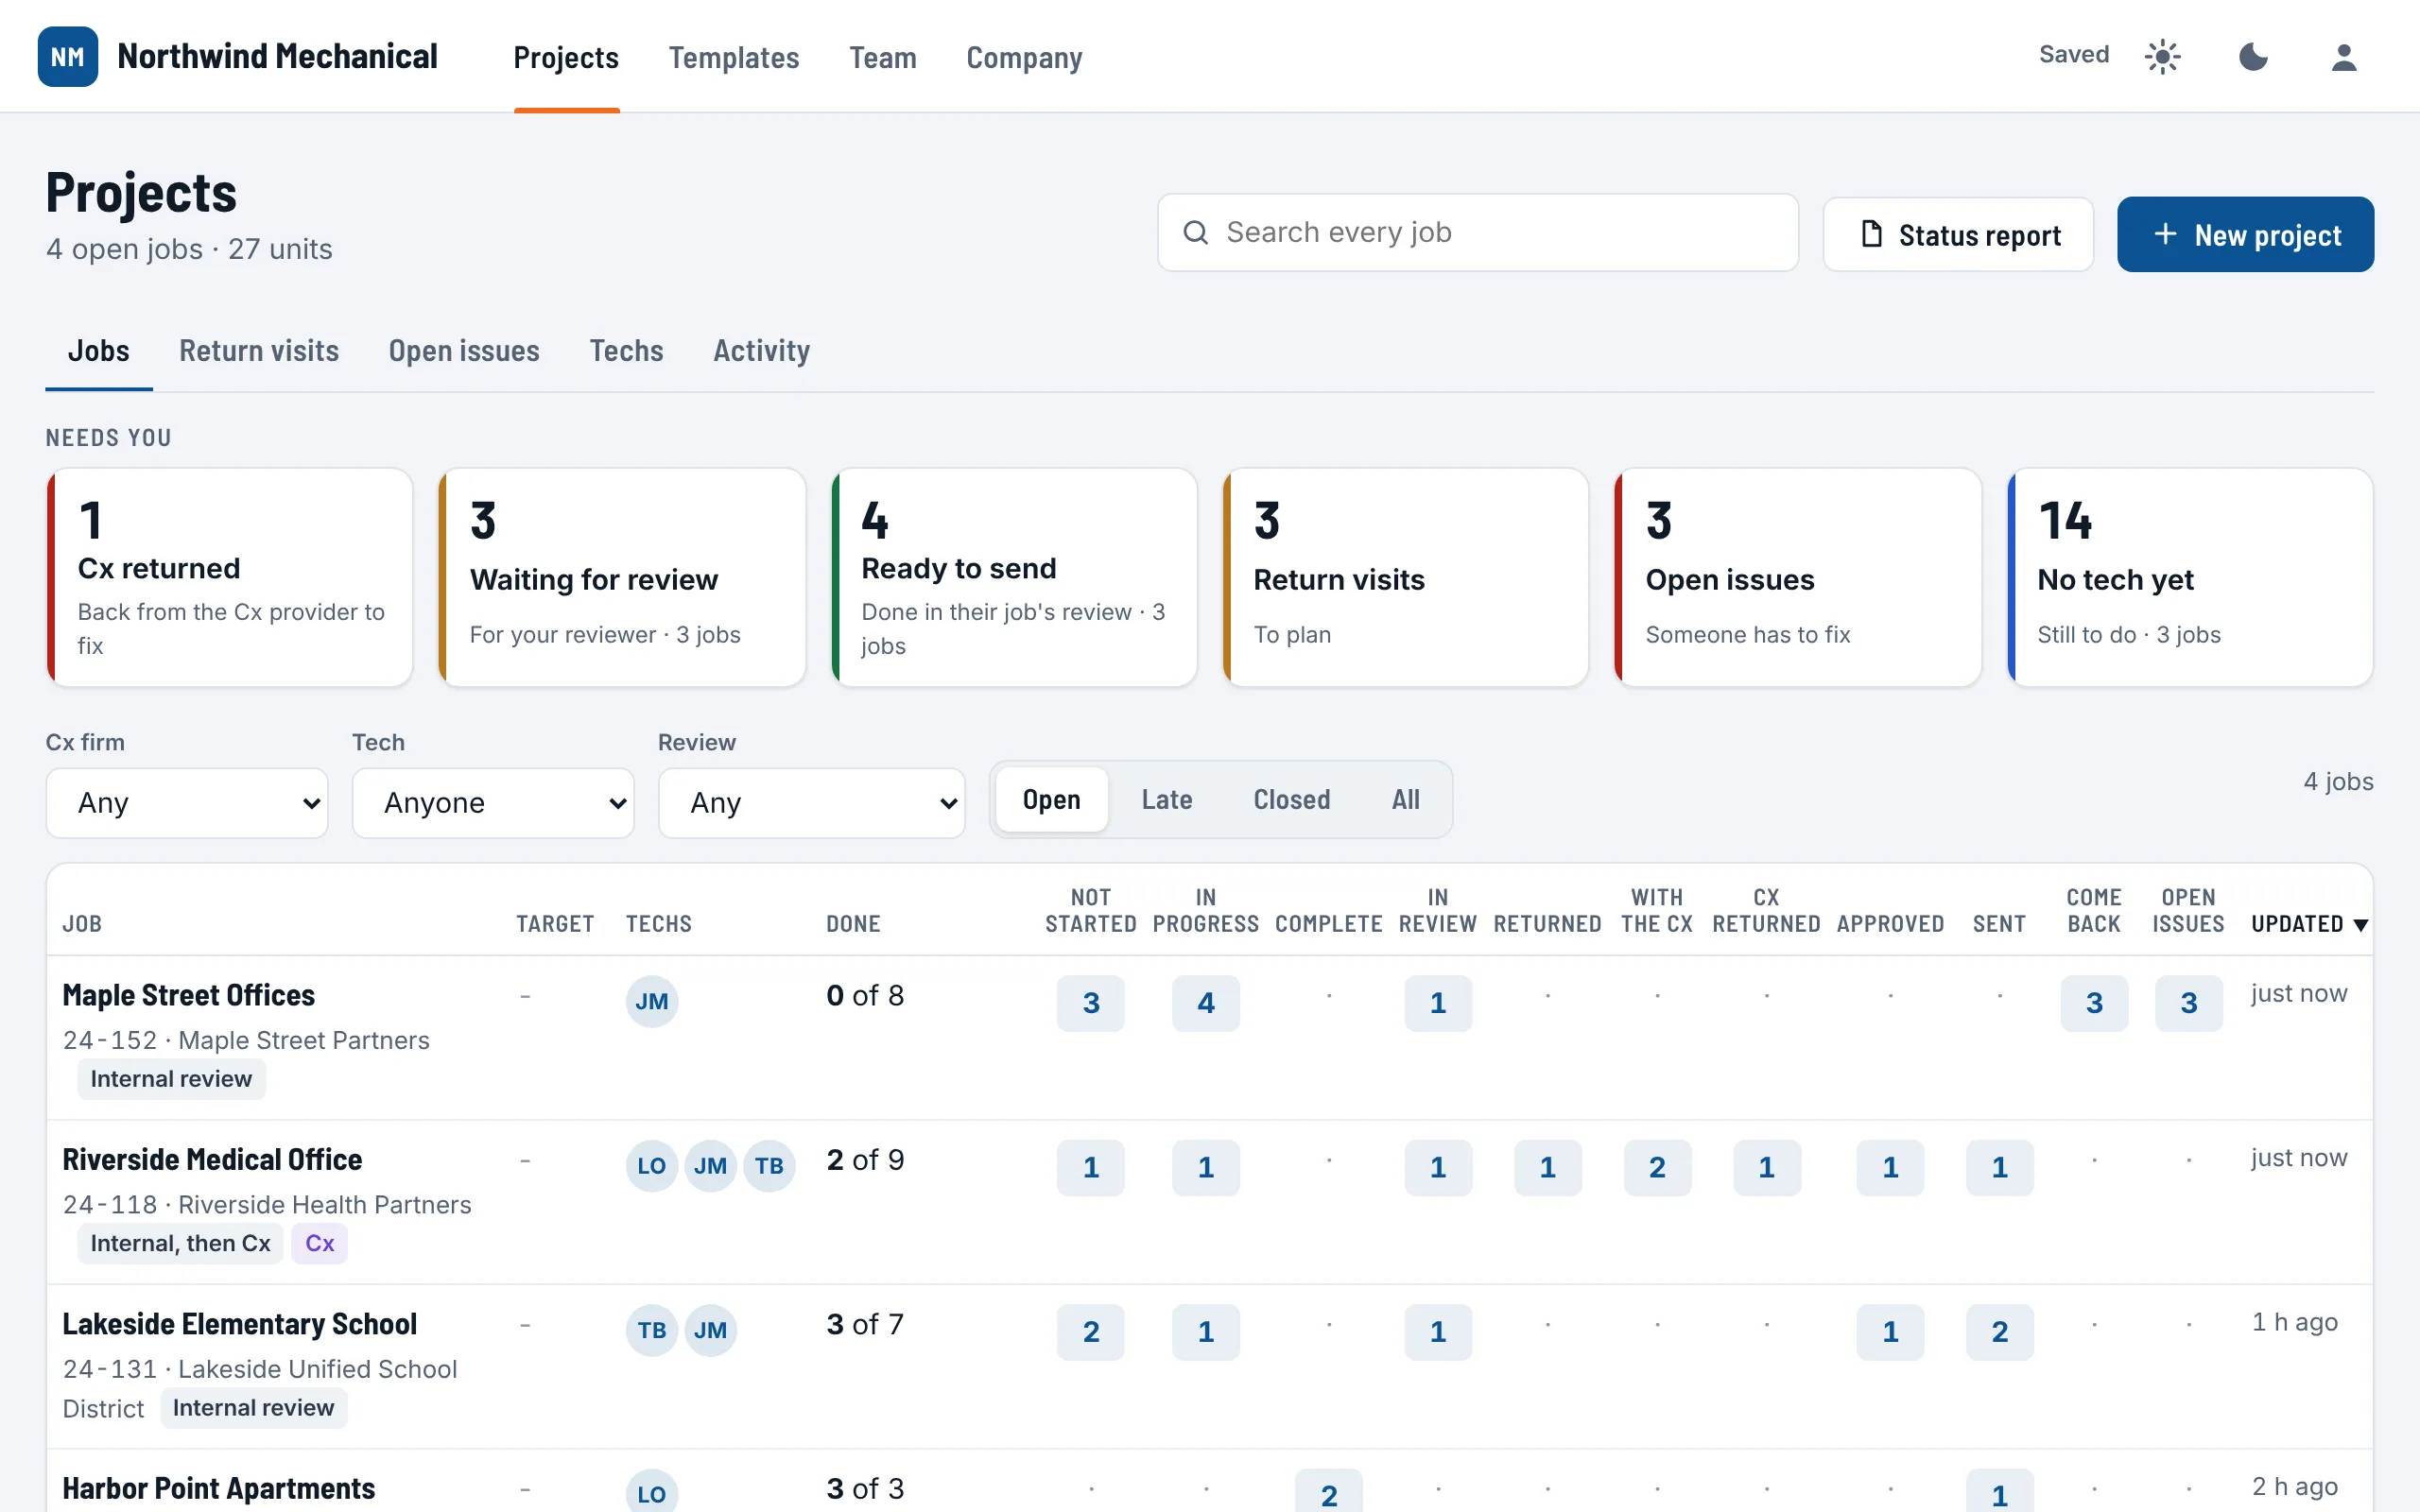
Make a project
- On Projects, choose New project.
- Type the Project name. Add the Customer, Project number and Address if you have them. The address is where the weather comes from.
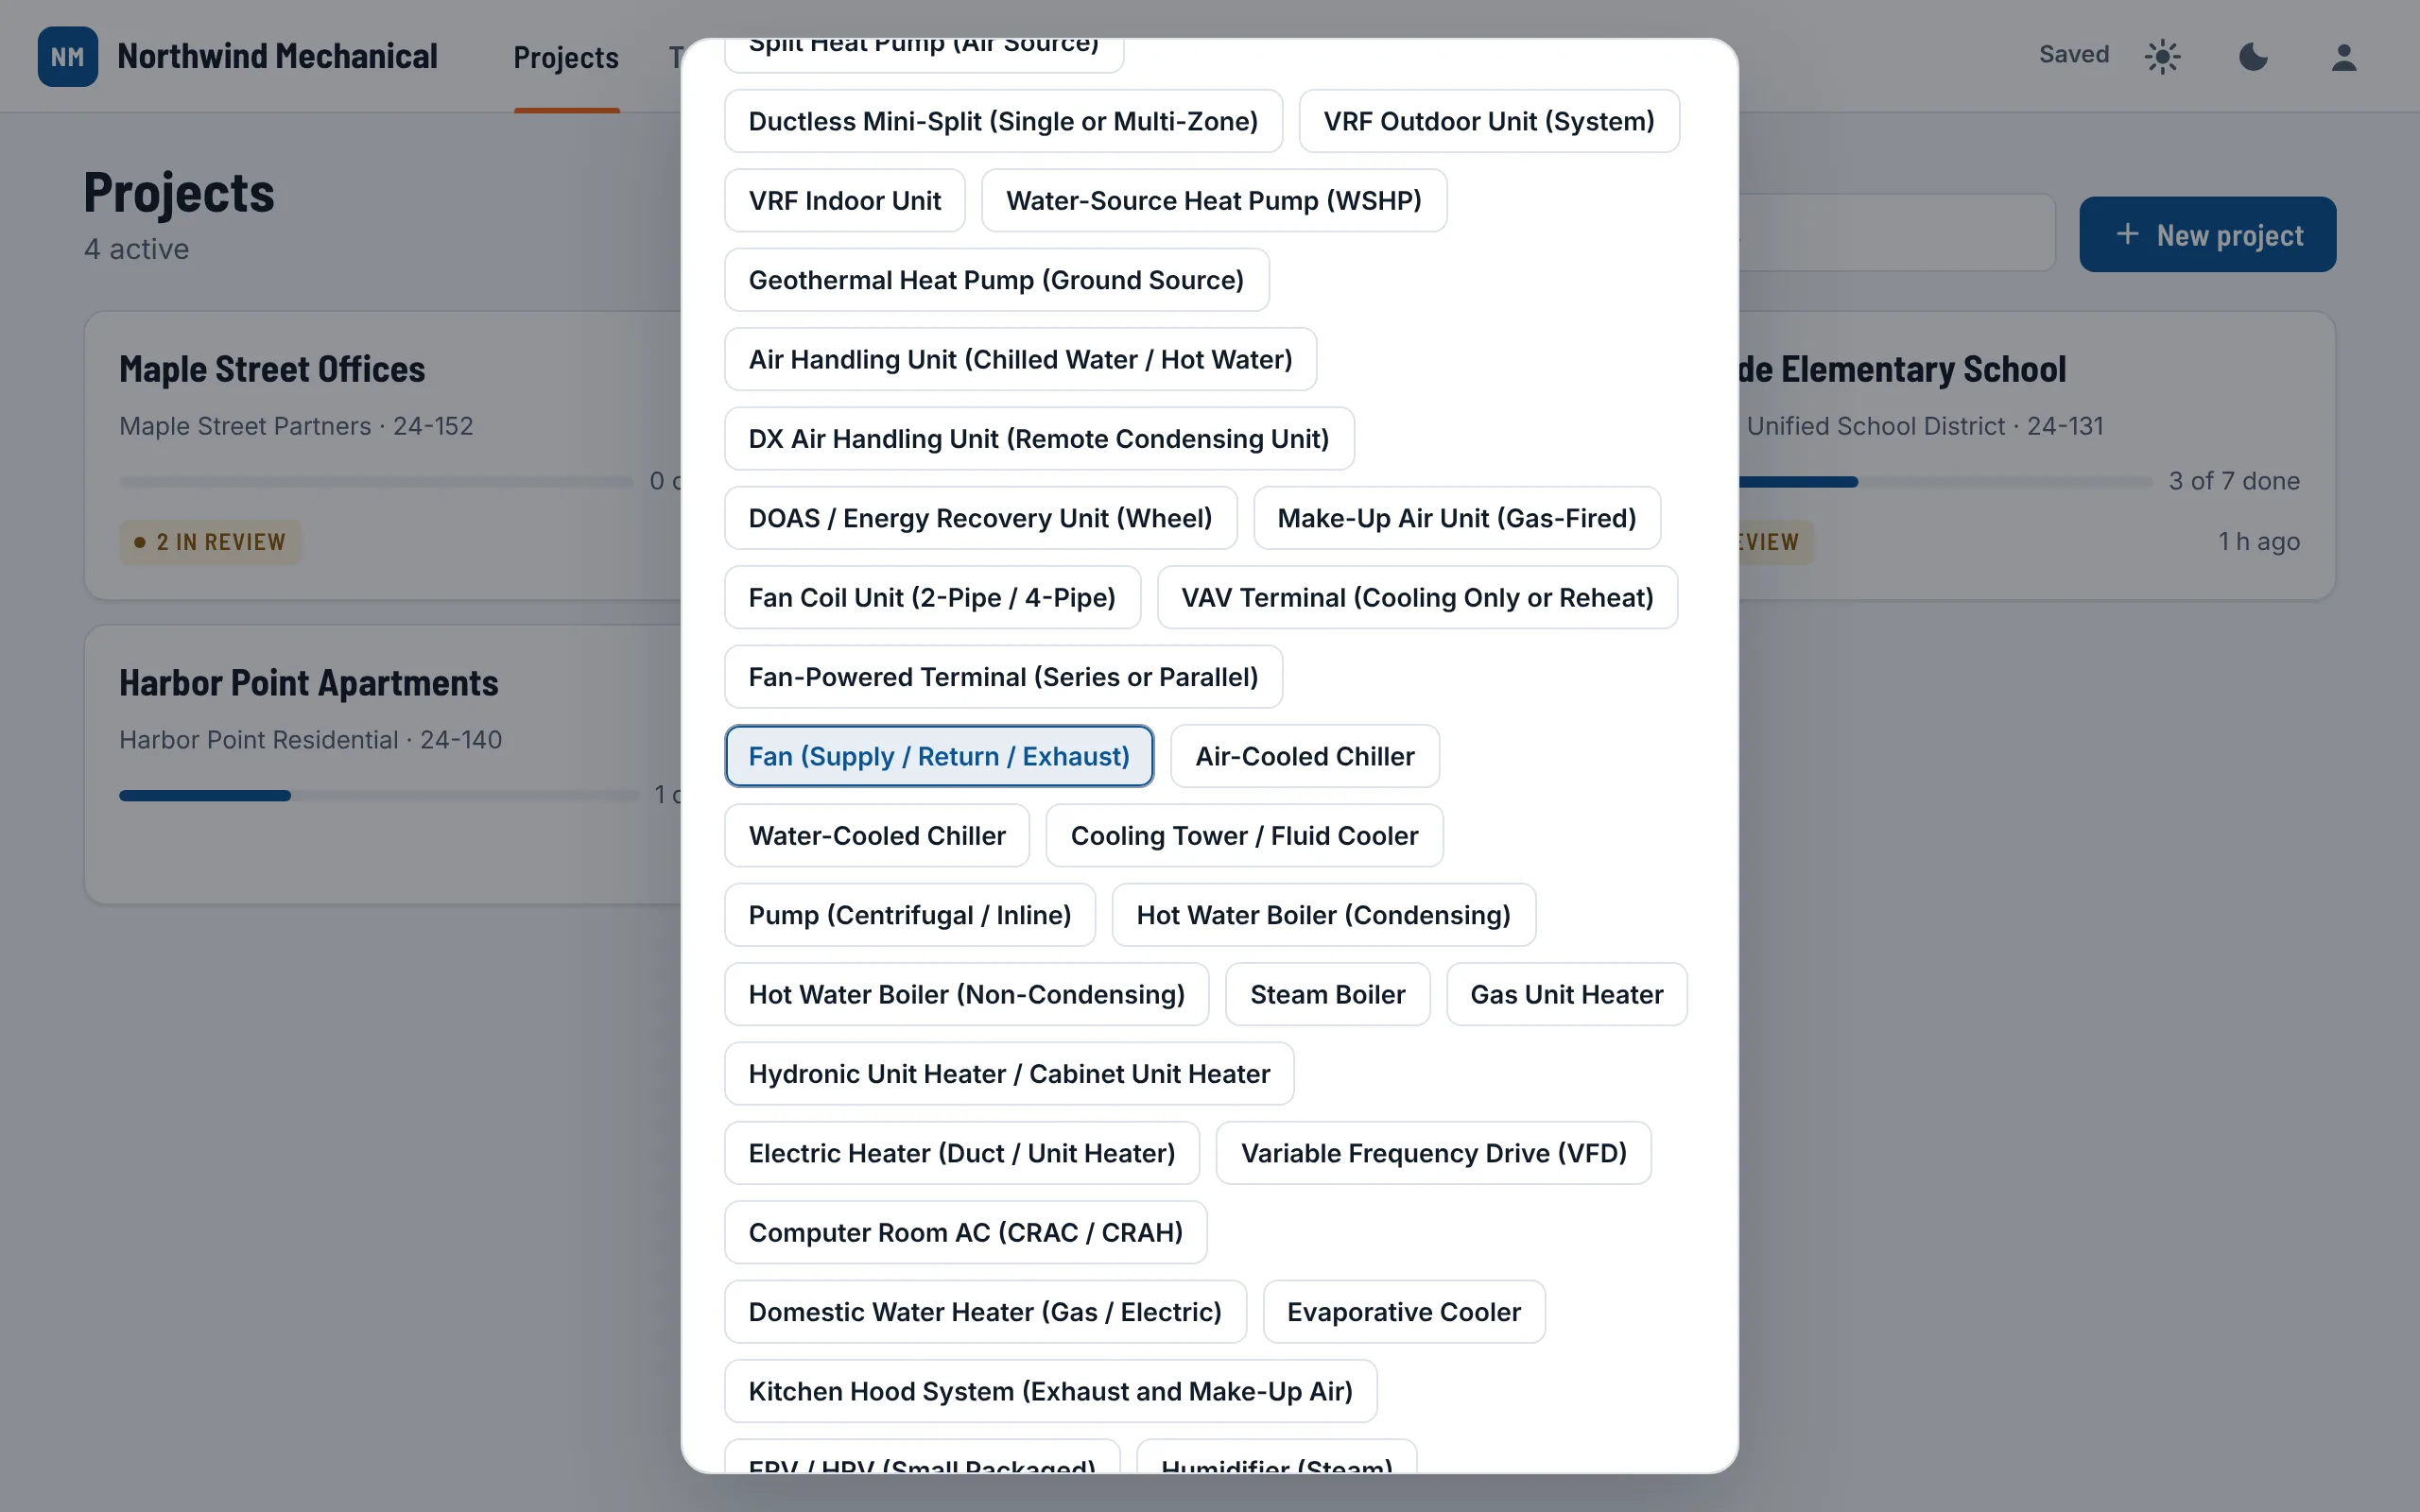
- Tap each kind of startup report the job needs (rooftop unit, exhaust fan, VAV box...). You can add more any time. Search the list if it is long.
- Pick the review for this job, or leave Company default.
- Check Send finished reports to, then choose Make project.
Add the equipment list
Choose Add units at the top of the project. There are two ways:
- Number them: pick the equipment type, then the start of the name (it suggests one, like RTU-), the first number and how many. A first number of 01 keeps the zero: RTU-01, RTU-02.
- Paste a list: one unit per line, straight from the schedule. Add a tab or a comma after the tag, then its location, if you have it.
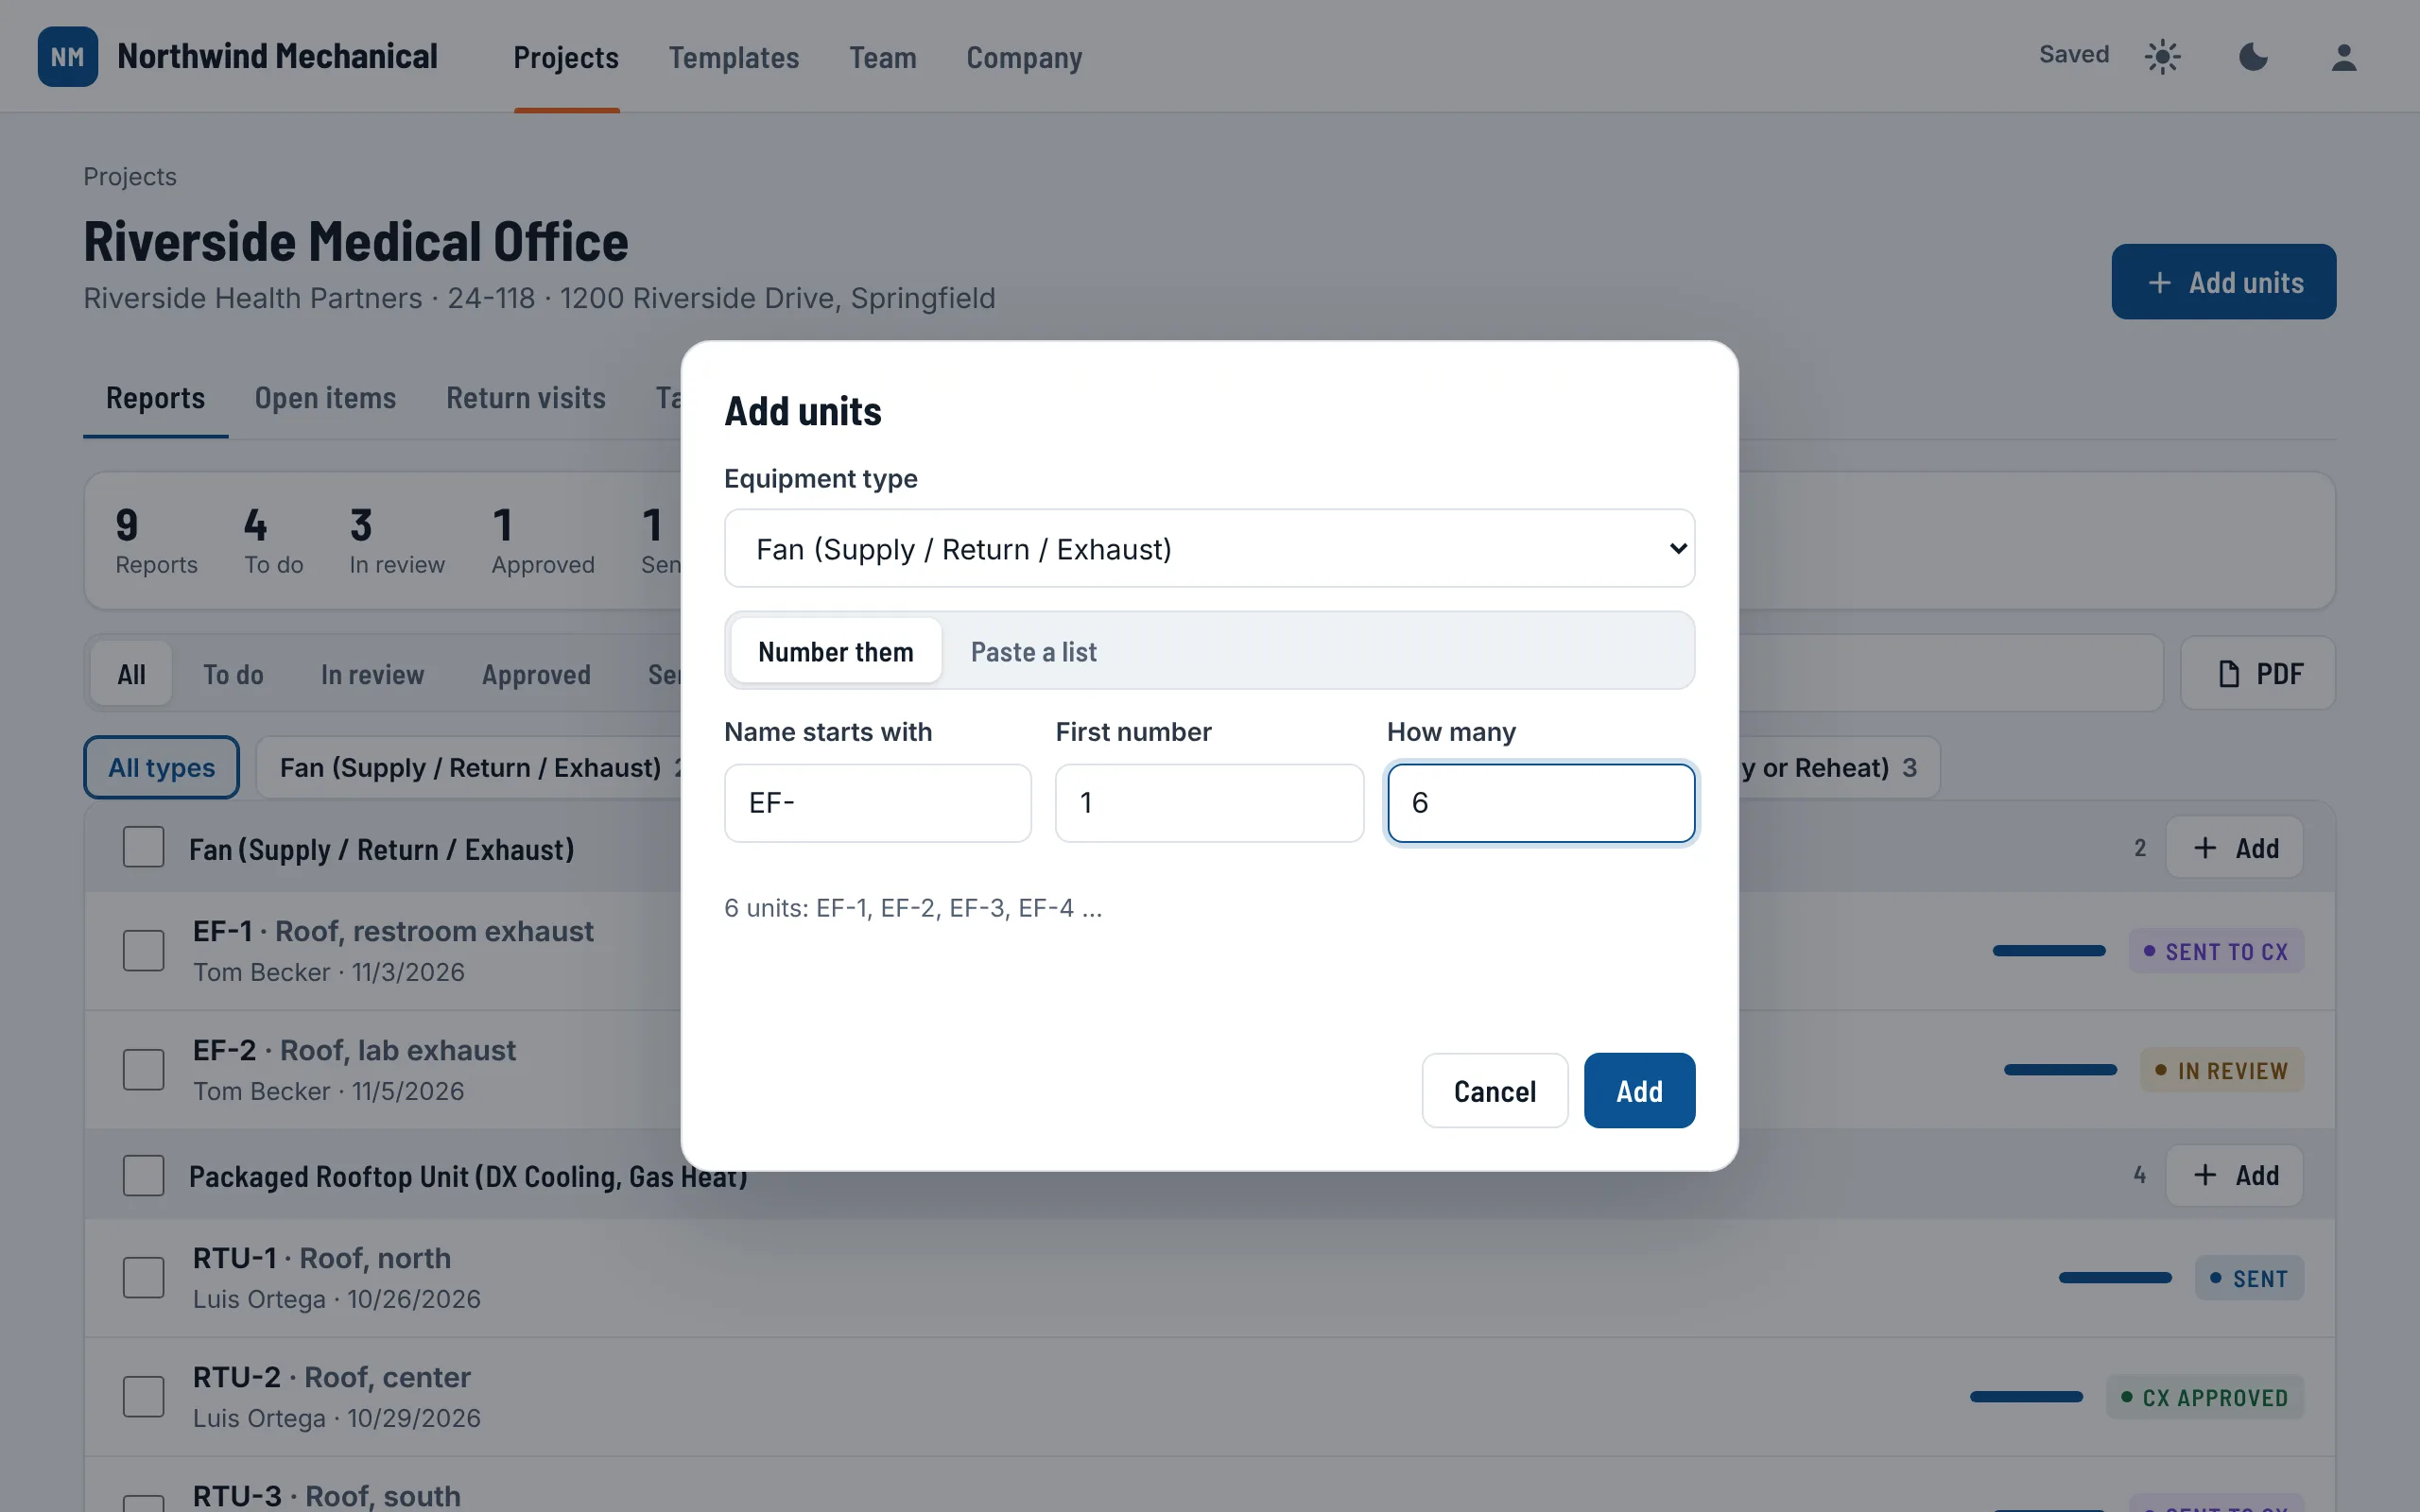
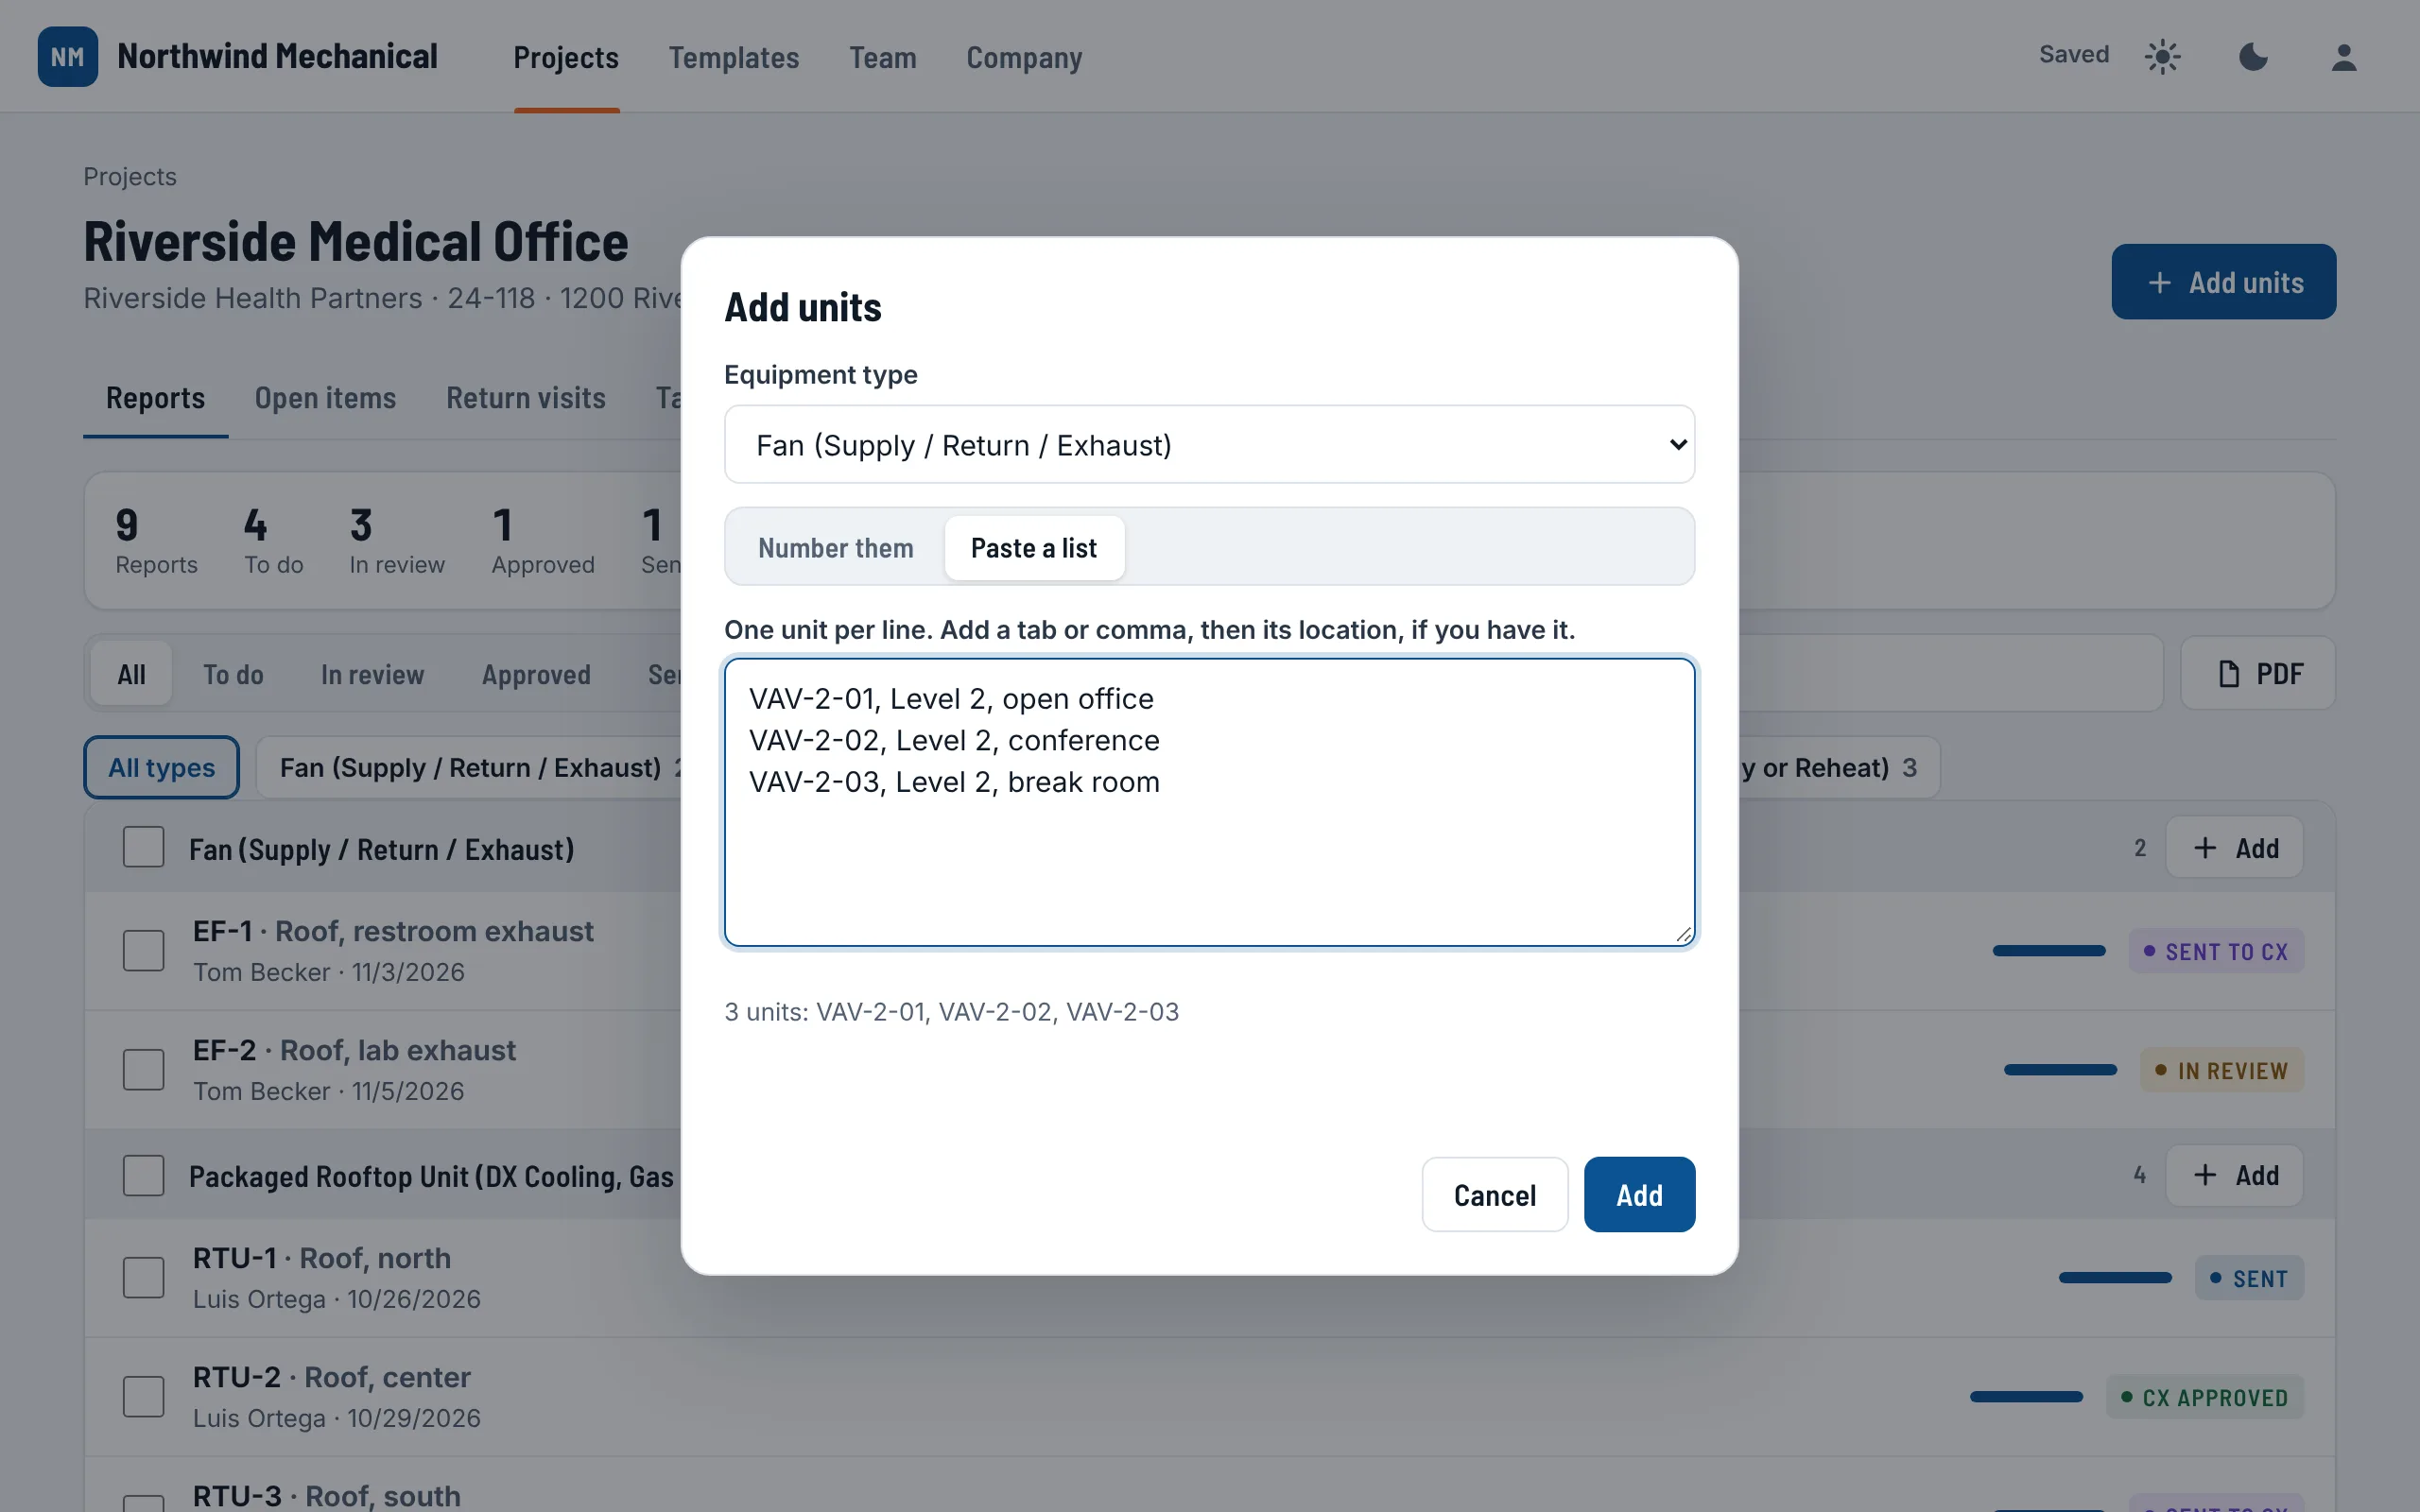
The line under the boxes shows what will be made before you choose Add. Up to 500 units at a time. Picking a type the project does not use yet adds it to the project. Techs can add units too, from the job on their phone.
The project's tabs
| Tab | What it is for |
|---|---|
| Reports | Every unit and its report: what is done, what is left, and actions on several at once. |
| Open items | Every issue on the job: what is wrong, how bad, who fixes it, resolved or not. See Open items. |
| Return visits | Every unit that needs another visit, and why. See Return visits. |
| Table | The whole equipment list as a spreadsheet, one equipment type at a time. |
| Review | Internal review and the commissioning provider's review links. Shows when the project has a review step. |
| Send | Email the finished reports as one PDF, and every PDF sent before. |
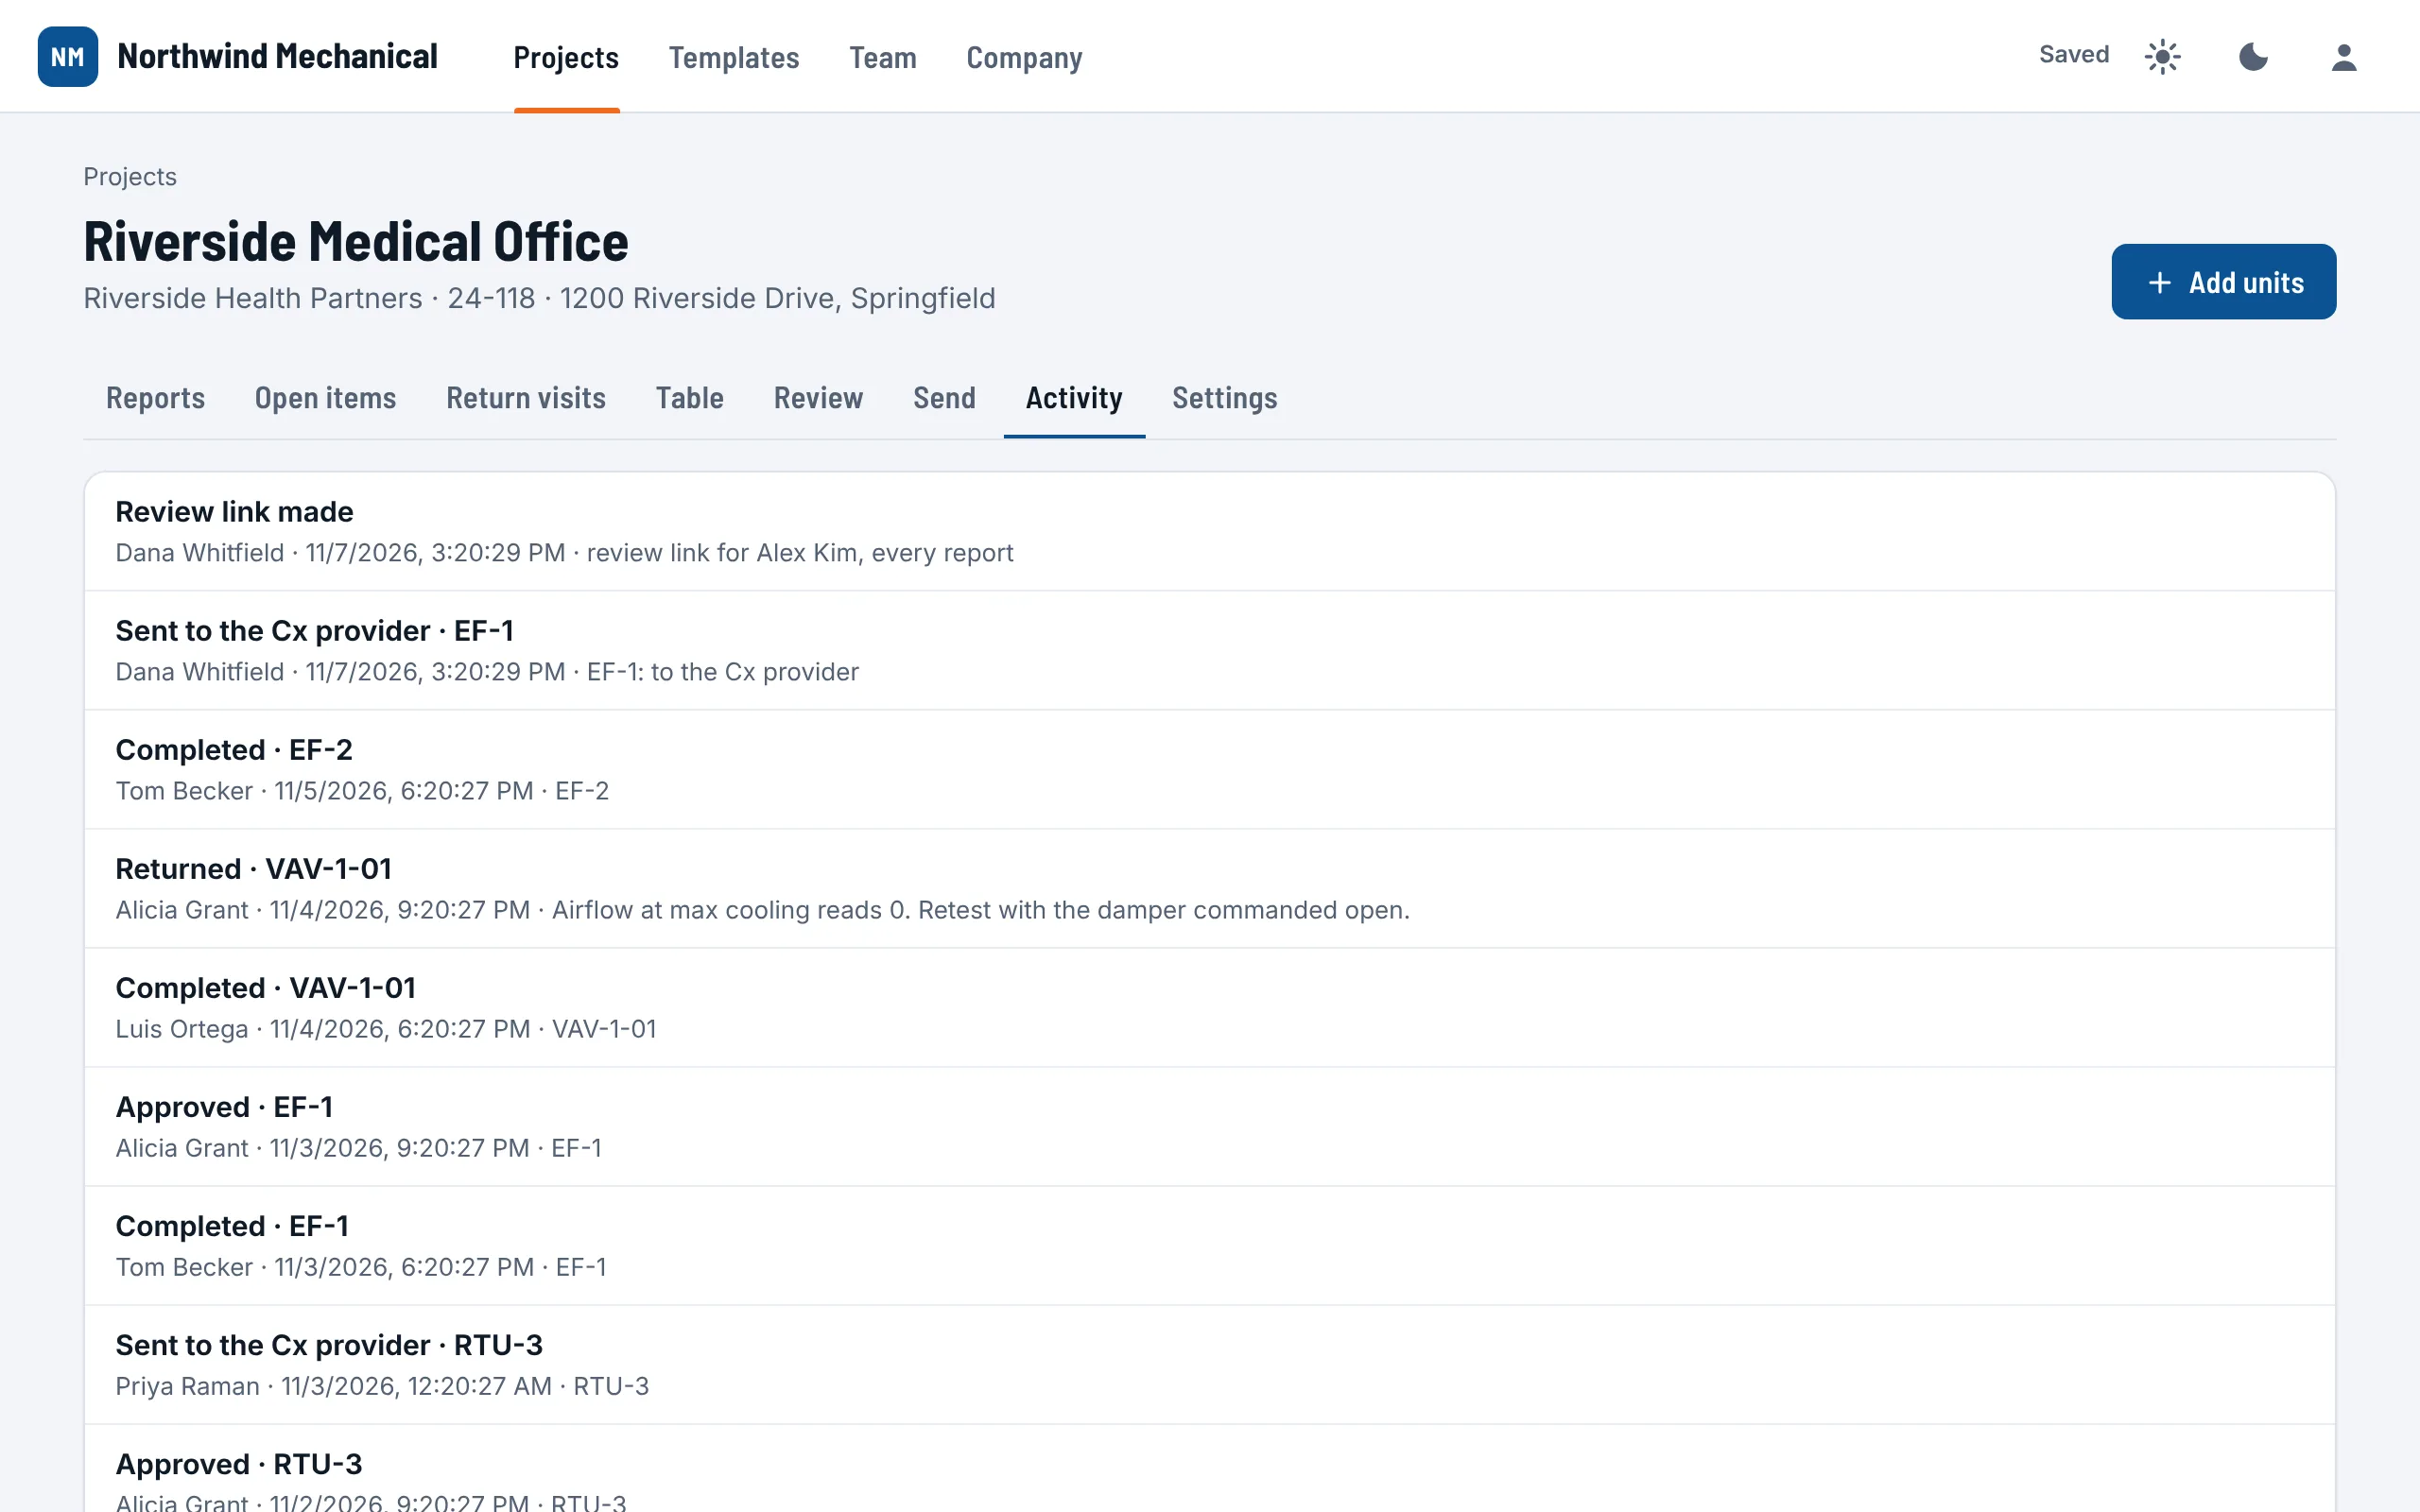
| Activity | What happened on the job, who did it and when. |
| Settings | The job's details, review and sending, and its equipment types. Admin and office only. |
The Reports list
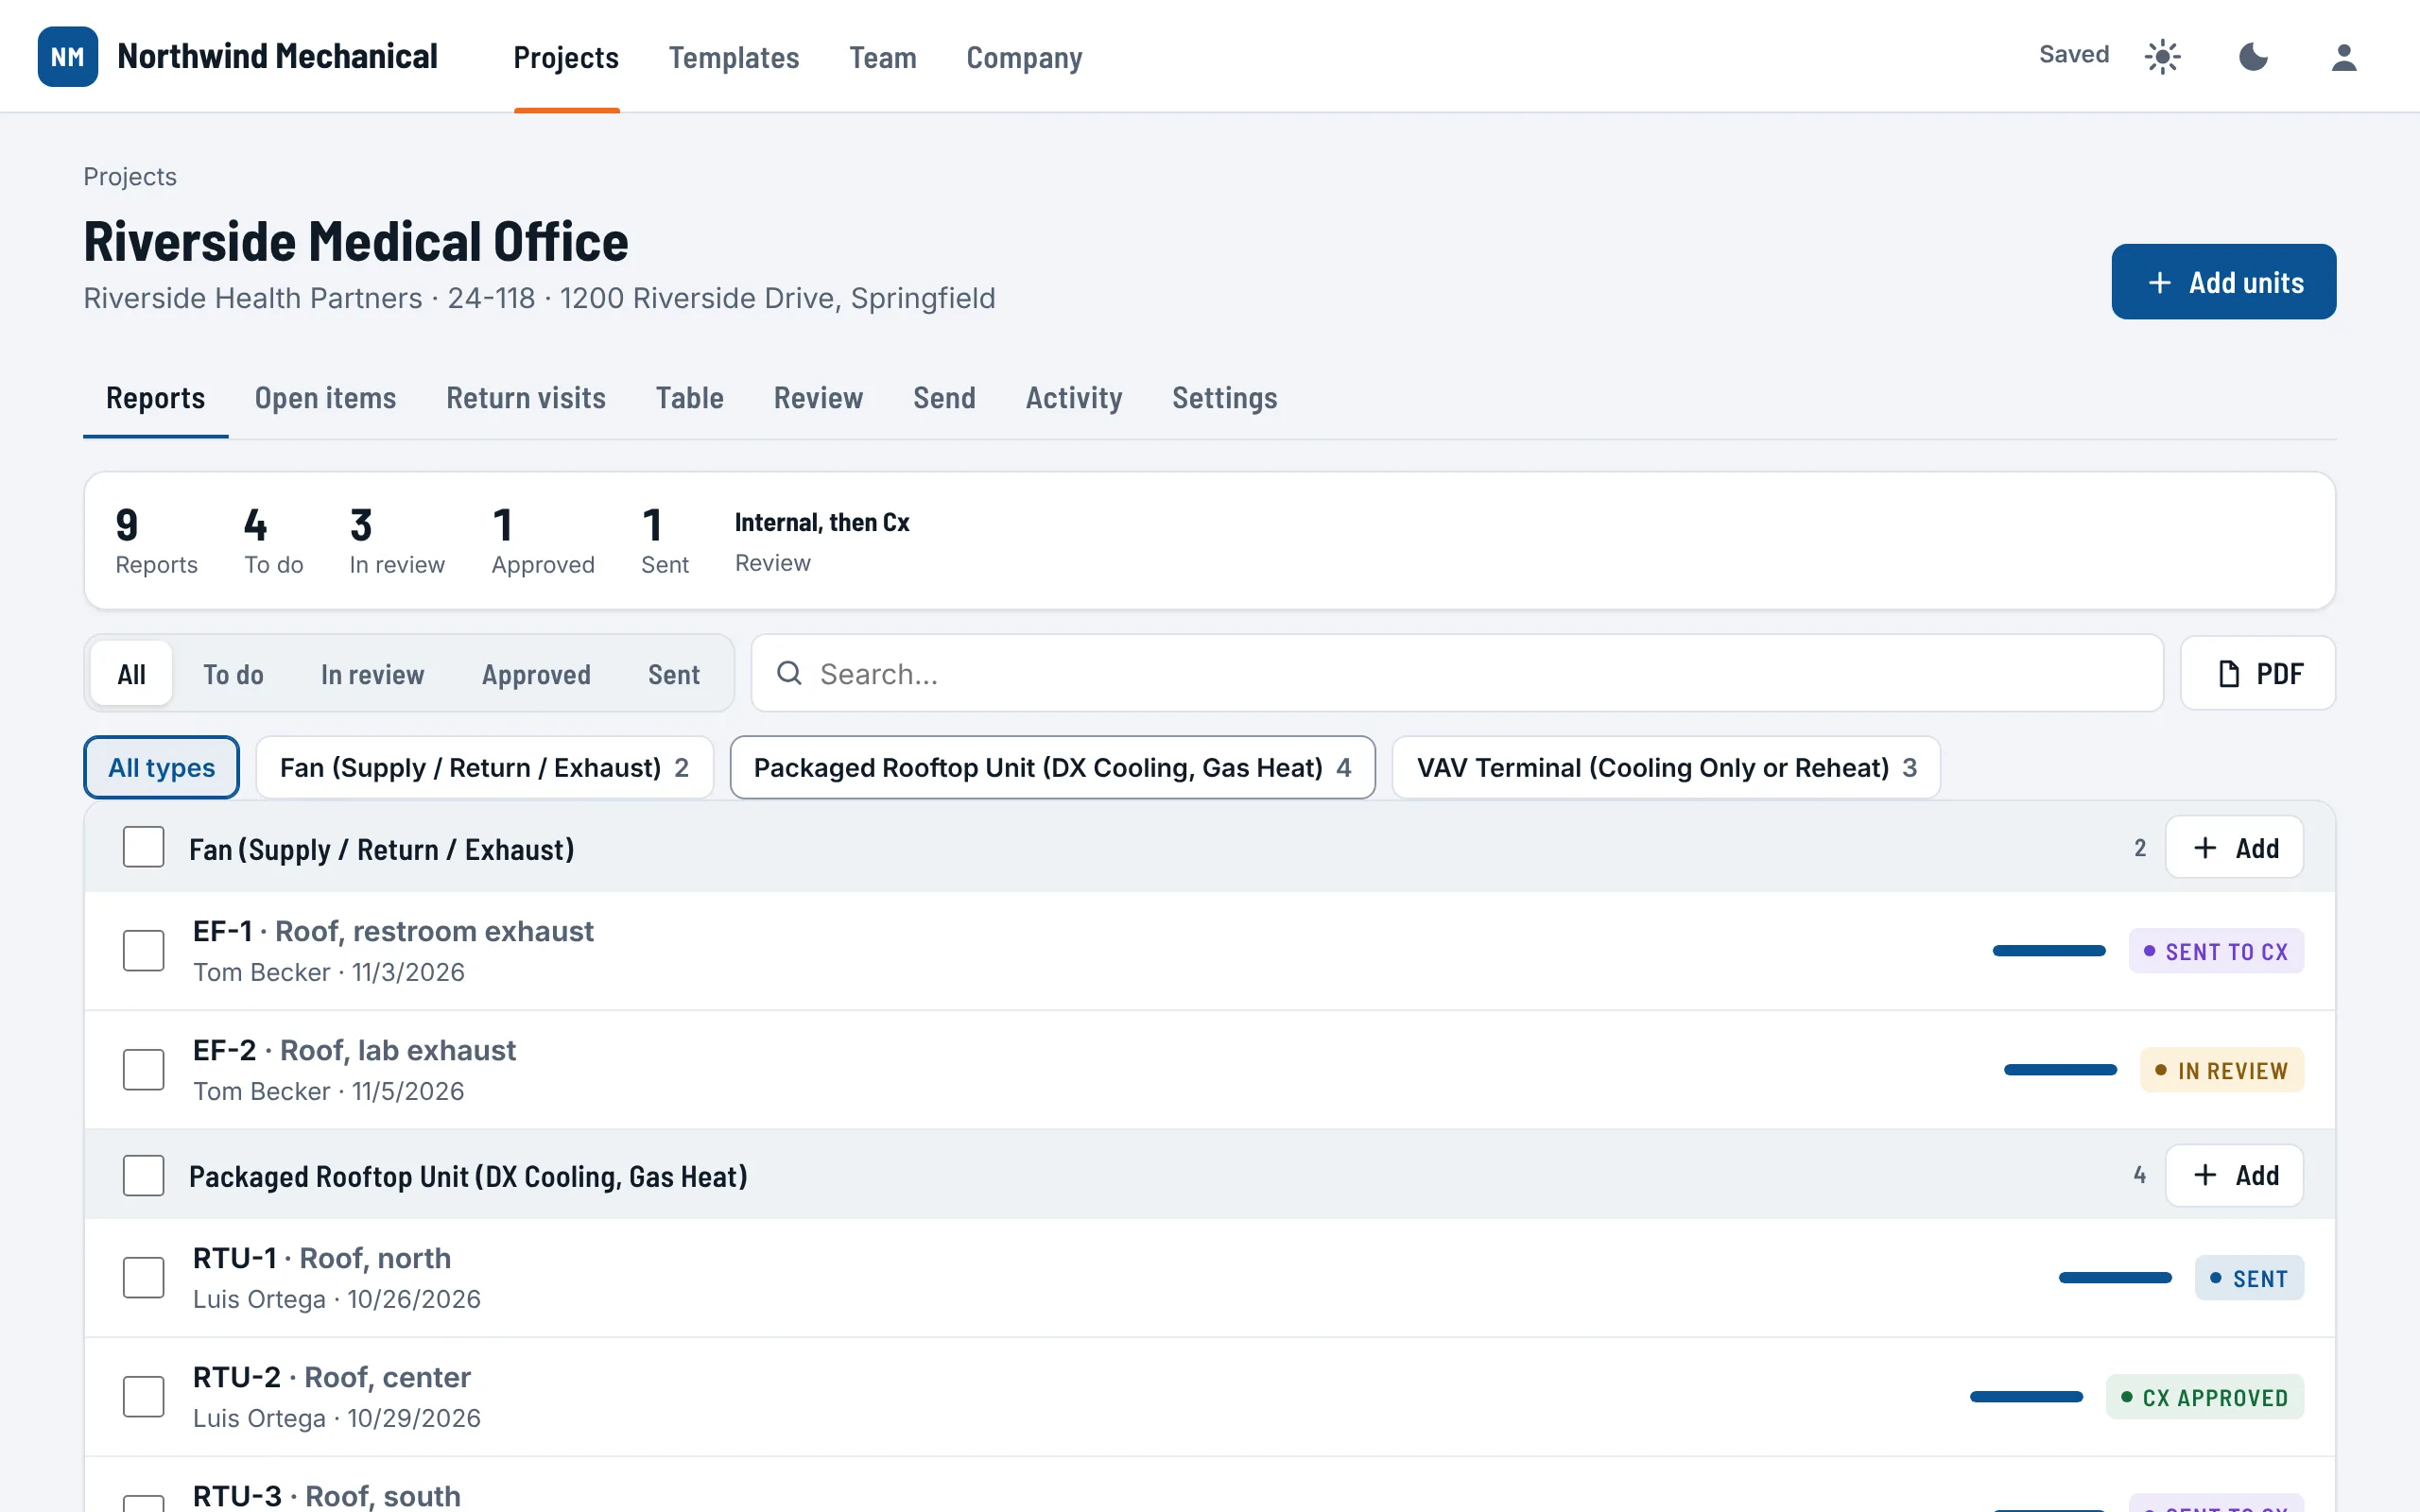
- The strip at the top counts the reports: to do, complete, in review, approved and sent, and names the project's review.
- Filter with All, To do, In review, Approved and Sent, pick one equipment type, or search by tag, location or tech.
- Each row shows the unit, the tech and date, how much is filled, and its status. Click a row to open the report.
- PDF makes one PDF of the reports the filter shows.
Tick reports (or a whole type with the box beside its name) and a bar appears with what you can do to all of them at once: Complete, Approve, Return, PDF, To the Cx, Send and Remove.

What each status means
| Status | Means |
|---|---|
| Not started | Nothing filled yet. |
| In progress | Some of it is filled. |
| Complete | The tech finished the visit. Ready to send when the project is PDF only, or to go to the Cx provider. |
| In review | Waiting for your own reviewer. |
| Returned | Sent back to the tech to fix, with a note and comments. |
| Approved | Your reviewer approved it. |
| Sent to Cx | With the commissioning provider, through their review link. |
| Cx approved / Cx returned | The commissioning provider approved it, or returned it for fixes. |
| Sent | Emailed as a PDF. |
A tech cannot change a report that is approved, with the Cx provider, or sent, except to start a return visit for what was put off. Admin and office can Reopen it from the report, with a reason.
The Table: the equipment list as a spreadsheet
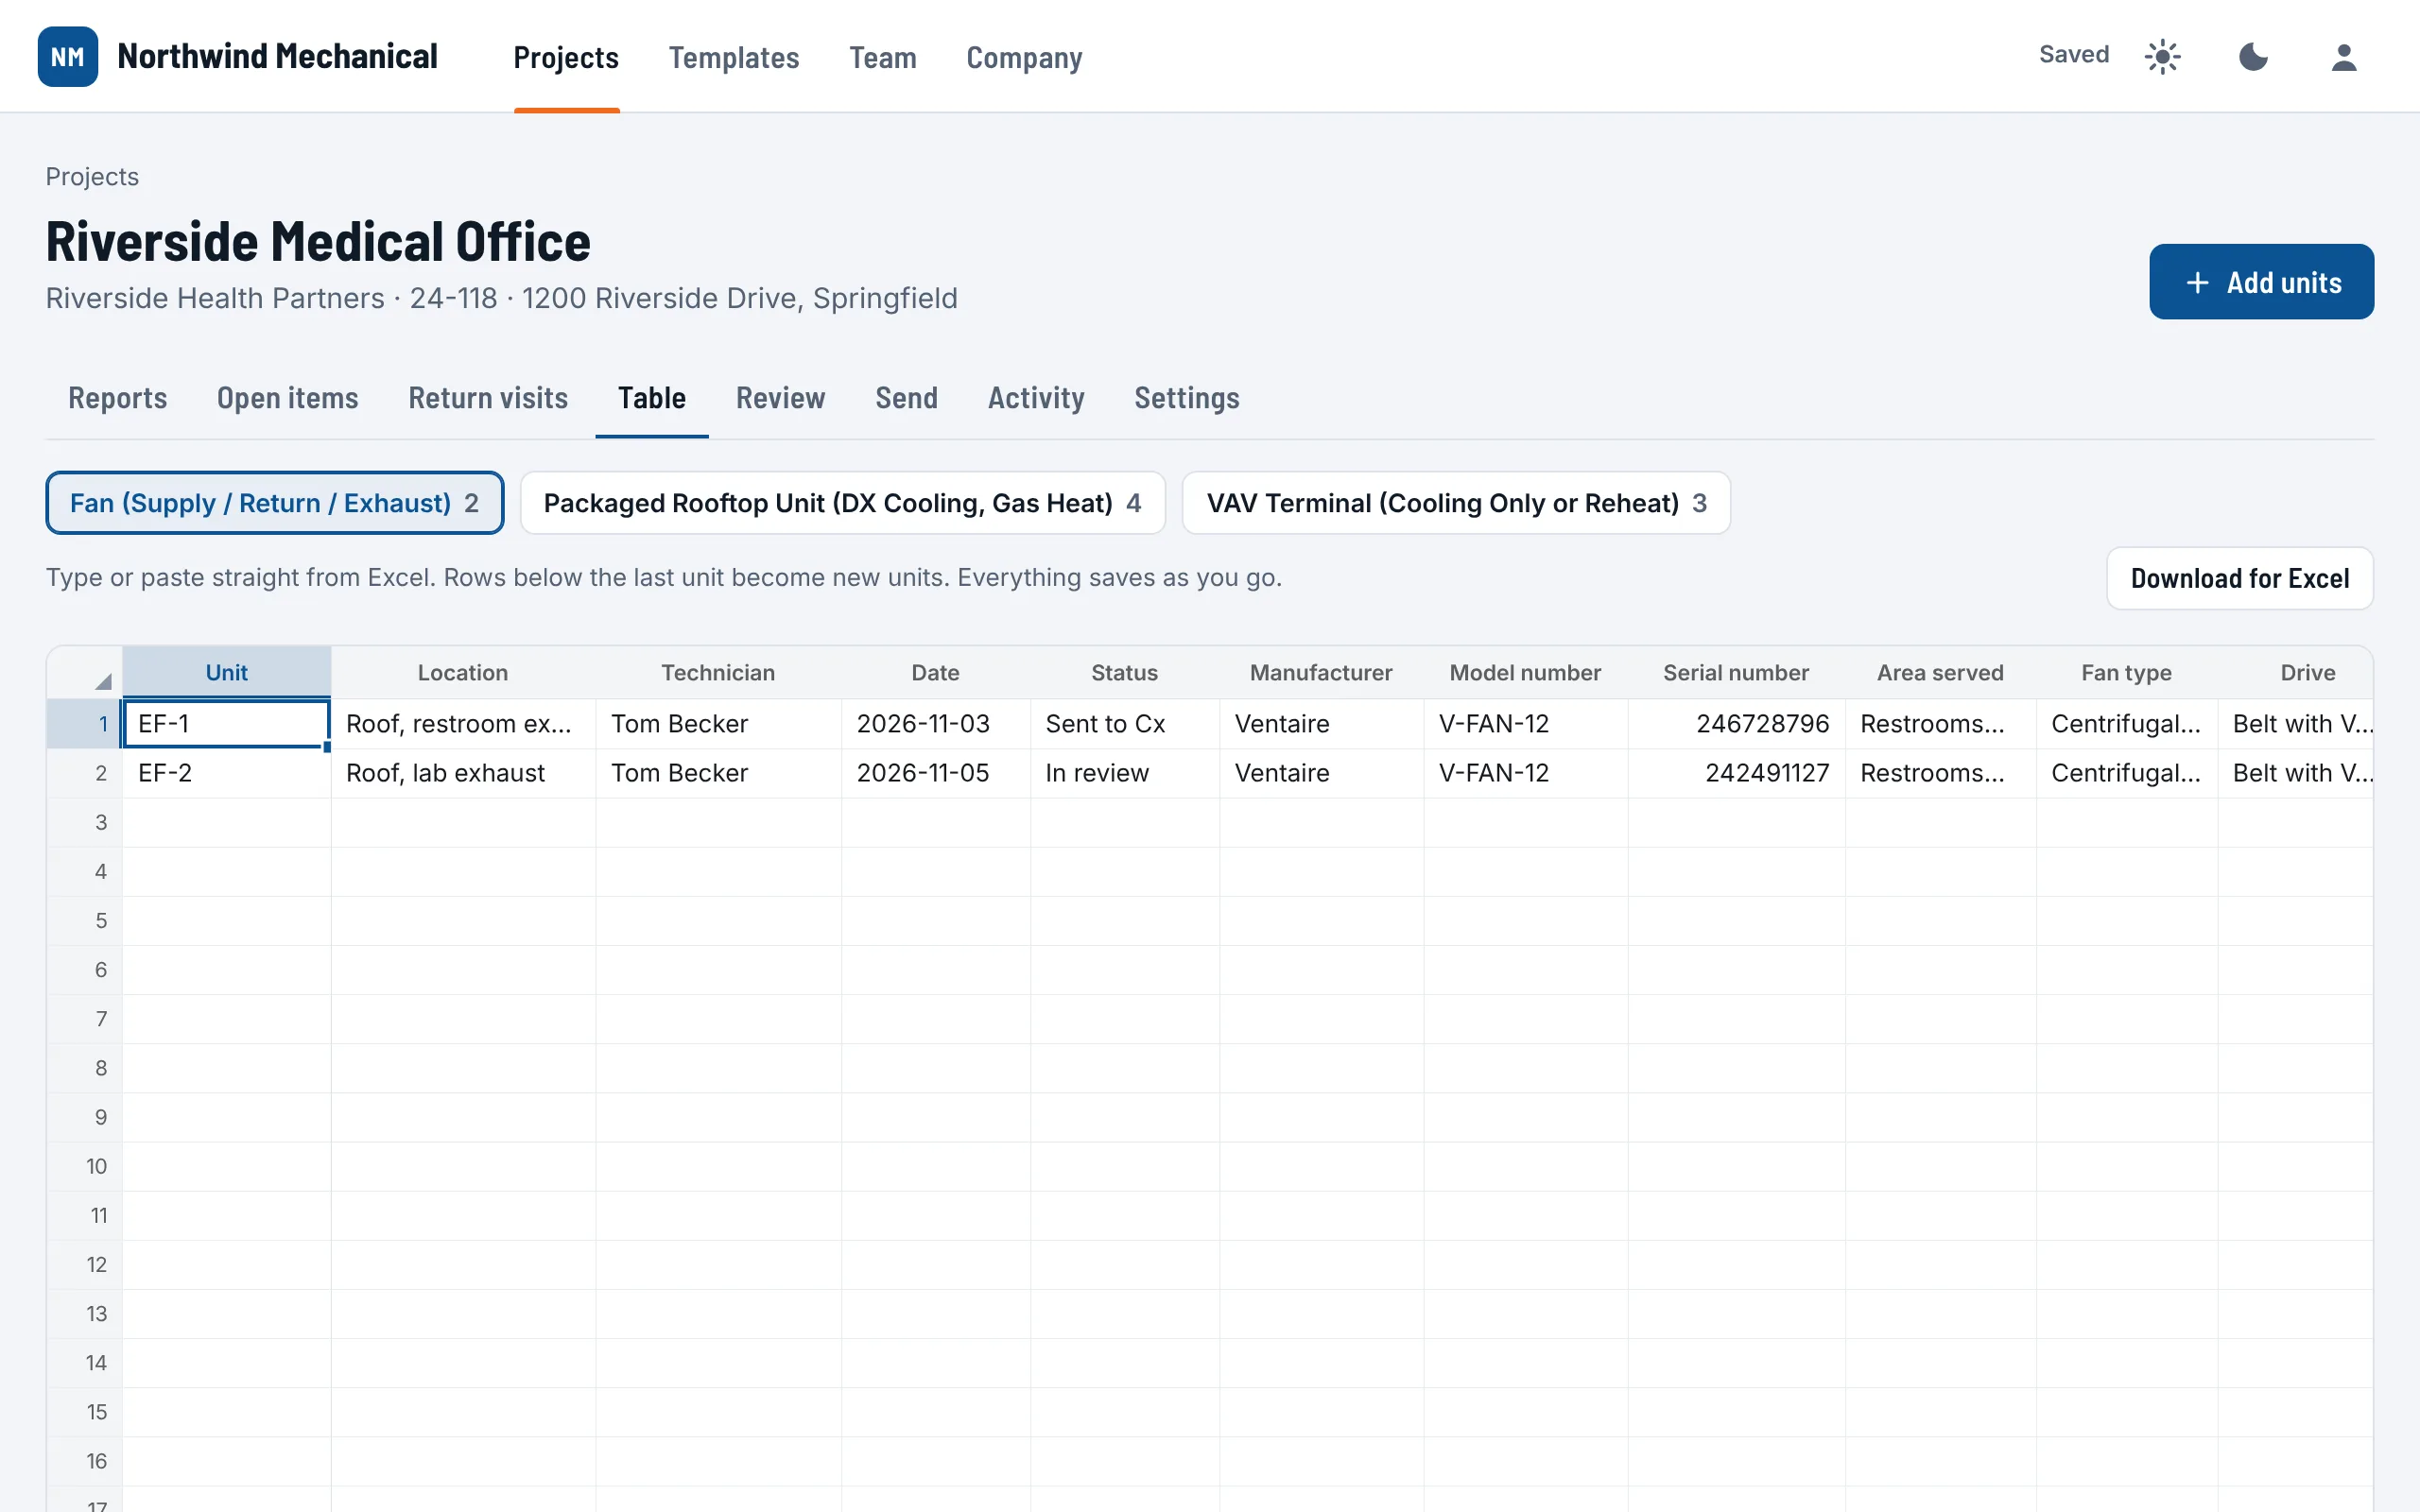
- Pick the equipment type with the buttons at the top. Each unit is a row; the first columns are Unit, Location, Technician, Date and Status, then every field on the report.
- Type in any cell, or paste straight from Excel: a block of cells pastes into a block. Everything saves as you go.
- Type or paste into the empty rows below the last unit and they become new units.
- Download for Excel saves the table as a file Excel opens.
This is the fastest way to type the nameplate and schedule values from the submittals before the techs go out.
Project settings
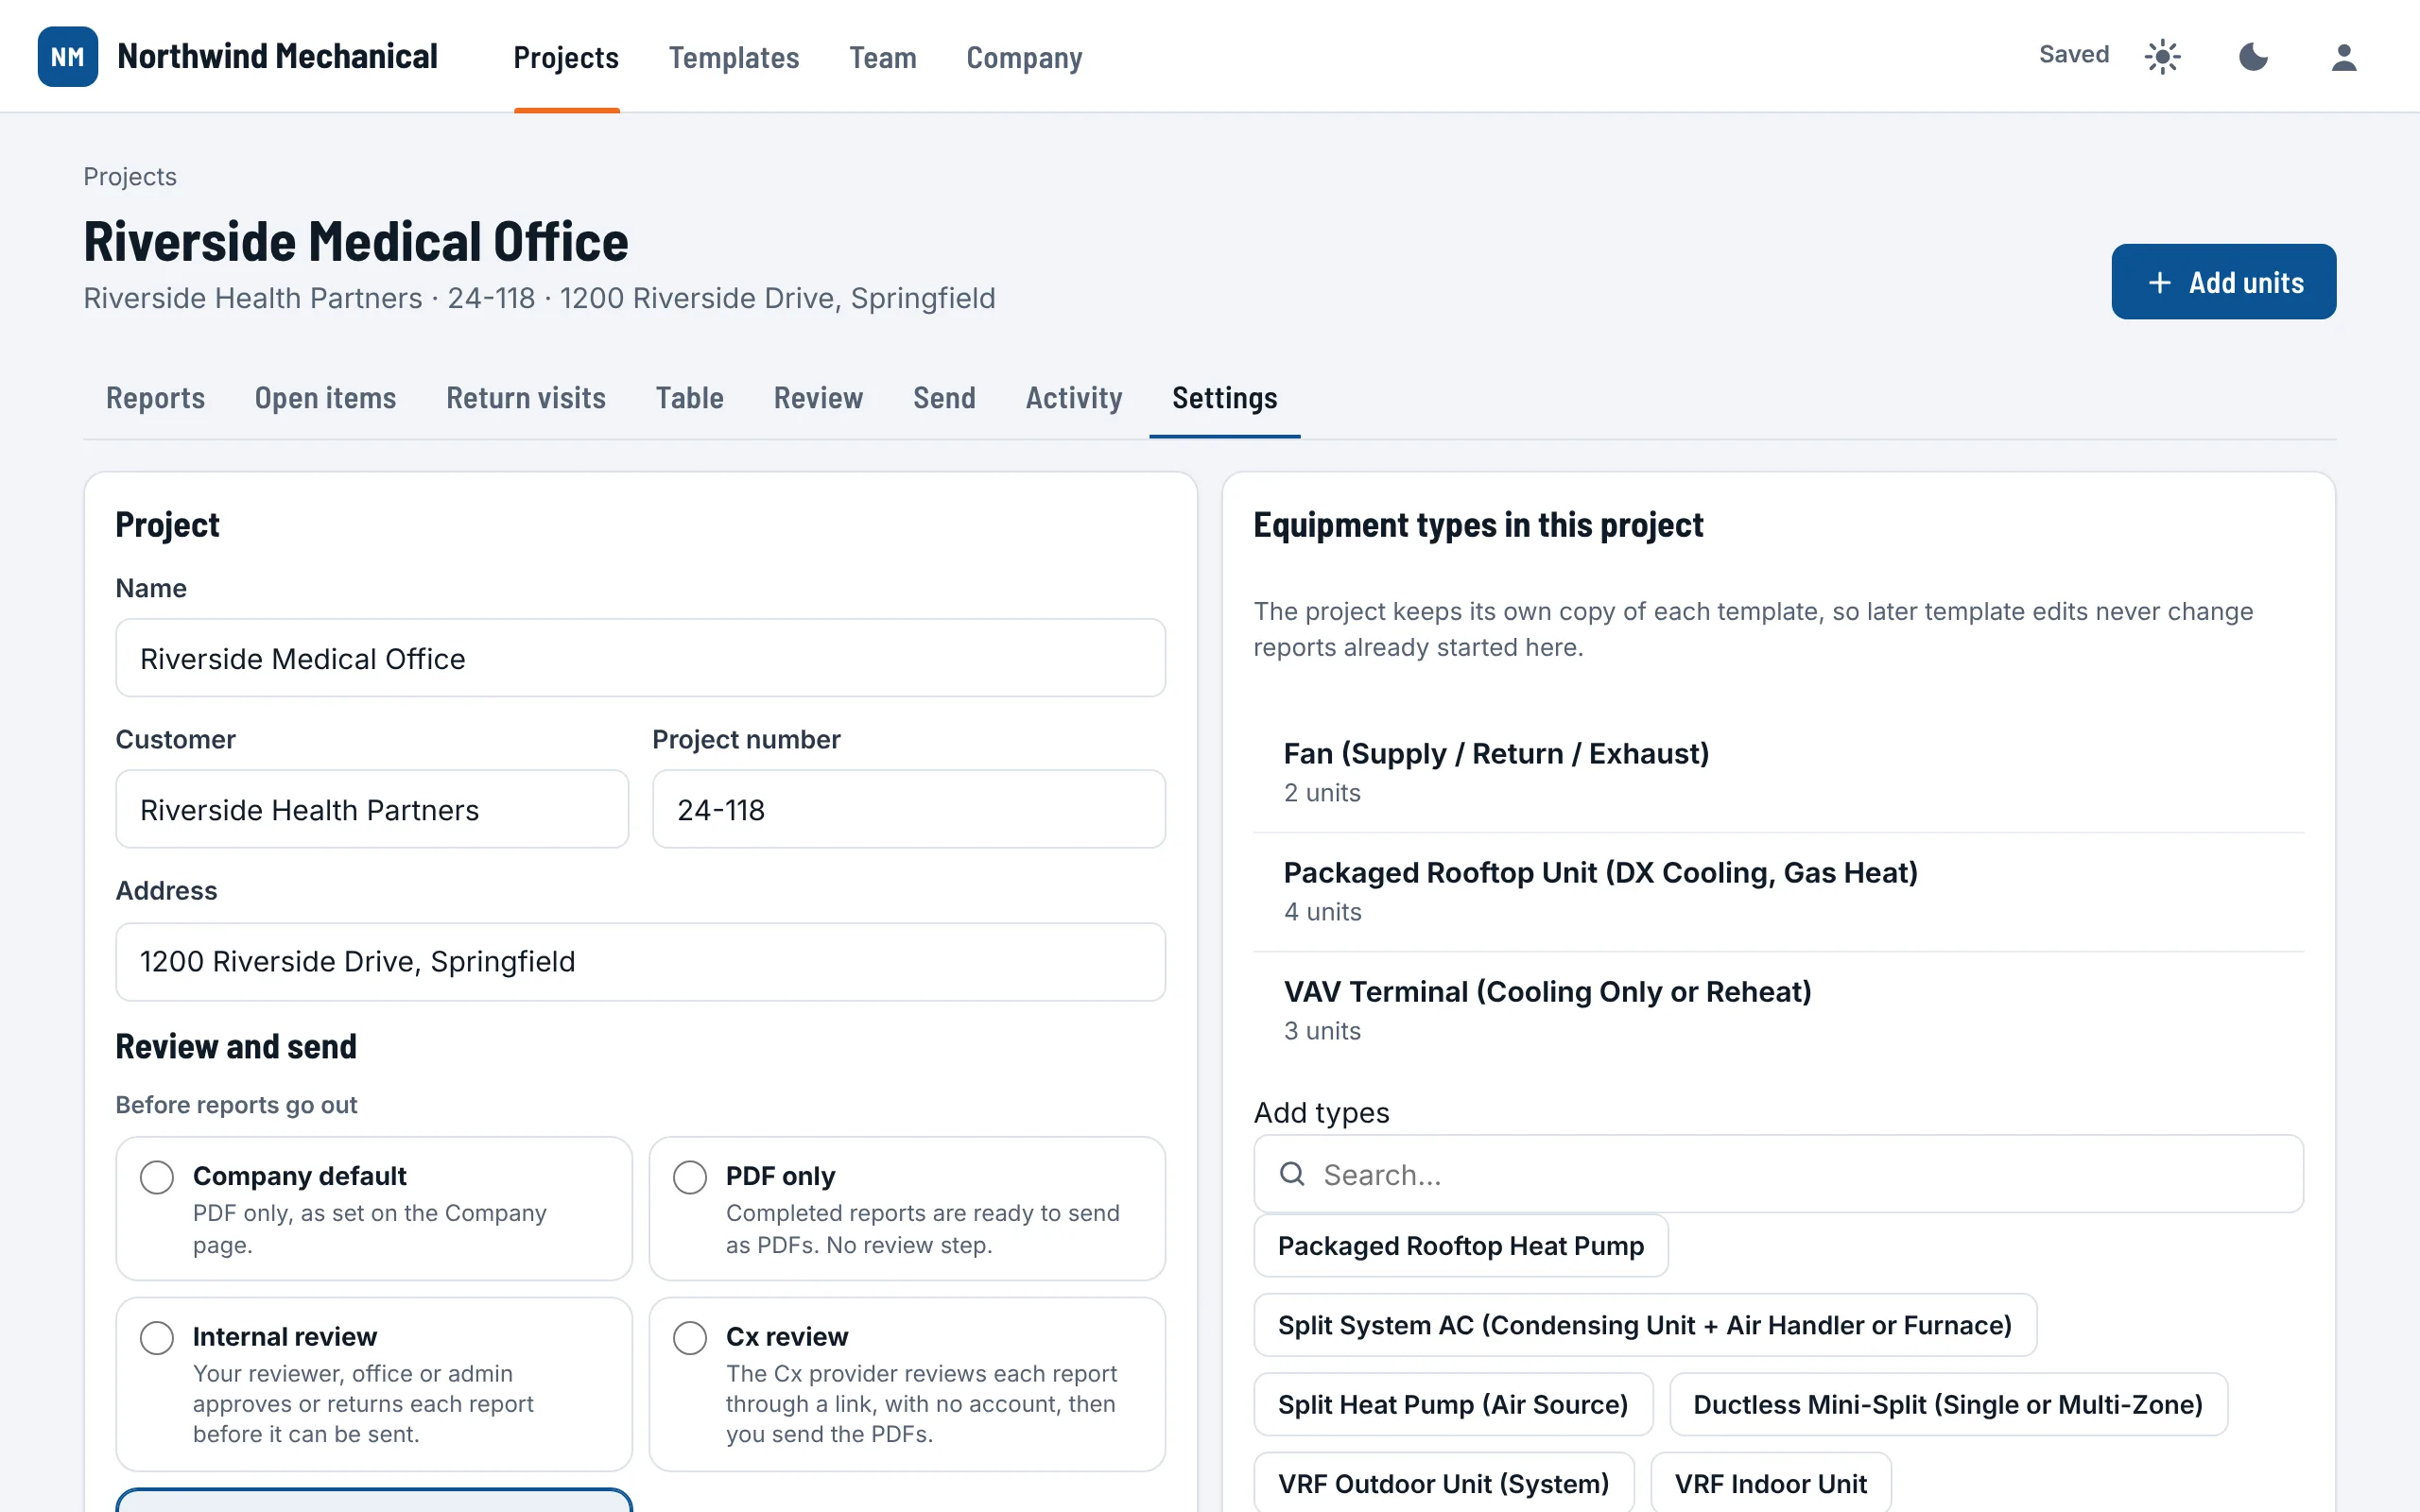
- Project: name, customer, number and address.
- Review and send: this job's review (or the company default), who gets the finished reports, Send automatically the moment a report is approved, and the archive copy address. Choose Save.
- Equipment types in this project: the project keeps its own copy of each template, so later template changes never change reports already started. When a newer version exists, Use newest moves the project to it. Add picked types adds more.
- Move project to Trash puts the whole job in the Trash, where it can be restored.
The equipment library and components #
Every company starts with StartupSend's library: startup sheets for each kind of equipment, researched from manufacturers' installation and startup instructions. The readings that prove a unit started properly come first; the checklists support them.
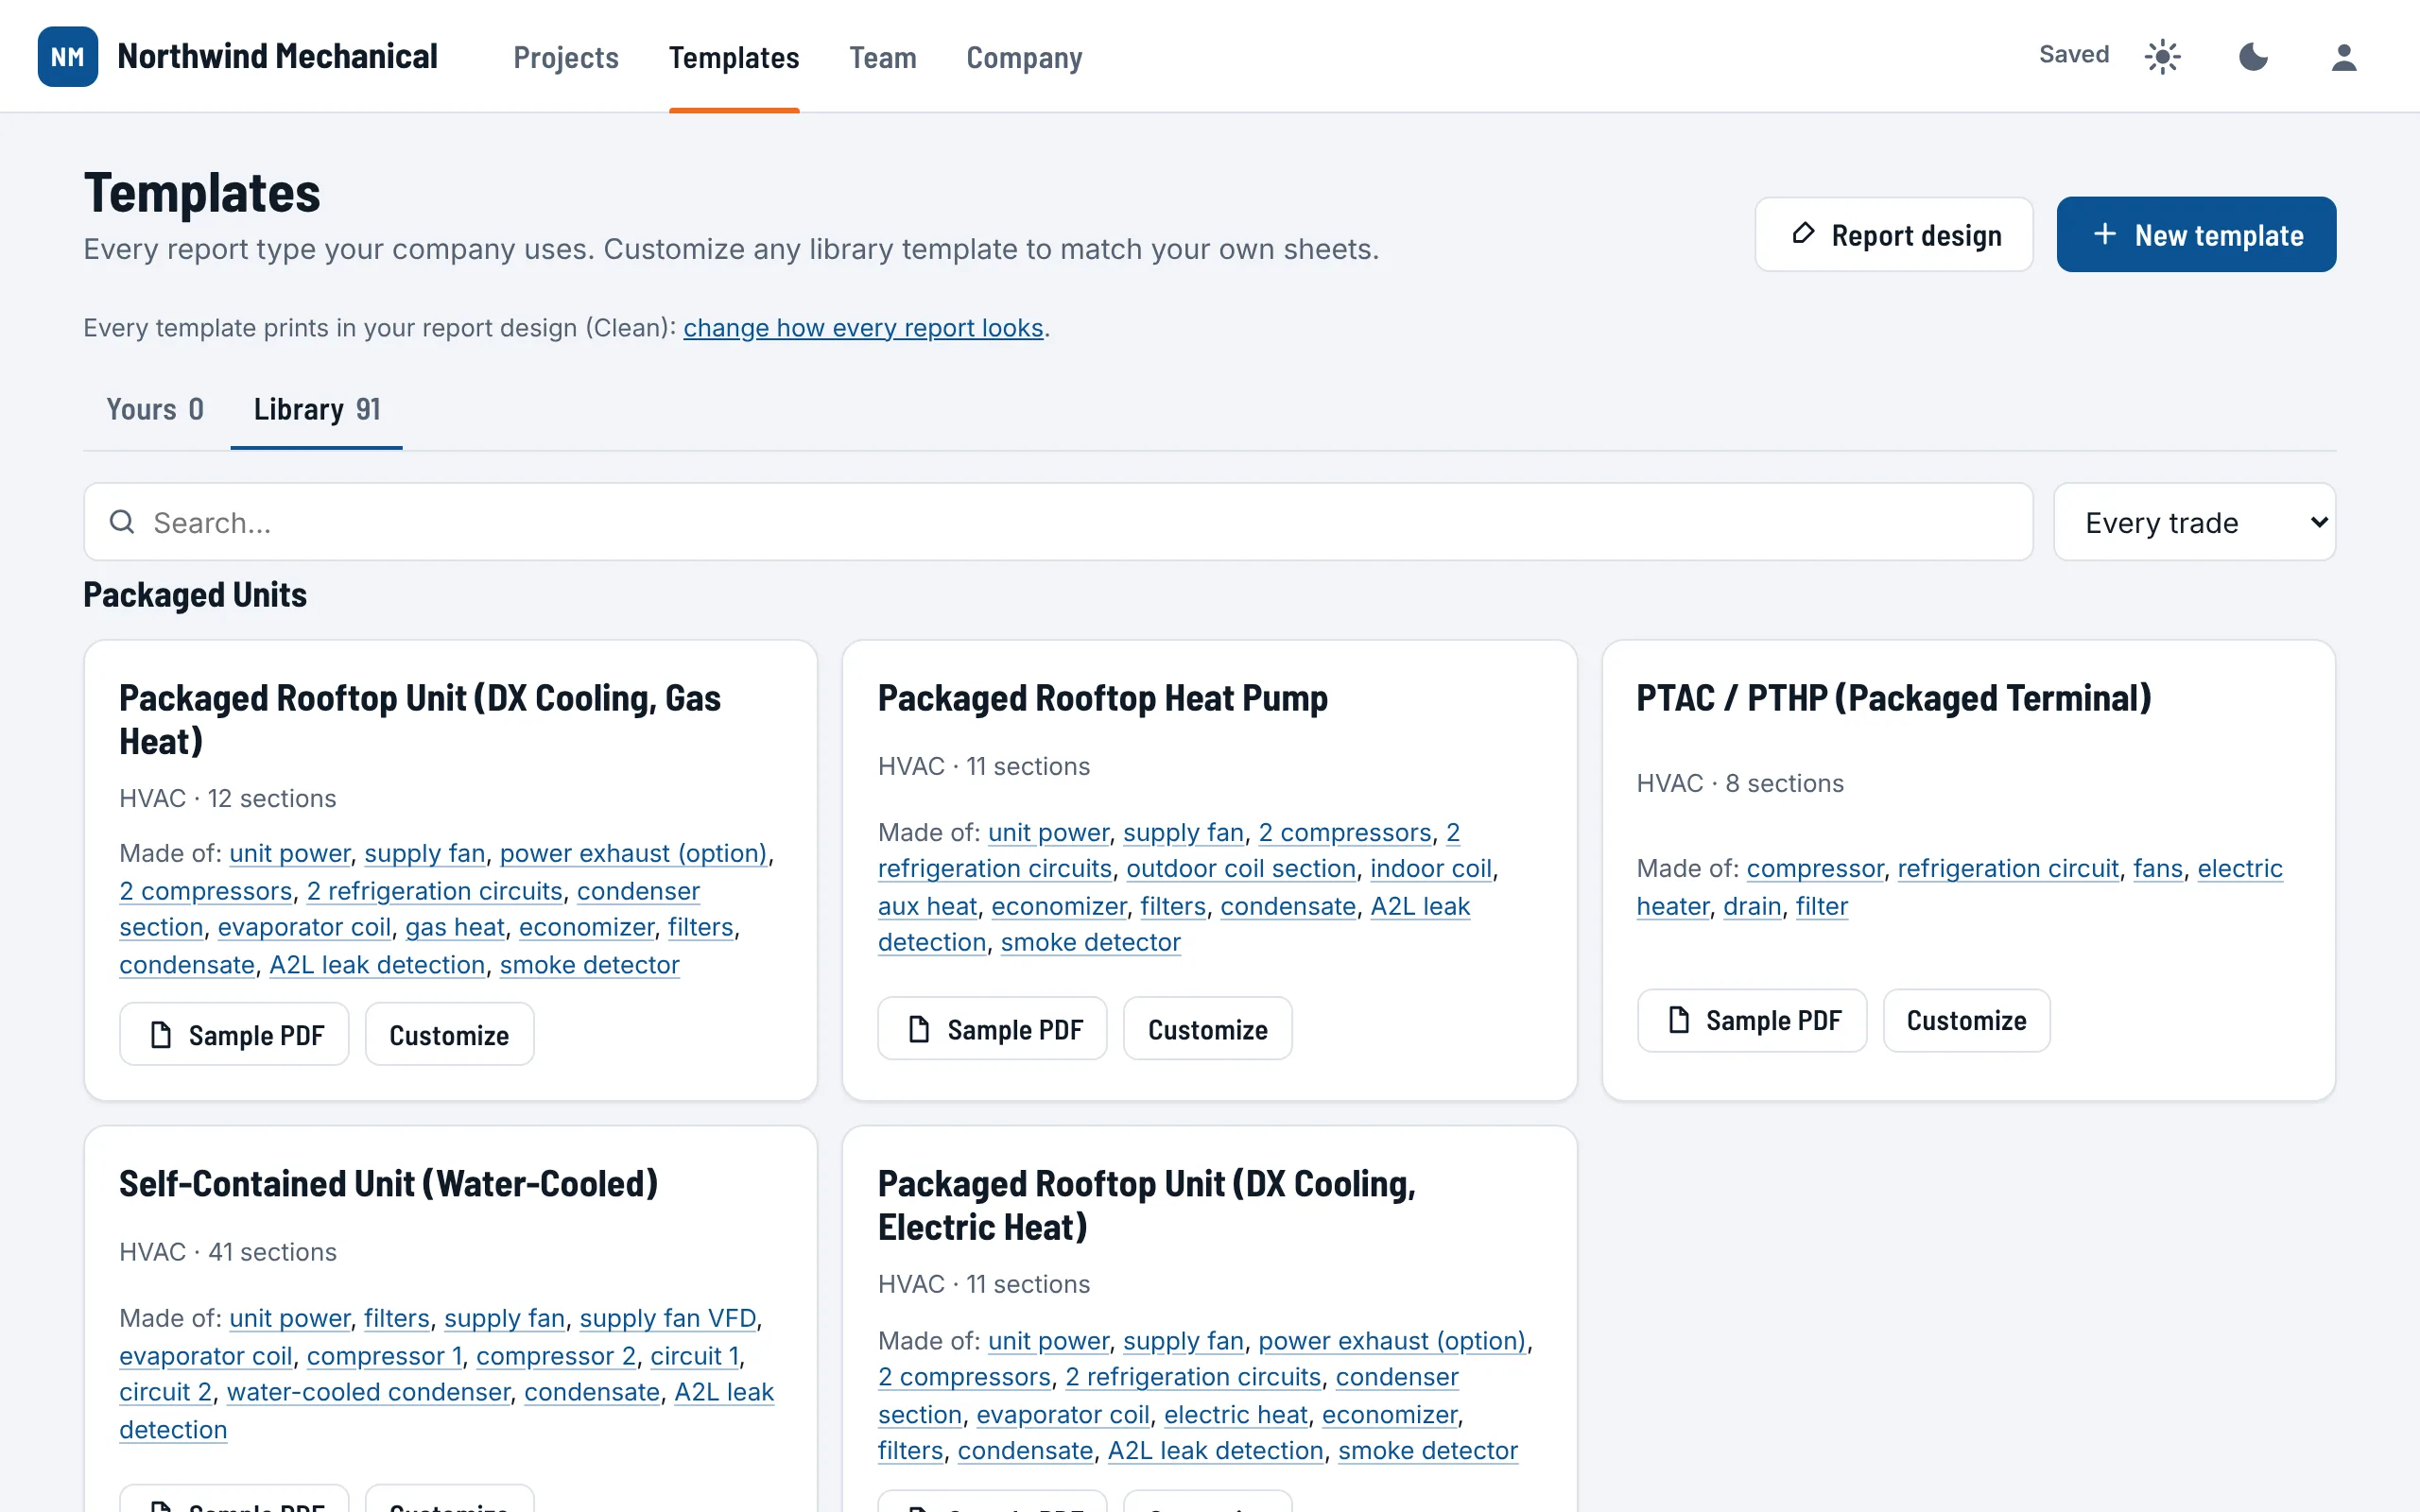
- Open Templates, then Library.
- Sheets are grouped by kind of equipment: packaged units, split and DX, heat pumps, air handlers, terminal units, fans, central plant, hydronics, heating, electrical, critical cooling, plumbing, kitchen, refrigeration and more. Search, or pick a trade.
- Sample PDF shows the sheet filled with typical readings, in your report design.
- Use a library sheet as it is: it is offered when you make a project. Or choose Customize to make your own copy (see Templates and the template builder).
Components: what a unit is made of
A sheet is made of components. Its card says what: "Made of: supply fan, 2 compressors, gas heat...". A fan brings its amps, volts, rotation and guards; a pump its pressures and flow; a refrigeration circuit its pressures, temperatures, superheat and subcooling. Click a part to go to it in the builder.
Components are how you build a sheet for a unit that is not in the library, like a custom-built air handler:
- On Templates, choose New template, then Start from components.
- Tap each part the unit is made of. Use + for more than one: 2 supply fans, 4 compressors, a water coil, an ionizer.
- Choose Make the sheet. The whole sheet opens in the builder, where you can change anything before you save it.
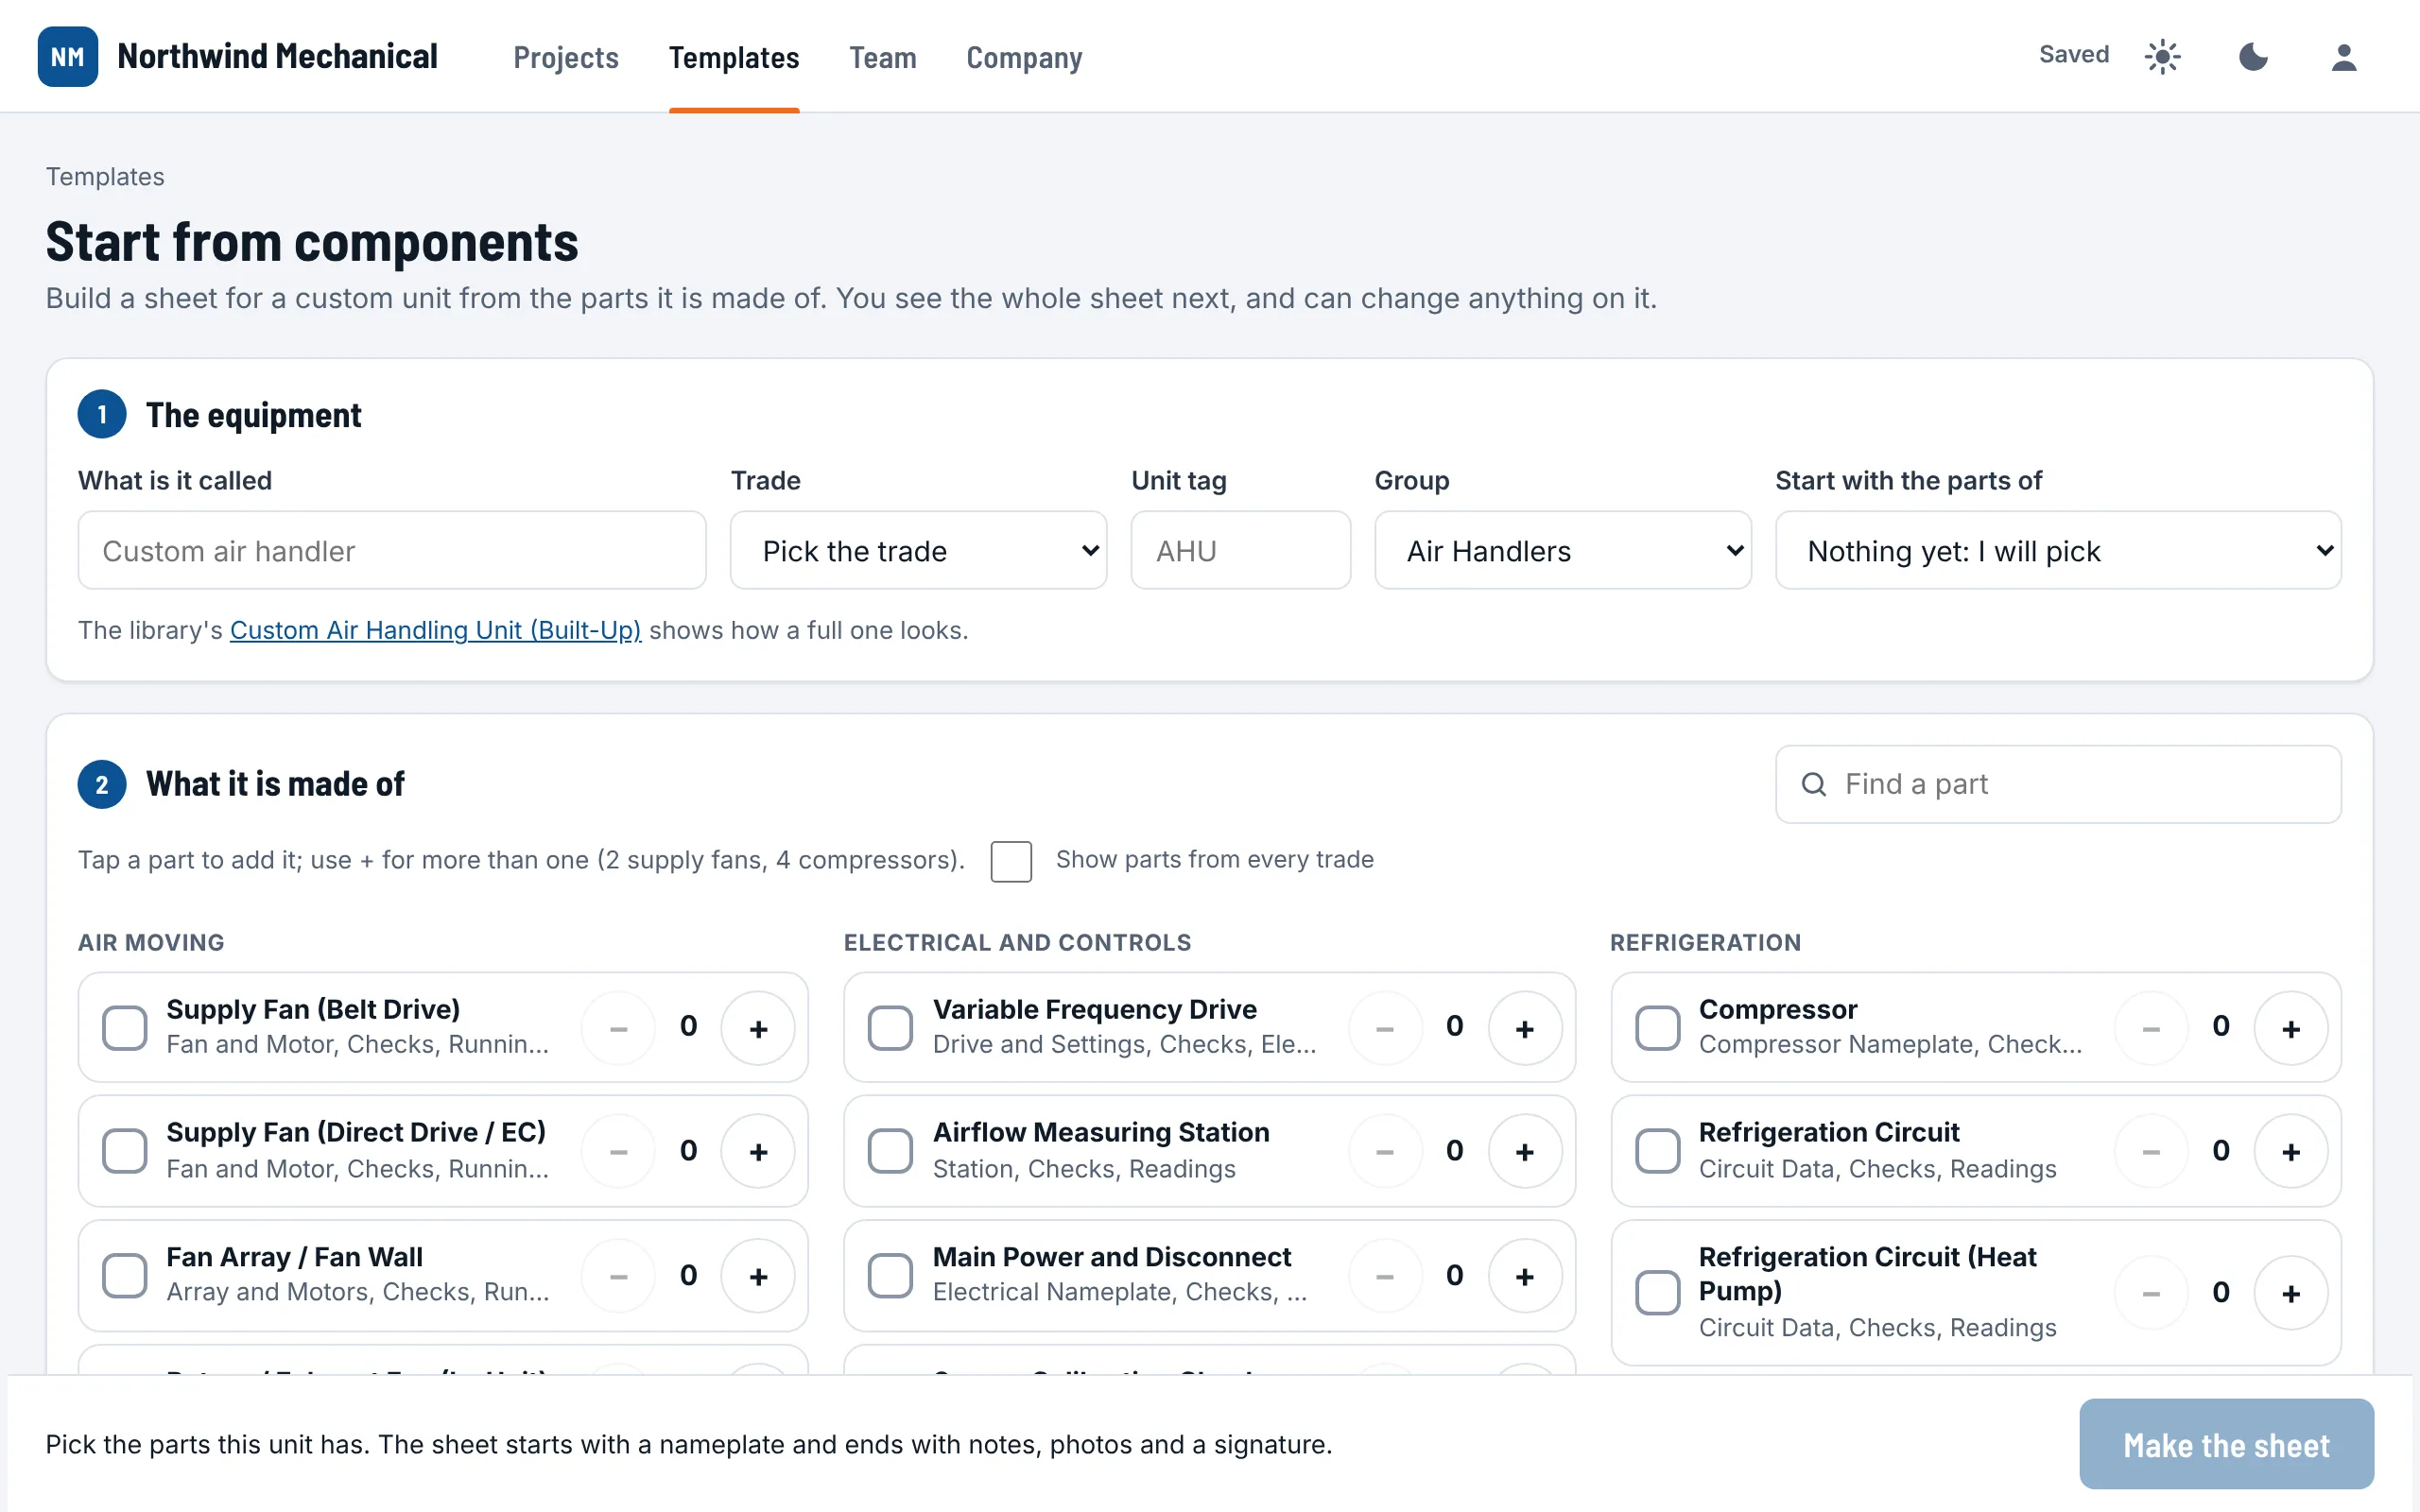
In the builder you can also add a component to any sheet: select the template (click its title area, or nothing at all) and choose Add a component. Each copy keeps its own readings, so two supply fans never mix.
Templates and the template builder #
A template is one kind of startup report. Your own templates are on Templates, Yours. You build them on the report itself: what you see while you build is what prints.
Start a template
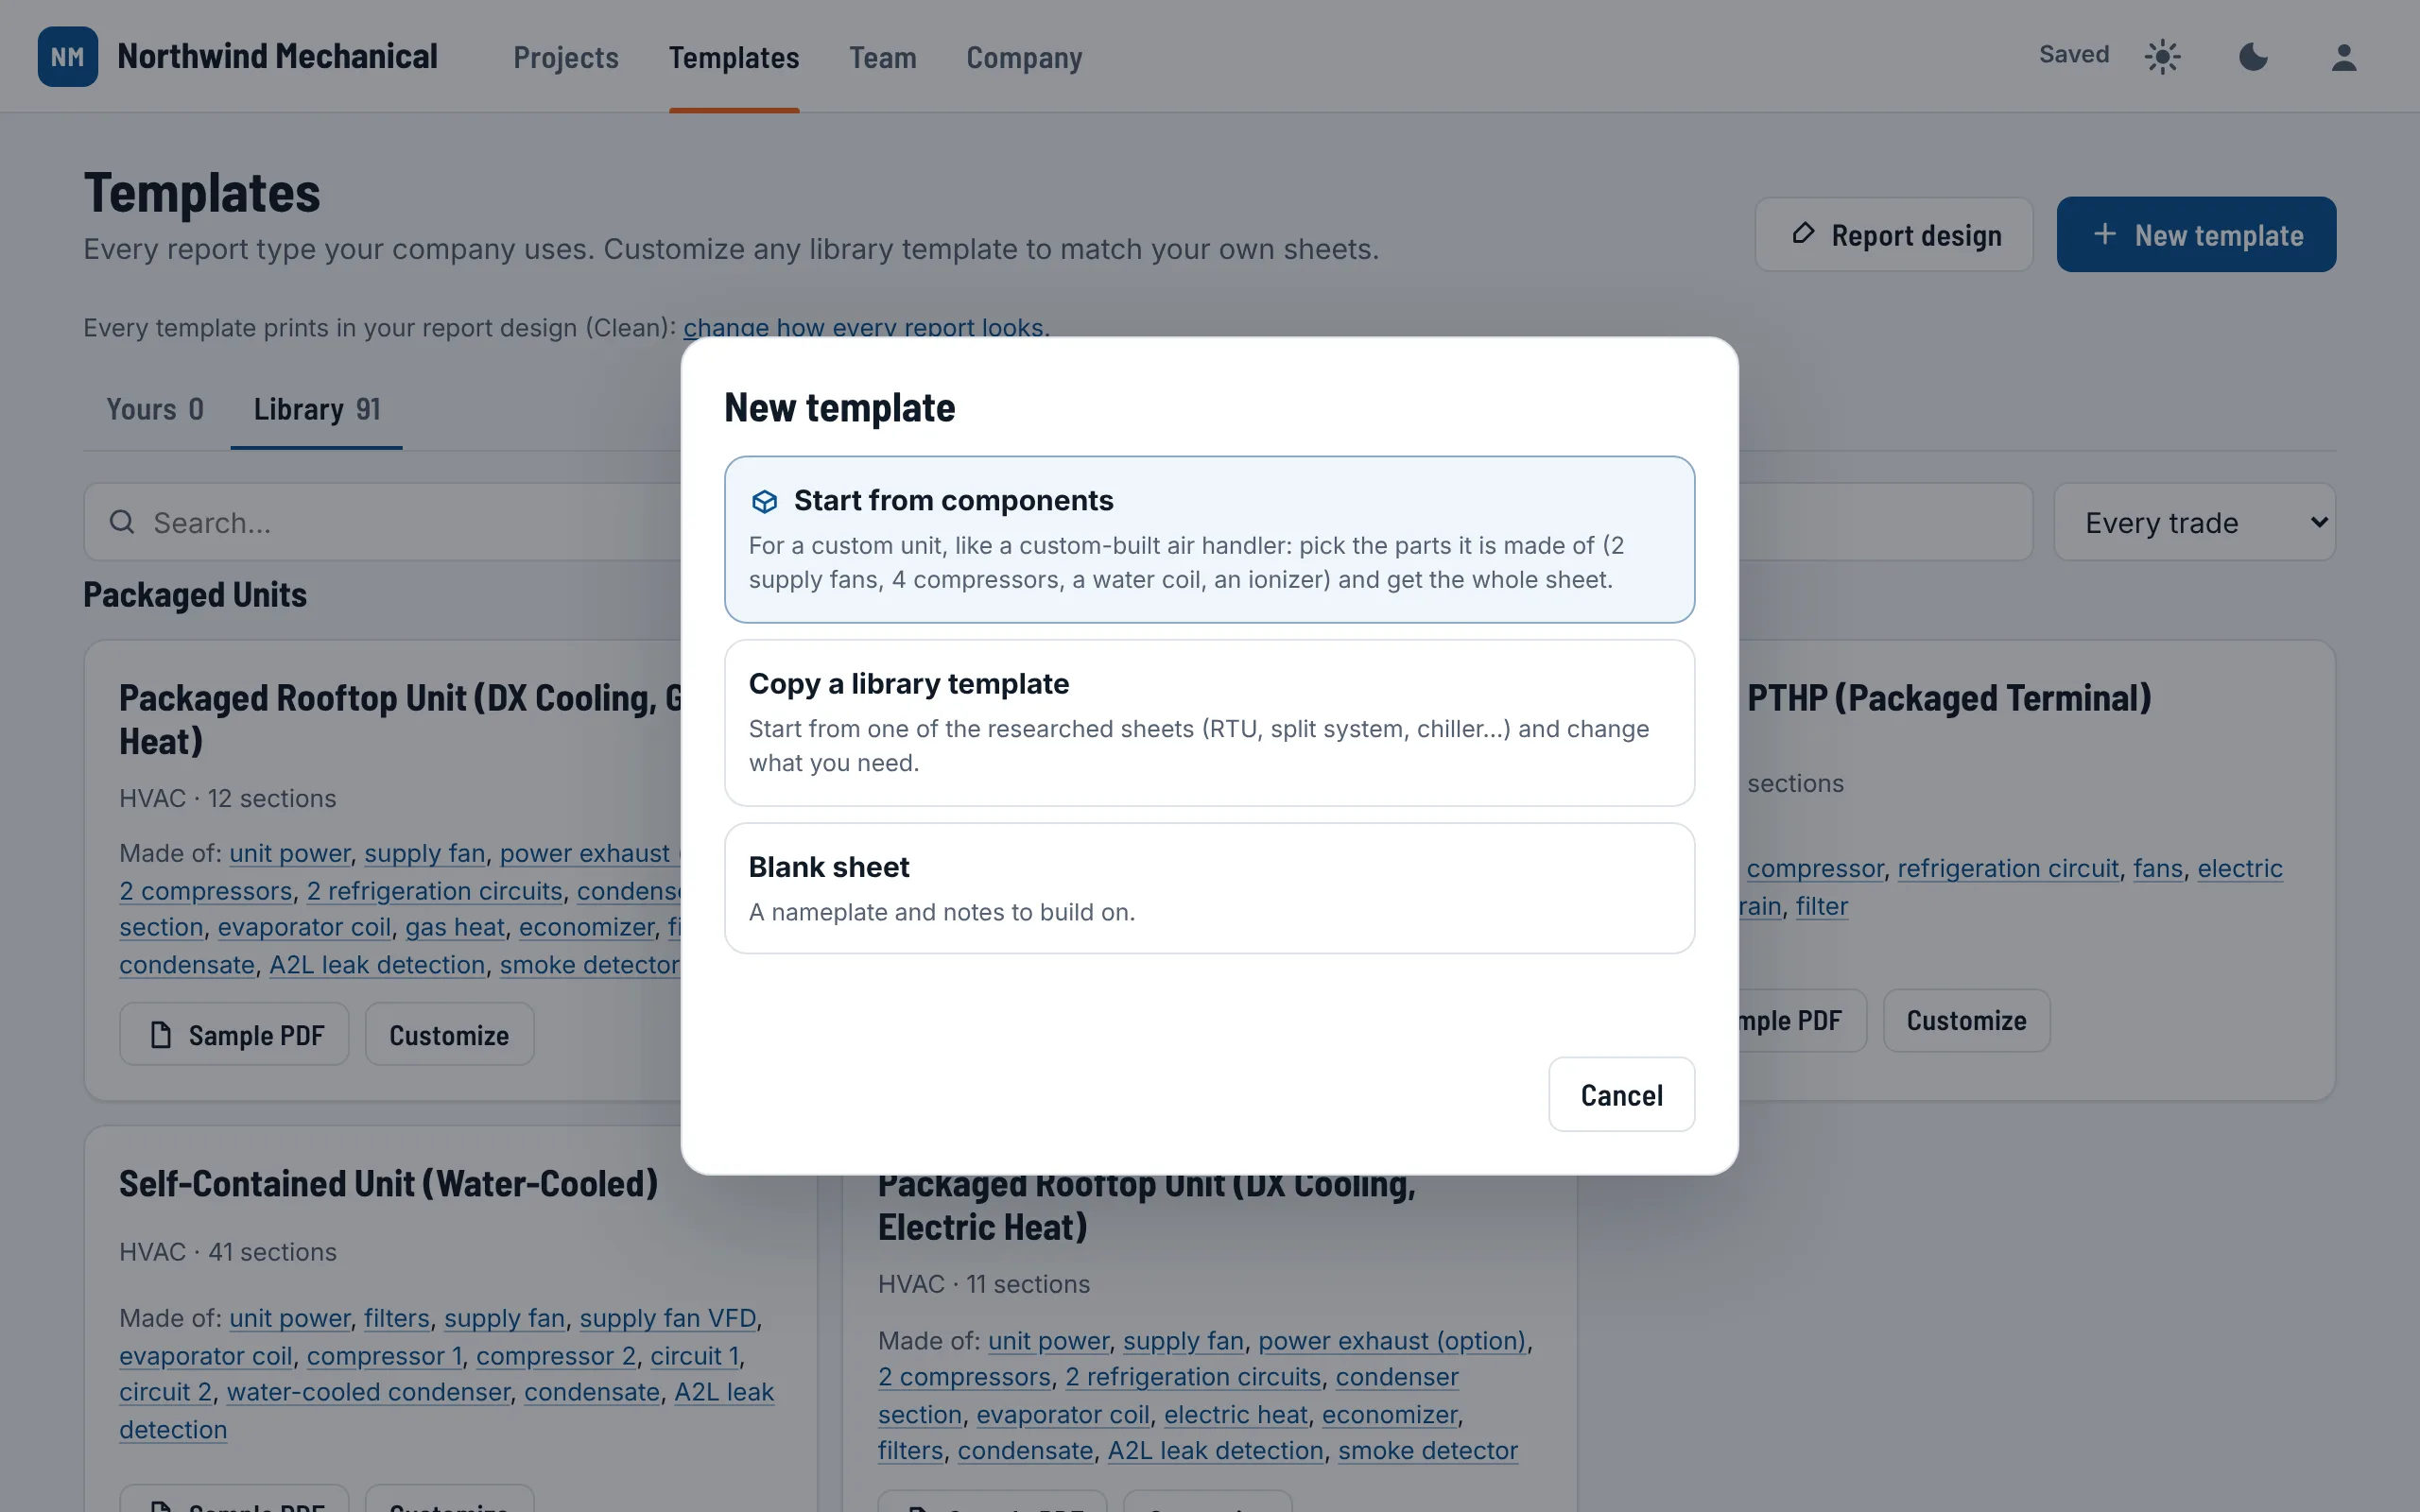
- Start from components: for a custom unit (see Components).
- Copy a library template: start from a researched sheet and change what you need. Or choose Customize on any library card.
- Blank sheet: a nameplate and notes to build on. It asks the name and trade first.
The builder
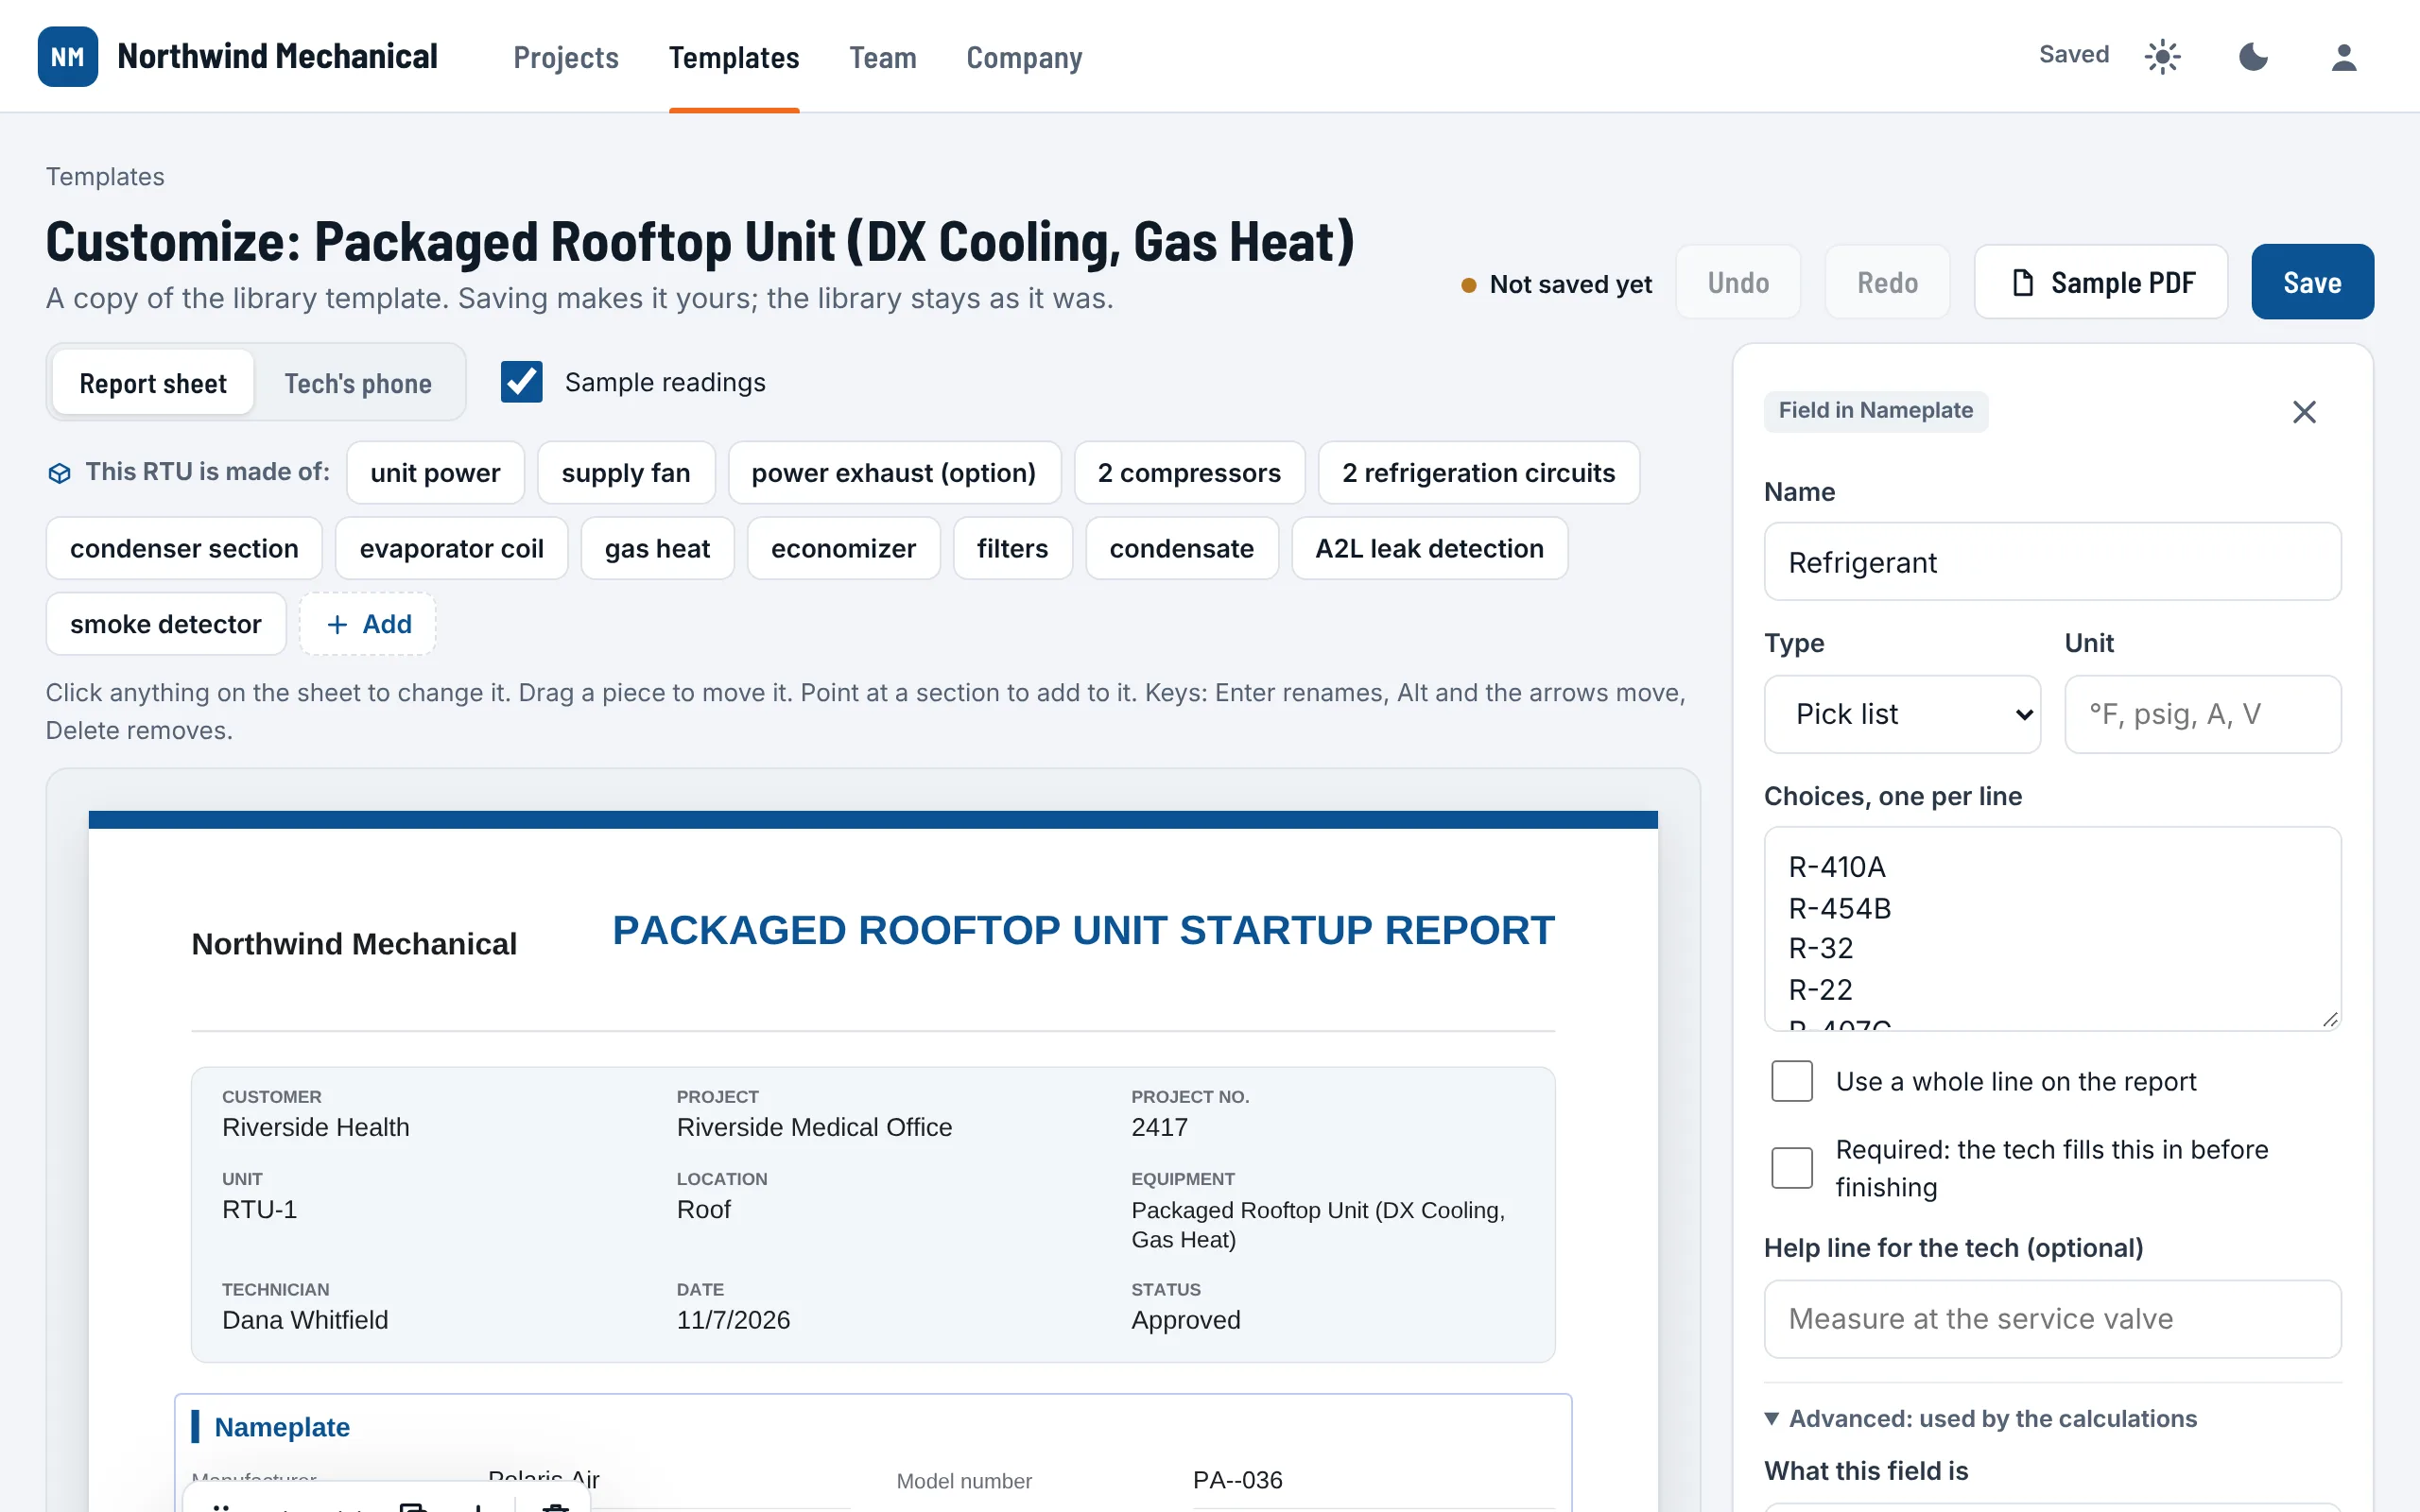
- Rename: click any heading, field, reading, column or check on the sheet and type. Renaming never moves a saved reading.
- Move: drag a piece, or use the arrows on its small toolbar. With the keyboard: Enter renames, Alt and the arrow keys move, Delete removes.
- Add: point at a section and choose + to add a field or a section right there. The panel also has Add a section for each kind: Fields, Checklist, Mode table, L1 / L2 / L3, Notes, Photos and Signature.
- Copy or remove: from the toolbar on the selected piece.
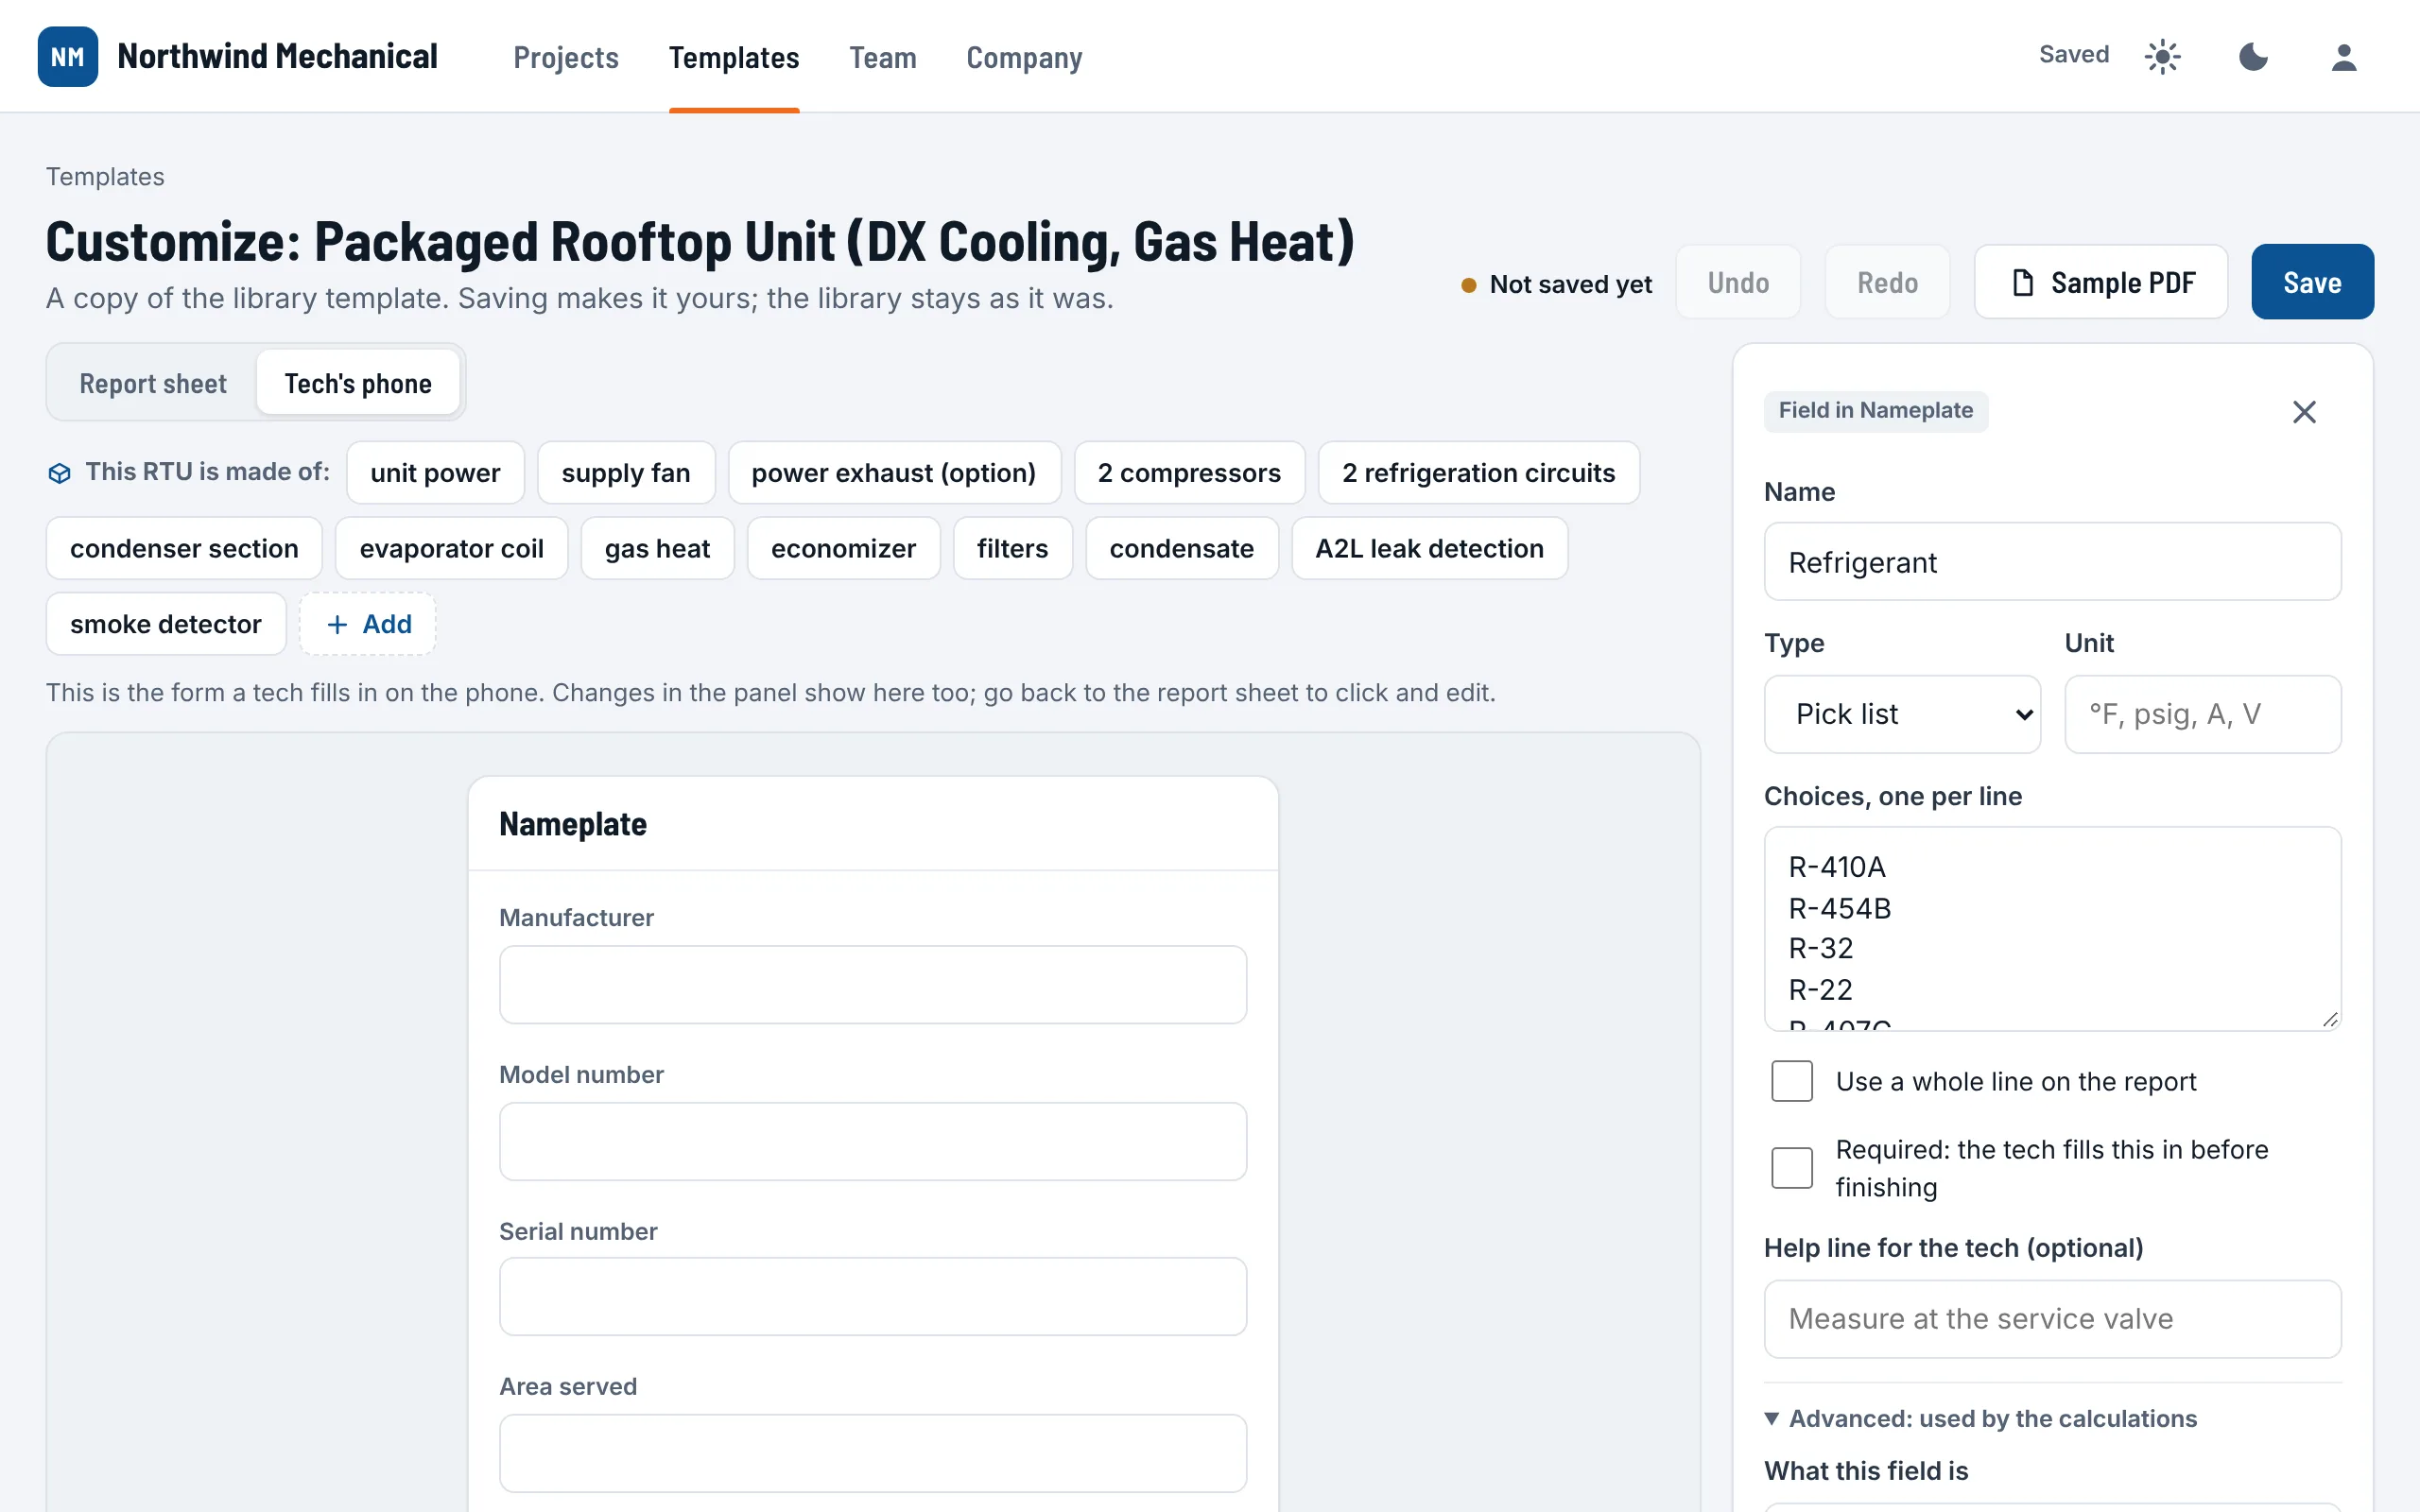
- Report sheet and Tech's phone switch between the printed sheet and what the tech sees. Sample readings fills it with typical numbers so you can judge the layout.
- Undo and Redo take every change back and forth. A change not saved yet stays on this computer, and the builder offers it back the next time you open the template.
What the panel sets for a field or reading
| Setting | What it does |
|---|---|
| Name | The words printed on the sheet. It suggests names StartupSend knows, so the calculations recognize them. |
| Type and unit | Text, Number, Pick list, Date, Yes / No / N/A or Checkbox, and the unit (°F, psig, A, V). |
| Choices | For a pick list: one choice per line. |
| Use a whole line on the report | For a long value, such as a note or a serial number. |
| Required | The tech fills it before finishing. It is named in the finish list; it never stops a save. |
| Help line for the tech | A short hint under the box, like "Measure at the service valve". |
| Expected range | Low, high and a note. A reading outside it is pointed out to the tech, never blocked. |
| Advanced: used by the calculations | What the reading is (suction pressure, nameplate RLA...) and what it is checked against. This is how StartupSend works out superheat, subcooling and amps against the nameplate. Leave it alone if you are not sure. |
Selecting a section shows its title, its columns (a mode table holds up to 6, such as Cooling and Heating), Paste a list for a checklist (one item per line, straight from Excel or Word), and suggestions from the nearest library sheet.
Save, versions and samples
- Choose Save. A customized library sheet becomes yours; the library stays as it was.
- Each save is a new version. A project keeps the version it started with, so reports already started never change. Move a project to the newest in its Settings.
- Sample PDF prints the sheet with typical readings in your report design.
- Remove takes your template out of the list. Projects that use it keep their copy, and the Trash can bring it back.
Building on a phone
On a phone the builder is a simple list. Tap a piece and its settings open in a sheet from the bottom; See the sheet shows the report as it prints.
Report design and branding #
Set how every report looks once, for the whole company. Every report and every template, library ones too, prints this way. Open Company, then Report design (or Report design on Templates).
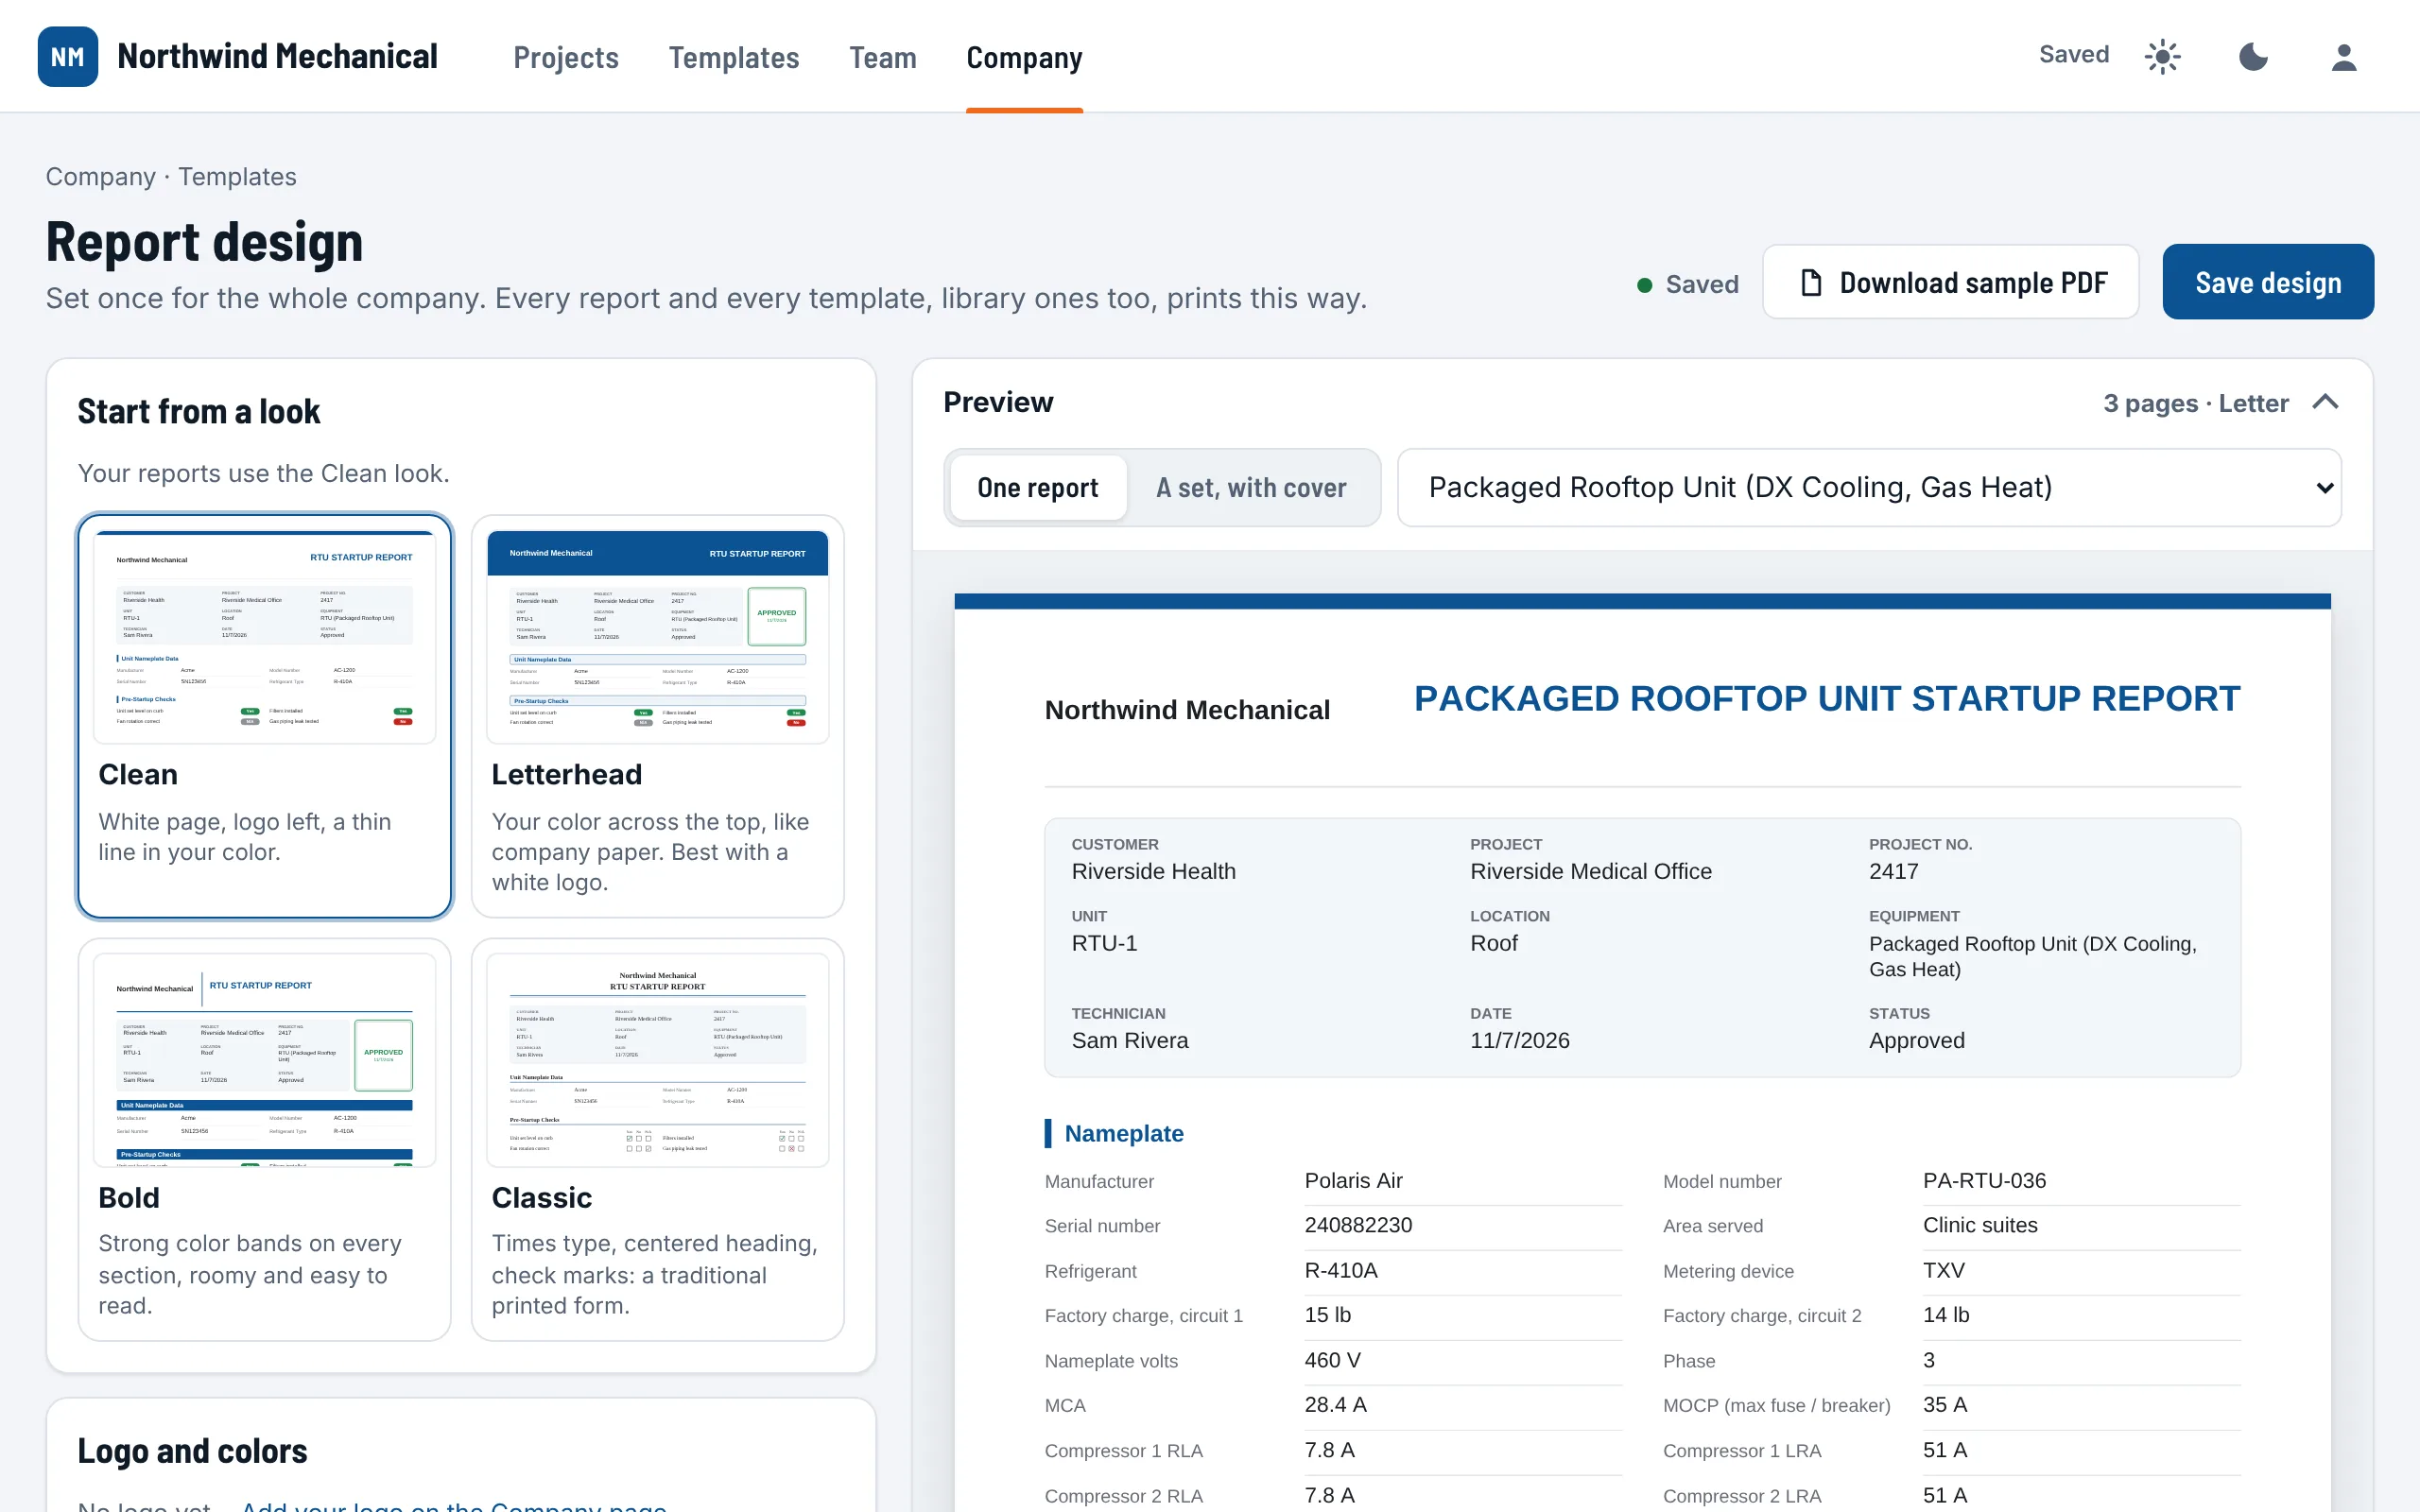
- Start from a look: Clean (white page, logo left, a thin line in your color), Letterhead (your color across the top), Bold (strong color bands, roomy) or Classic (Times type, centered heading, check marks). Anything you change after that is kept on top of it; Undo my changes to this look goes back.
- Logo and colors: logo position and size, main color, second color, and the heading color (main color, near black or your own).
- Top of the page: the header style: thin line, color band, split or centered.
- Type and spacing: Helvetica or Times; compact, standard or roomy; Letter or A4 paper.
- Sections: the section headings (side bar, color band, underline, boxed), readings tables striped or as a grid, checklist answers as colored pills or check marks, and what an empty box shows (a dash or an empty line).
- Sign-off: signature lines for the technician, technician and reviewer, or technician and witness, and Print an APPROVED stamp on approved reports.
- Cover page: for a set of reports, a cover with a contents list (a color band, simple, centered, or no cover). One report never gets a cover.
- Bottom of every page: your own line, the company name, the project name, the date the PDF was made, and page numbers.
- Watch the Preview. Switch between One report and A set, with cover, and pick which template to preview. Download sample PDF gives the real file.
- Choose Save design. Only an admin can save it; everyone else sees how reports print today.
Changes you have not saved stay on this computer if you leave the page, and come back when you open it again.
The Checks console #
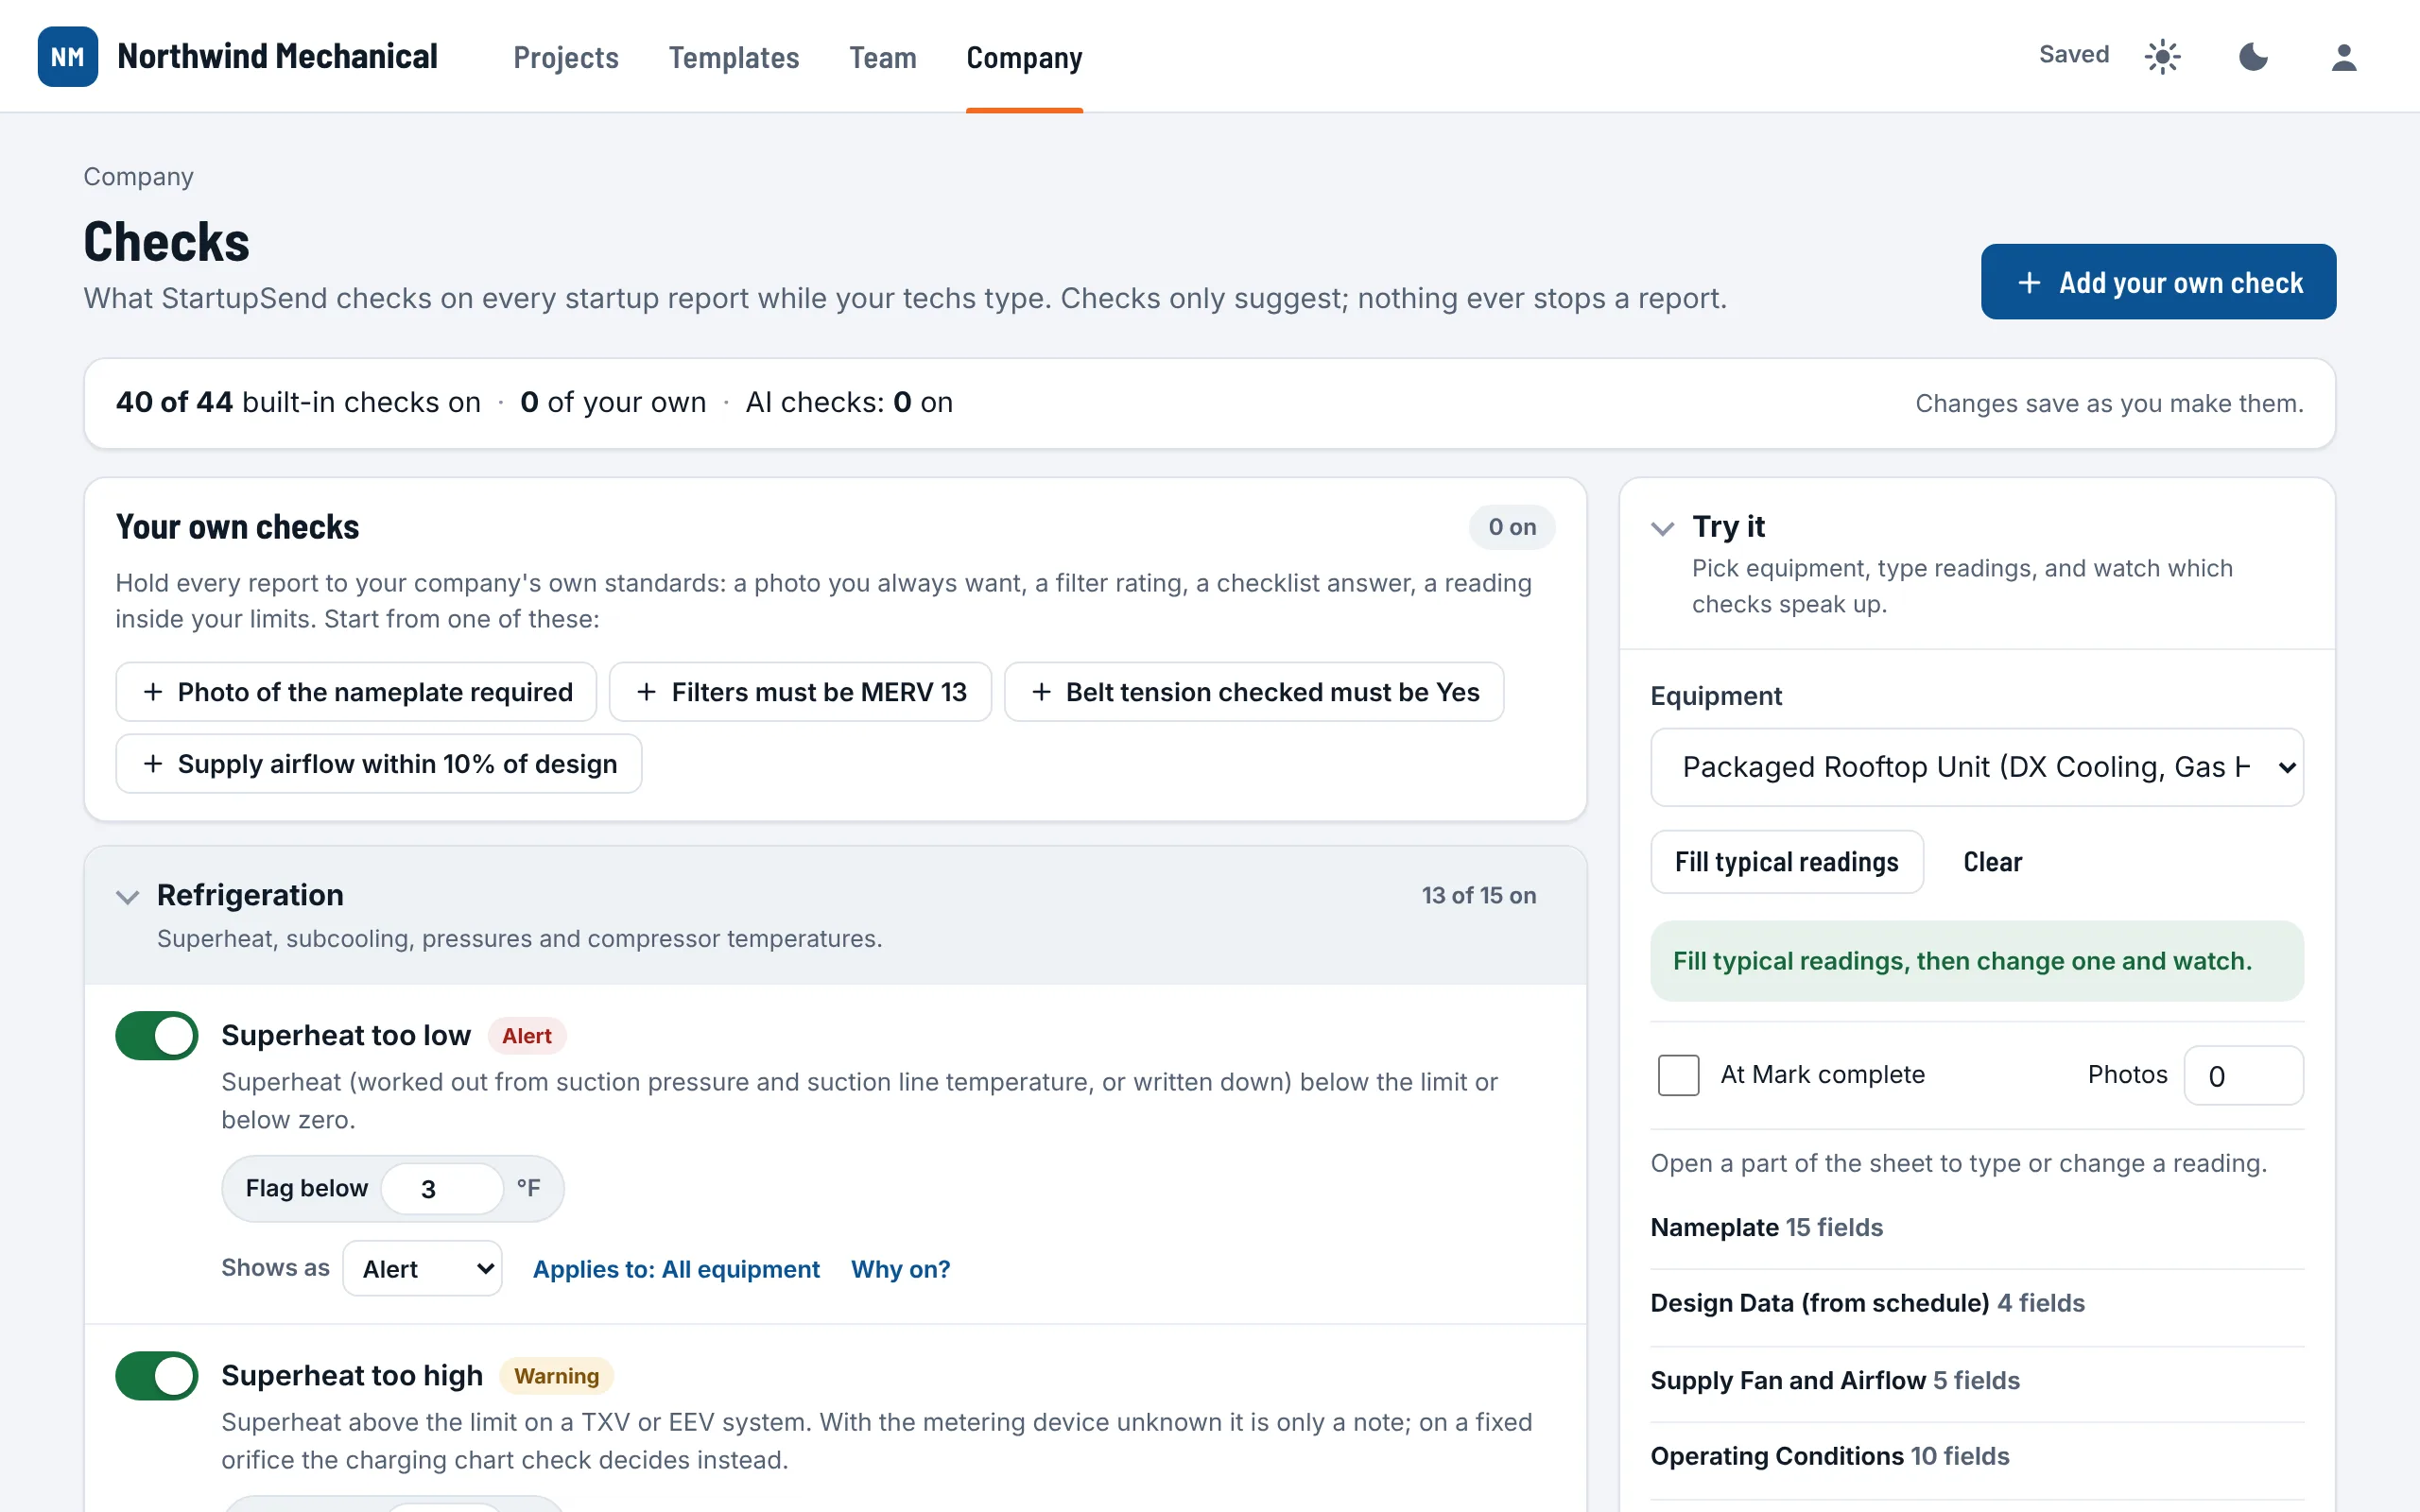
While a tech types, StartupSend checks the readings and points out what looks wrong: superheat high for a TXV, amps over the nameplate, voltage imbalance, airflow far from design. Checks only suggest. Nothing ever stops a report. The Checks console decides which checks run, how loud they are and on which equipment.
Admins open it from Company, Checks, and change it. Office staff see it as the Checks tab and can use Try it.
The built-in checks
They are grouped: Refrigeration, Electrical, Airflow, Water, Combustion and gas, Drives and motors, Nameplate sanity, Completeness, and AI checks. Open a group to see each check. Only checks that hold across manufacturers and conditions are on by default, so techs do not learn to ignore them.
- The switch turns a check on or off.
- Shows as: Note, Warning or Alert. On the tech's phone these read "Good to know", "Worth a look" and "Check this".
- The limits (a number and its unit) change where the check speaks up. A changed limit is marked, and goes back with Reset.
- Applies to picks the equipment it runs on.
- Why on? or Why off? says why StartupSend set it that way and where the number comes from.
Every change saves at once, with Undo in the message that follows. Reset all to StartupSend defaults puts every built-in check back and leaves your own checks alone.
Your own checks
Hold every report to your company's standards: a photo you always want, a filter rating, a checklist answer, a reading inside your limits. Start from an example or choose Add your own check, then three steps:
- What it applies to: all equipment or only some types, and what to look at: fields whose name has some words, a kind of reading, every field in a section, or the photos. The line under it says what it matches on real sheets.
- What to check: filled in before finishing, at least or at most a number, between two numbers, must be or must not be a value, a number of photos, or within a percent of another reading.
- What it says: its name, the message the tech sees, and Note, Warning or Alert.
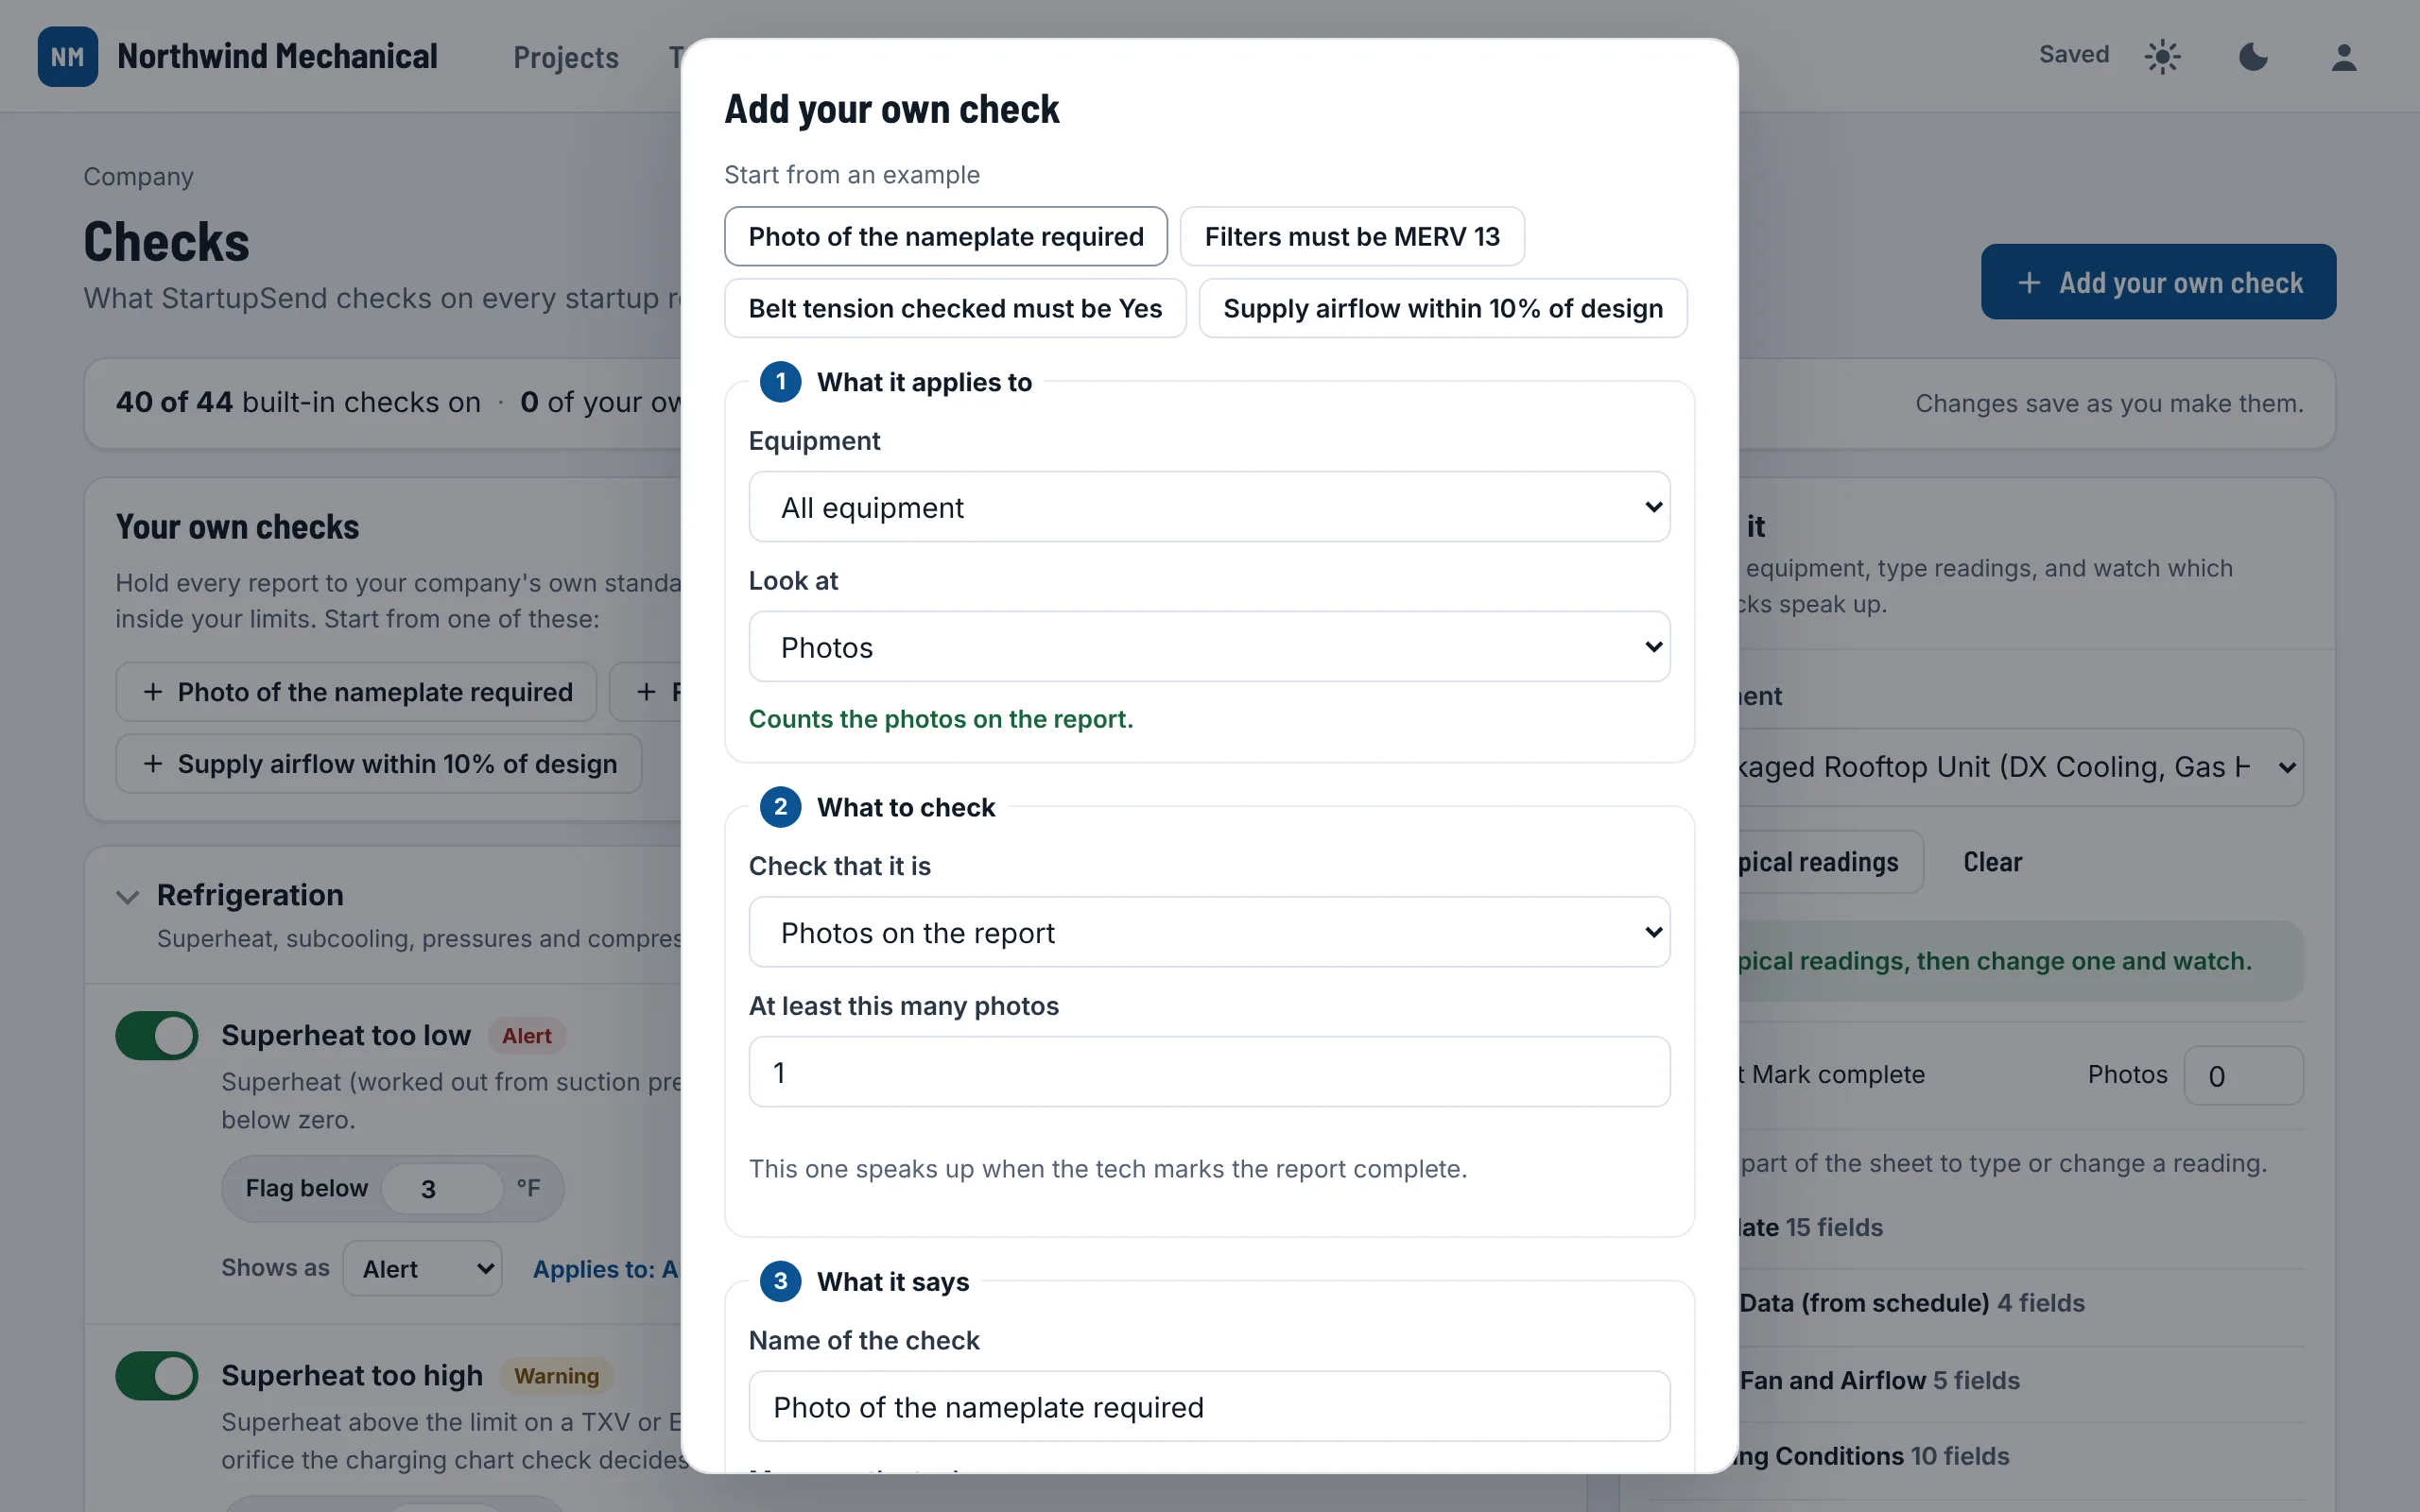
Edit, copy or remove your checks from their row. A removed check waits under Removed and can be restored.
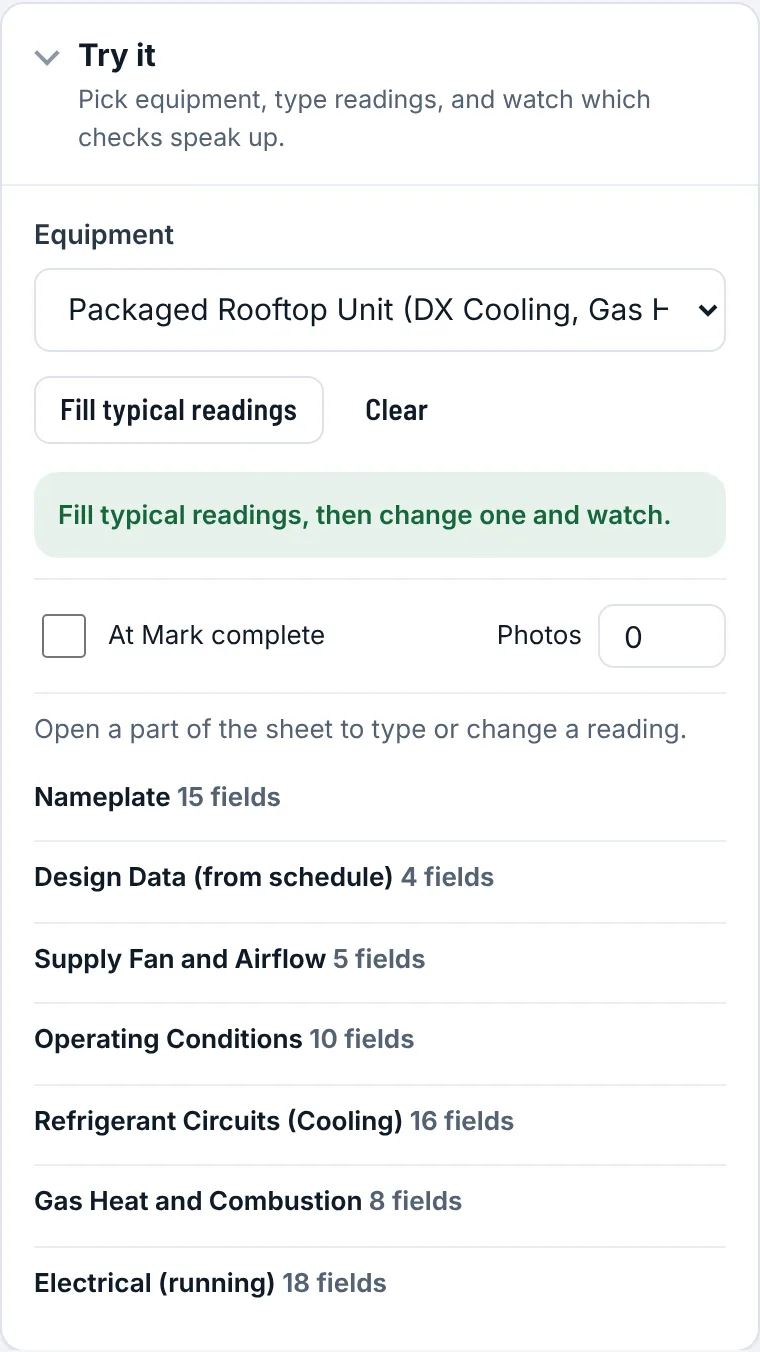
Try it
Try it sits beside the checks: pick equipment, type readings, and watch which checks speak up. It changes no report.
AI checks
AI is included in every plan. A group of AI checks reads the photos and notes: the nameplate photo can be read, a photo shows the unit's own tag, a filter photo shows a dirty filter, the belt guard is in the fan photo, the notes describe an open problem on a complete report, the notes and readings disagree. They are all off until you turn them on. You can also write your own in plain words, such as "Every RTU needs a photo of the condensate trap". They run when the tech finishes the visit and when the report is reviewed, never while typing. Each AI-checked report counts as a quarter of a tag photo against your plan's monthly allowance. If StartupSend has switched AI off for your company, the group shows as locked.
Assigning work #
StartupSend does not hand units to one tech. Every field tech in your company sees every job that has reports to fill, on their My work screen. The office decides who goes where, as it does today, and StartupSend keeps the work in front of them.
- Add each tech on Team with the Field role (see People and roles). They get a sign-in link by email, or you copy it and text it.
- Make the project and add its equipment list. It shows on every tech's My work at once, with what is left by type ("6 RTUs, 2 done").
- Tell the crew which job, or which units, are theirs. Locations on the units ("Roof, north") help them find their part.
- The first tech to type on a report gets their name and the date on it. The Reports list and the Table show who did each one.
Reports sent back to fix always sit at the top of every tech's My work, with the note, so nothing returned waits for someone to notice.
What the tech does on site #
The field tech's screens are simpler than yours: one big card per job, one step of the report at a time, big buttons that work with gloves. The field tech guide covers every step; this is what the office should know.
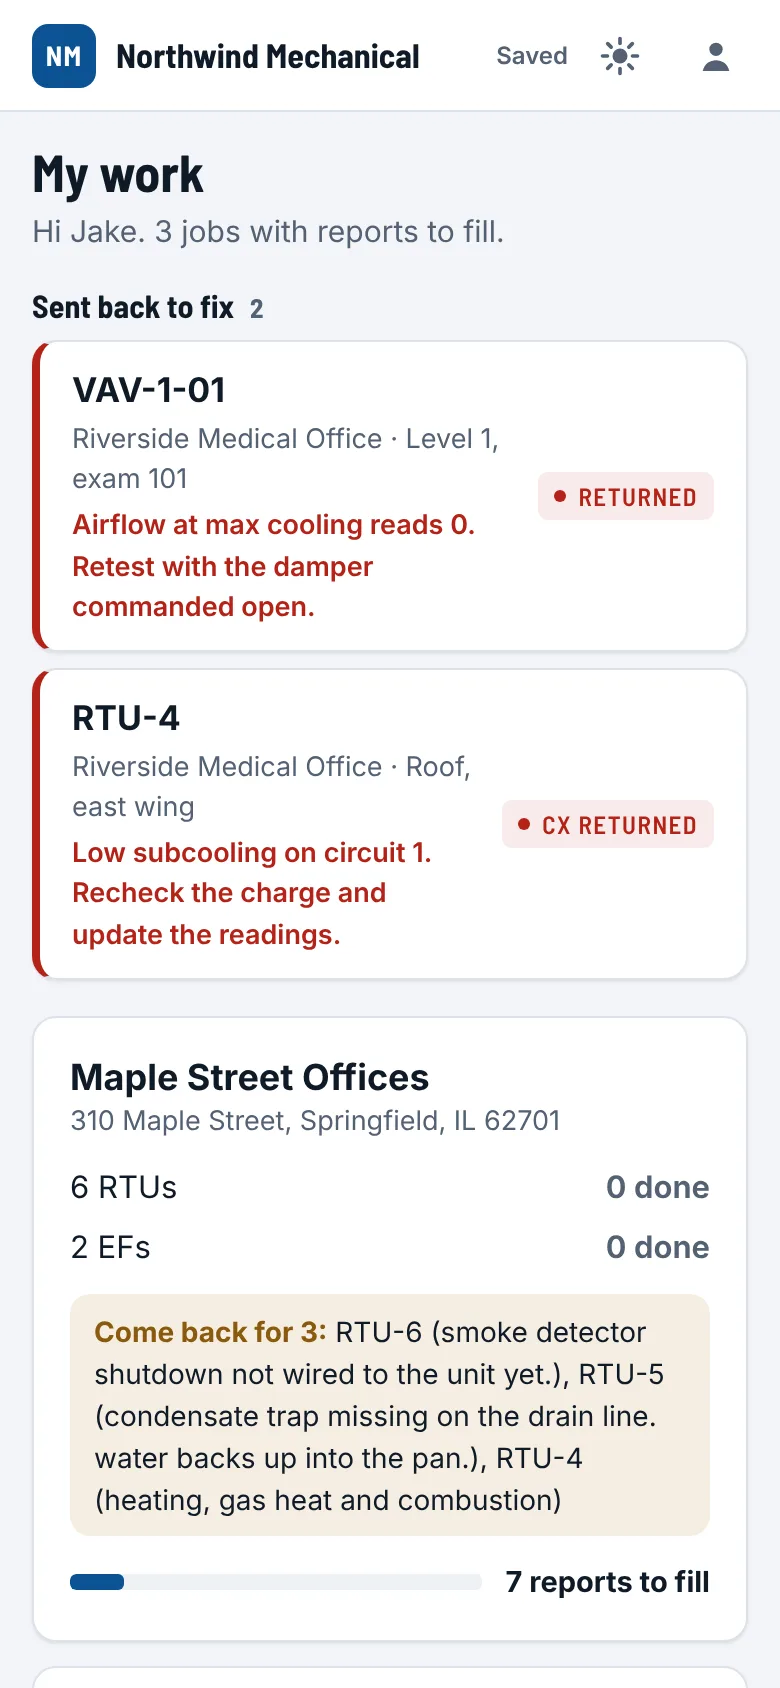
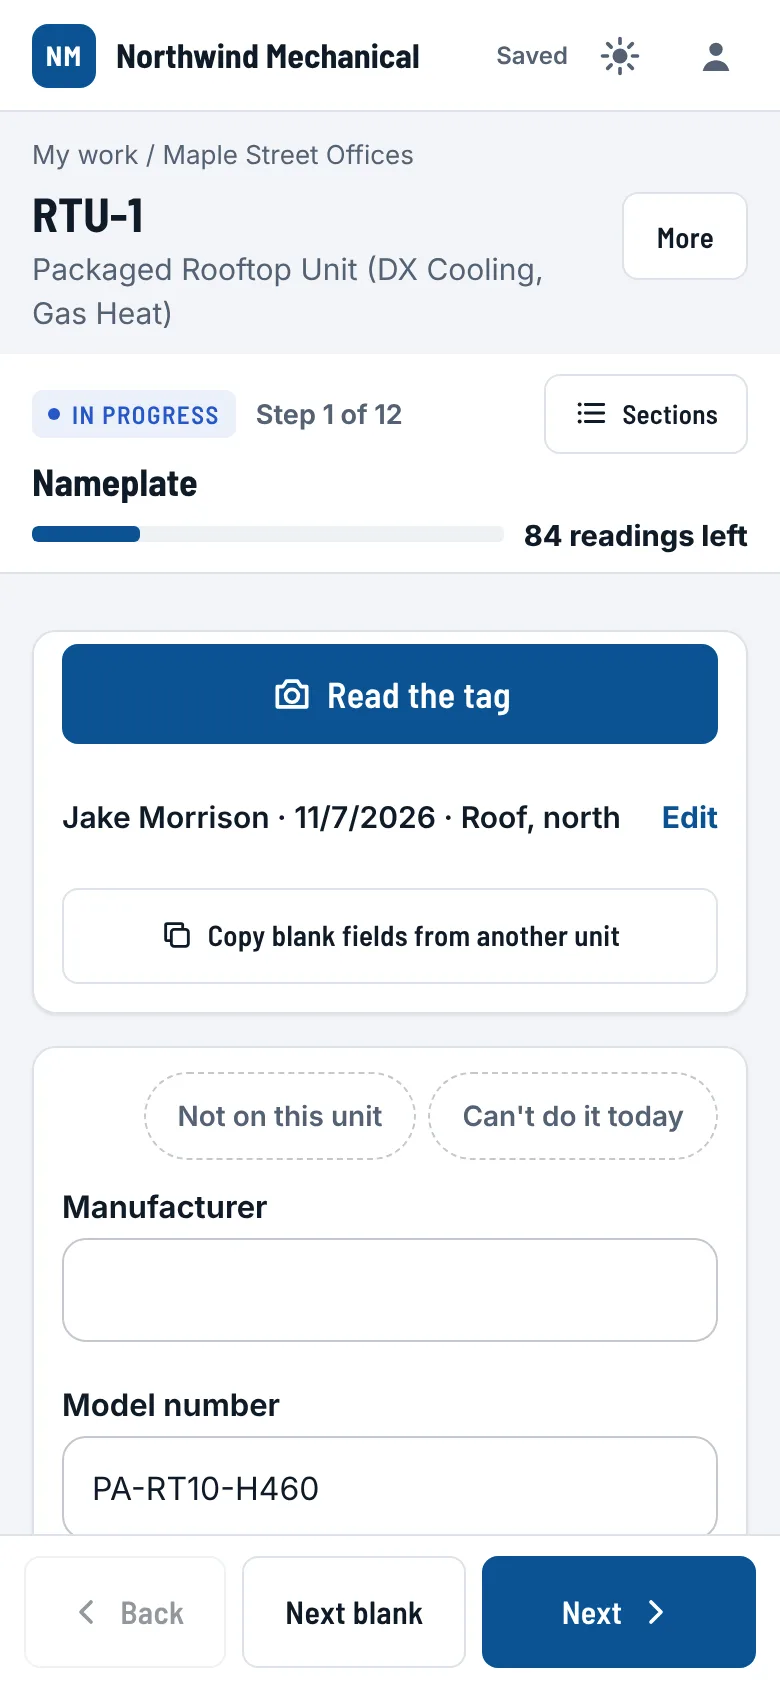
- One step at a time. Each section is a step with Back, Next blank and Next, and the count of readings left. On a computer the whole form shows on one page, with the sections at the side; One at a time switches.
- The tech and date fill themselves on the first entry.
- Smart fill. After the manufacturer or model is typed on one unit, StartupSend offers to fill it on the other units of the same type still blank. Values that follow the model (RLA, FLA, design airflow) go only to units with the same model number. Serial numbers, tags, locations and readings are never copied.
- Live checks. Superheat, subcooling, voltage imbalance, amps against the nameplate and temperature differences are worked out as the readings go in, with a "Use 11 °F" button to fill the result. These follow your Checks console.
- PT chart for every common refrigerant, from the refrigerant section or the menu.
- Weather fills the outdoor temperature from the job's address, if your company has it on.
- Sun mode turns the screen black on white for bright sun. The screen stays on while a report is open.
- Not on this unit marks a section or a column (circuit 2, heating) as not there. Can't do it today puts a part off to another visit with a reason ("No gas yet"). The PDF shows a part not on the unit as a heading and one quiet line.
- Add an issue records something wrong with how bad it is, who fixes it and a photo. See Open items.
- Finish this visit ends with one of three outcomes: complete, complete with open issues, or partial, needing a return visit. It lists what is still blank and the checks still open, but never stops the tech.
- Start the return visit opens the same report again for only what was left. See Return visits.
- No signal. Every entry is kept on the phone and sent when the signal comes back.
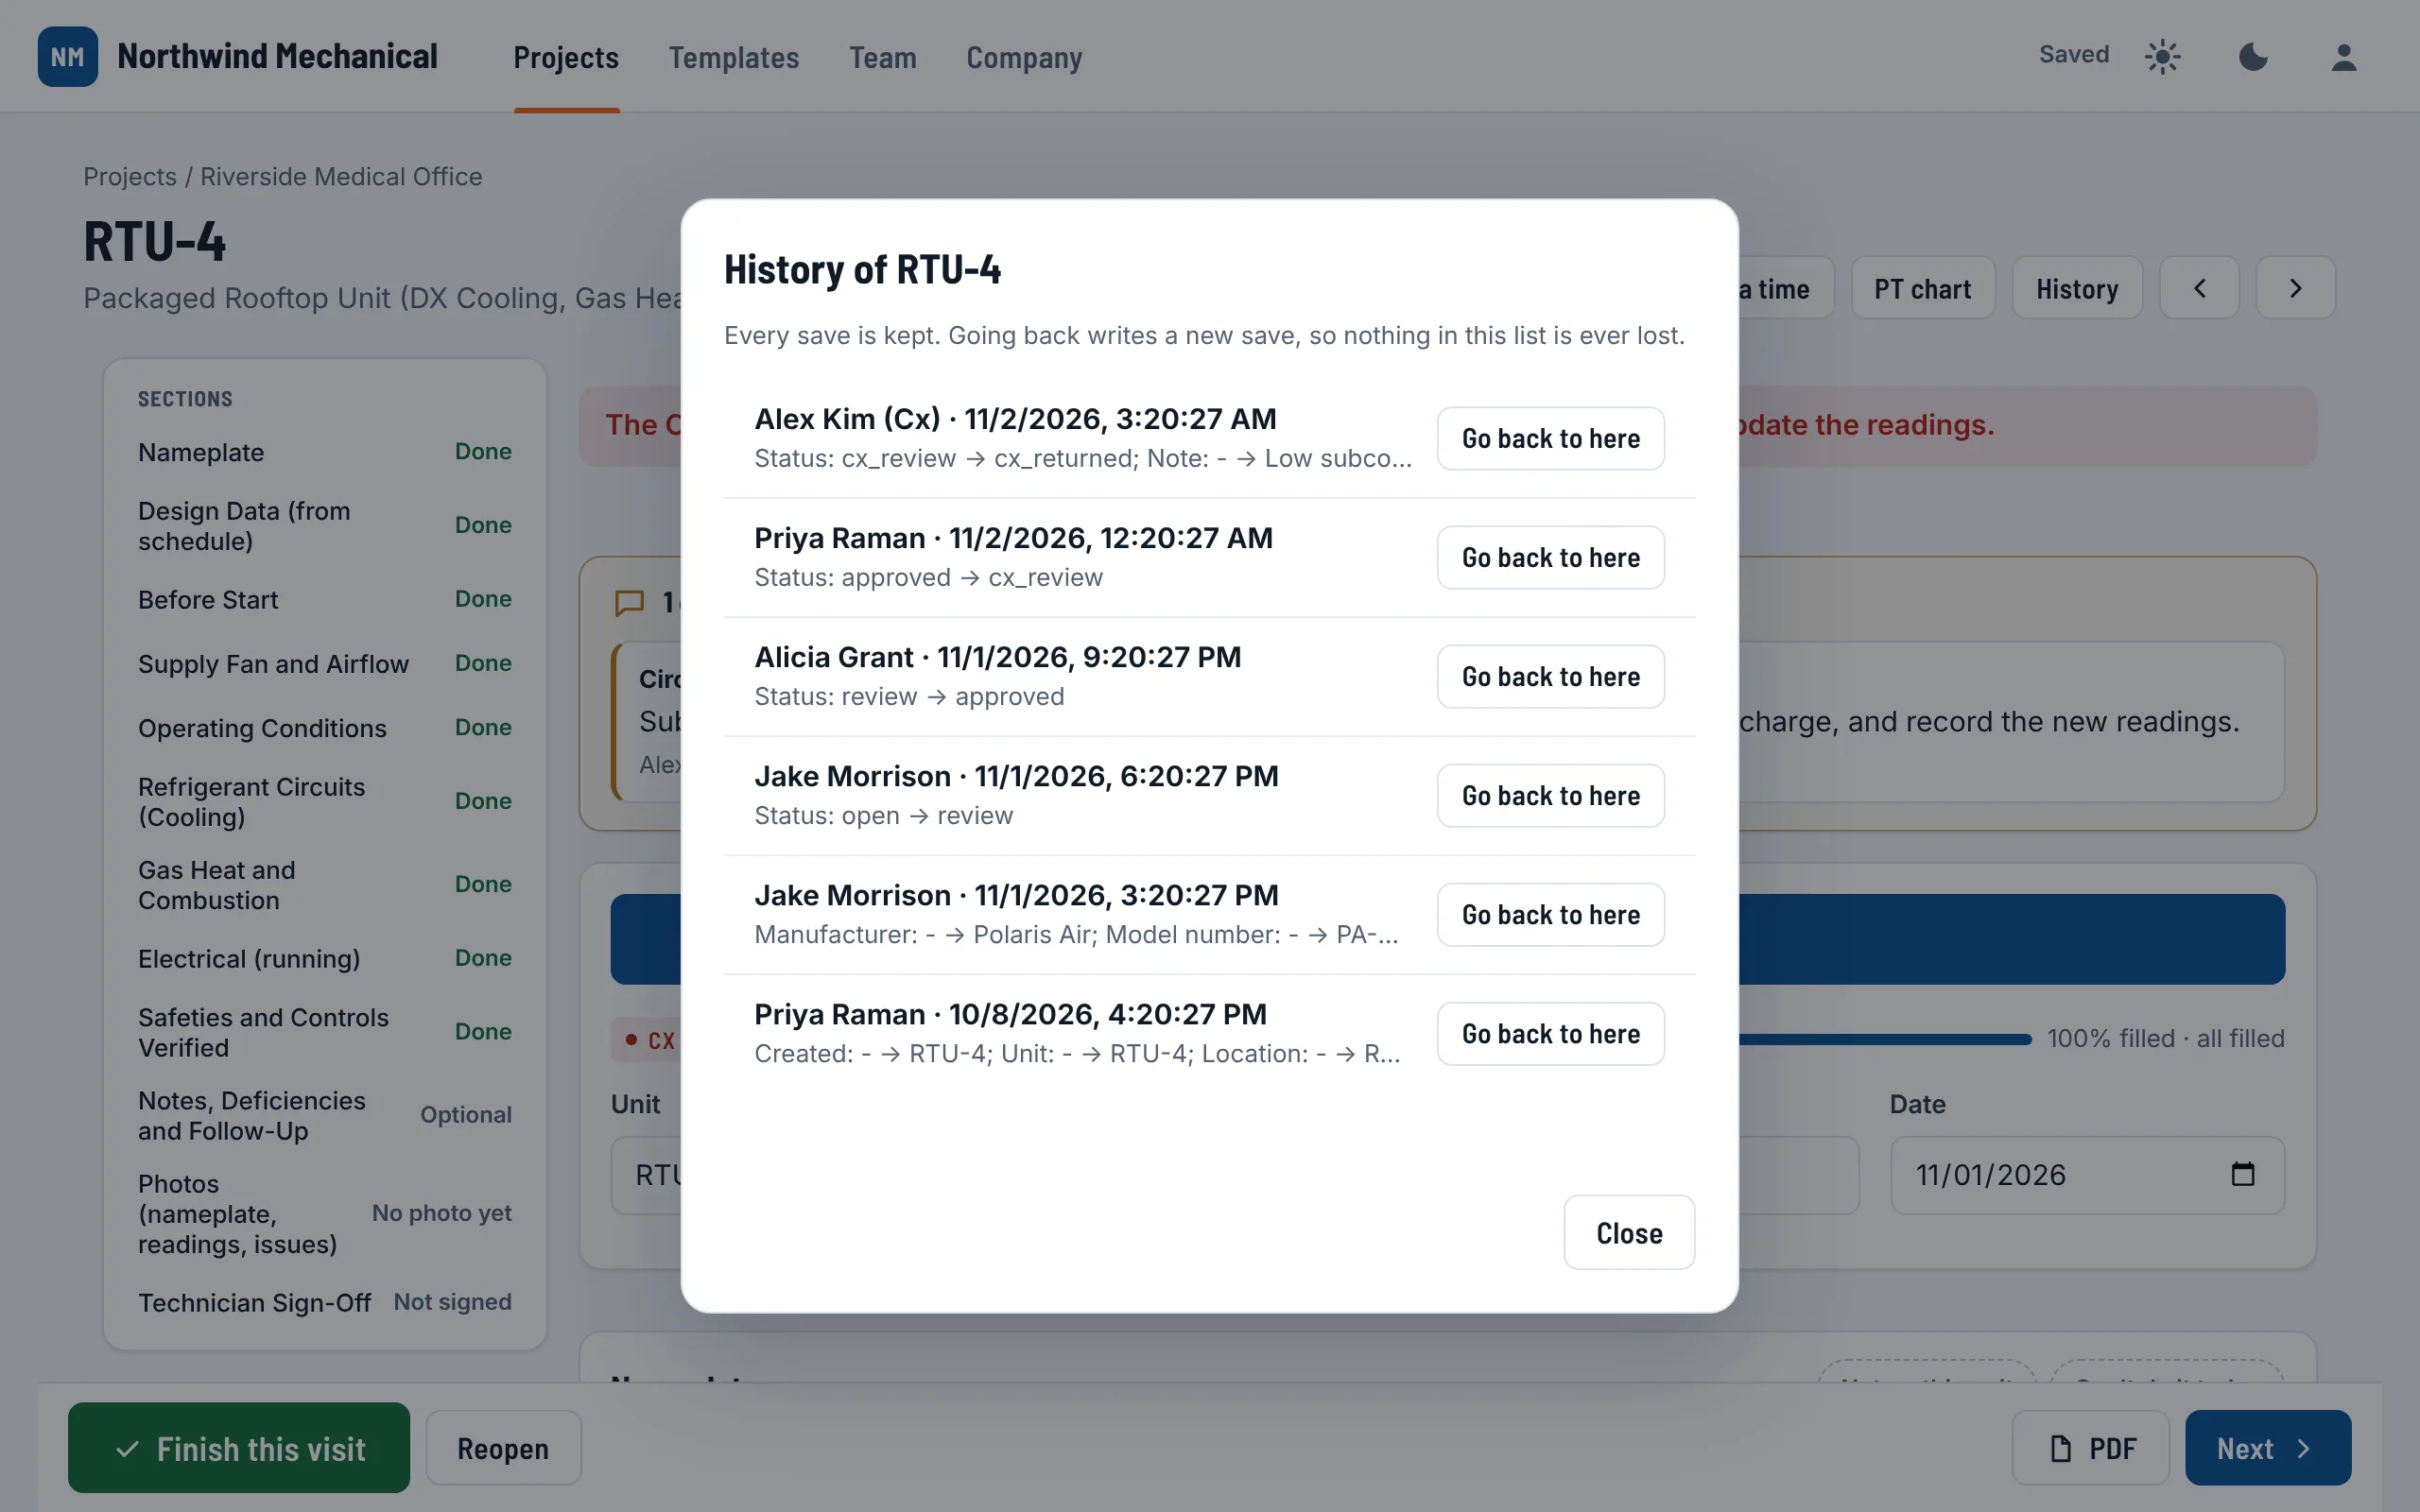
Every report keeps a full History of changes: who changed what, when, and what it was before. Admin and office can go back to any earlier save; going back is itself a new save, so nothing is lost.
Tracking the work #
- Projects: each job's card shows how many reports are done and how many wait for review, and when it last changed. Search by name, customer, number or address.
- The Reports list: the counts strip, the filters and each report's status and fill bar. See The Reports list.
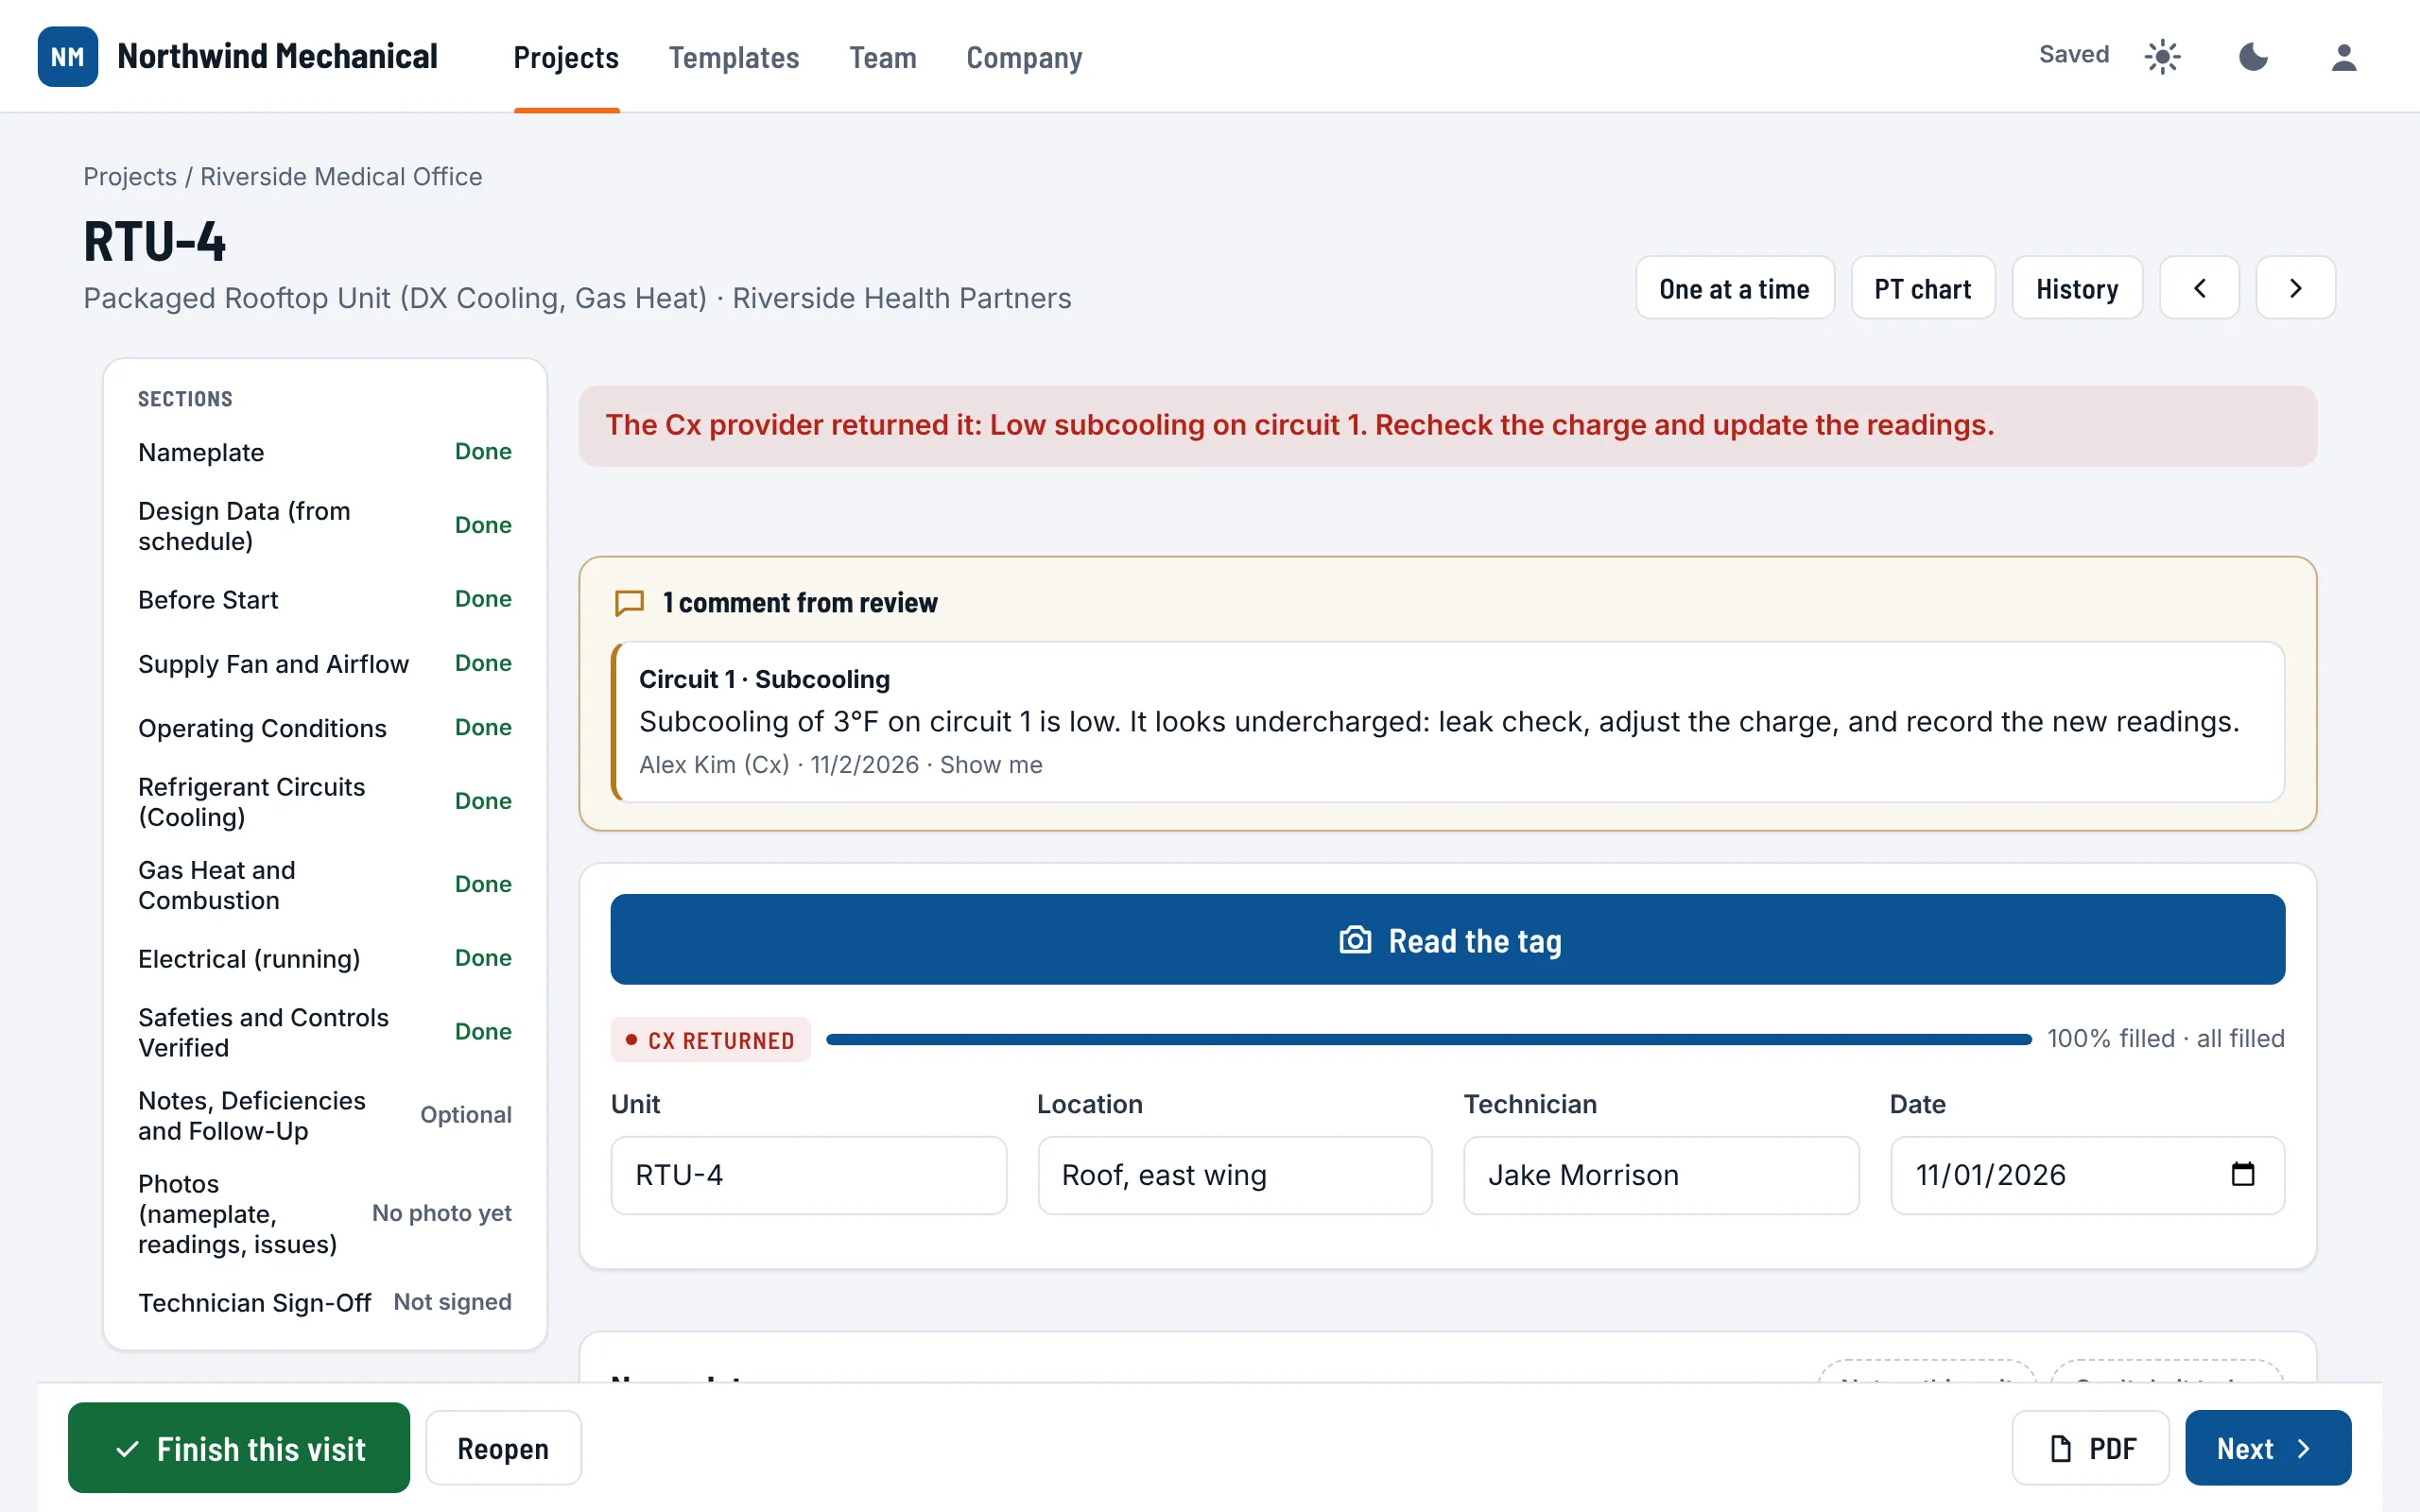
- The report header: the status, how much is filled, and the visit line, such as "Cooling done · Heating deferred (no gas yet)", with "Needs a return visit" or "Return visit 2" when that is where it stands.
- Open items and Return visits: the project's tabs for what someone must fix and what needs another trip, each with its count on the tab.
- Activity: what happened on the job, newest first: completed, returned, approved, sent, comments, review links opened, units added, the owner opening the company for support.
- History on each report: every field change, with who and when, and the values the weather or the tag photo filled.
Every report printed or sent shows the same readings you see on screen: the PDF is made from the report as it is at that moment.
Issues and return visits #
Startups do not always end complete. StartupSend keeps three things apart: how each visit ended, the open items someone must fix, and the parts left for another visit. One report per unit holds all of it, visit after visit.
How a visit ends
When the tech chooses Finish this visit, they pick one of three:
- Complete: everything on this unit is done.
- Complete, with open issues: done, but something is wrong that someone must fix.
- Partial, needs a return visit: some of it could not be done today.
StartupSend picks the likely one first: Partial when a part was put off or more than a quarter of the readings are still blank, Complete with open issues when an item is open, otherwise Complete. The tech can change it. The report still moves on as finished (to review, or ready to send, as the project's review says); the outcome prints on the report and shows in review.
Parts put off to another visit
A tech marks a section, or one column such as Heating, Can't do it today with a reason: no gas yet, no boiler water yet, no power or temporary power only, no water flow, too cold to run cooling, too warm to test heating, controls not ready, waiting on parts, or their own words. What was typed is kept, and that part stops counting until it is done.
Open items: the issues log
An issue is something wrong on a unit that someone must fix. A tech (or the office) adds one from a section (Something wrong here? Add an issue), from a No on a checklist (Someone must fix it: add an issue), from the report's Open items card, or from the finish screen. Each issue says:
- What is wrong, and which check it is about. A check with an issue on it is marked No.
- How bad: High (stops the startup or is unsafe), Normal (needs fixing before the job is done) or Low (small, fix when you can).
- Who fixes it: the mechanical contractor, controls, electrical, the GC, the owner, or someone else by name.
- A photo, if the tech takes one.
- Come back to check it: ticked, it goes on the Return visits list.
Resolve asks how it was fixed or who checked it (with ready-made notes such as "Fixed and checked."), and takes a photo of the fix if you have one. A resolved item can be reopened. Change edits an item; Remove this issue takes one raised by mistake off the list, with Undo. Nothing is deleted.
The project's Open items tab lists every issue on the job, worst first. The strip counts the open ones, the high ones, the resolved ones and the units with open items. Filter by open, resolved or all, by how bad, and by who fixes it, so you can send the electrician their list.
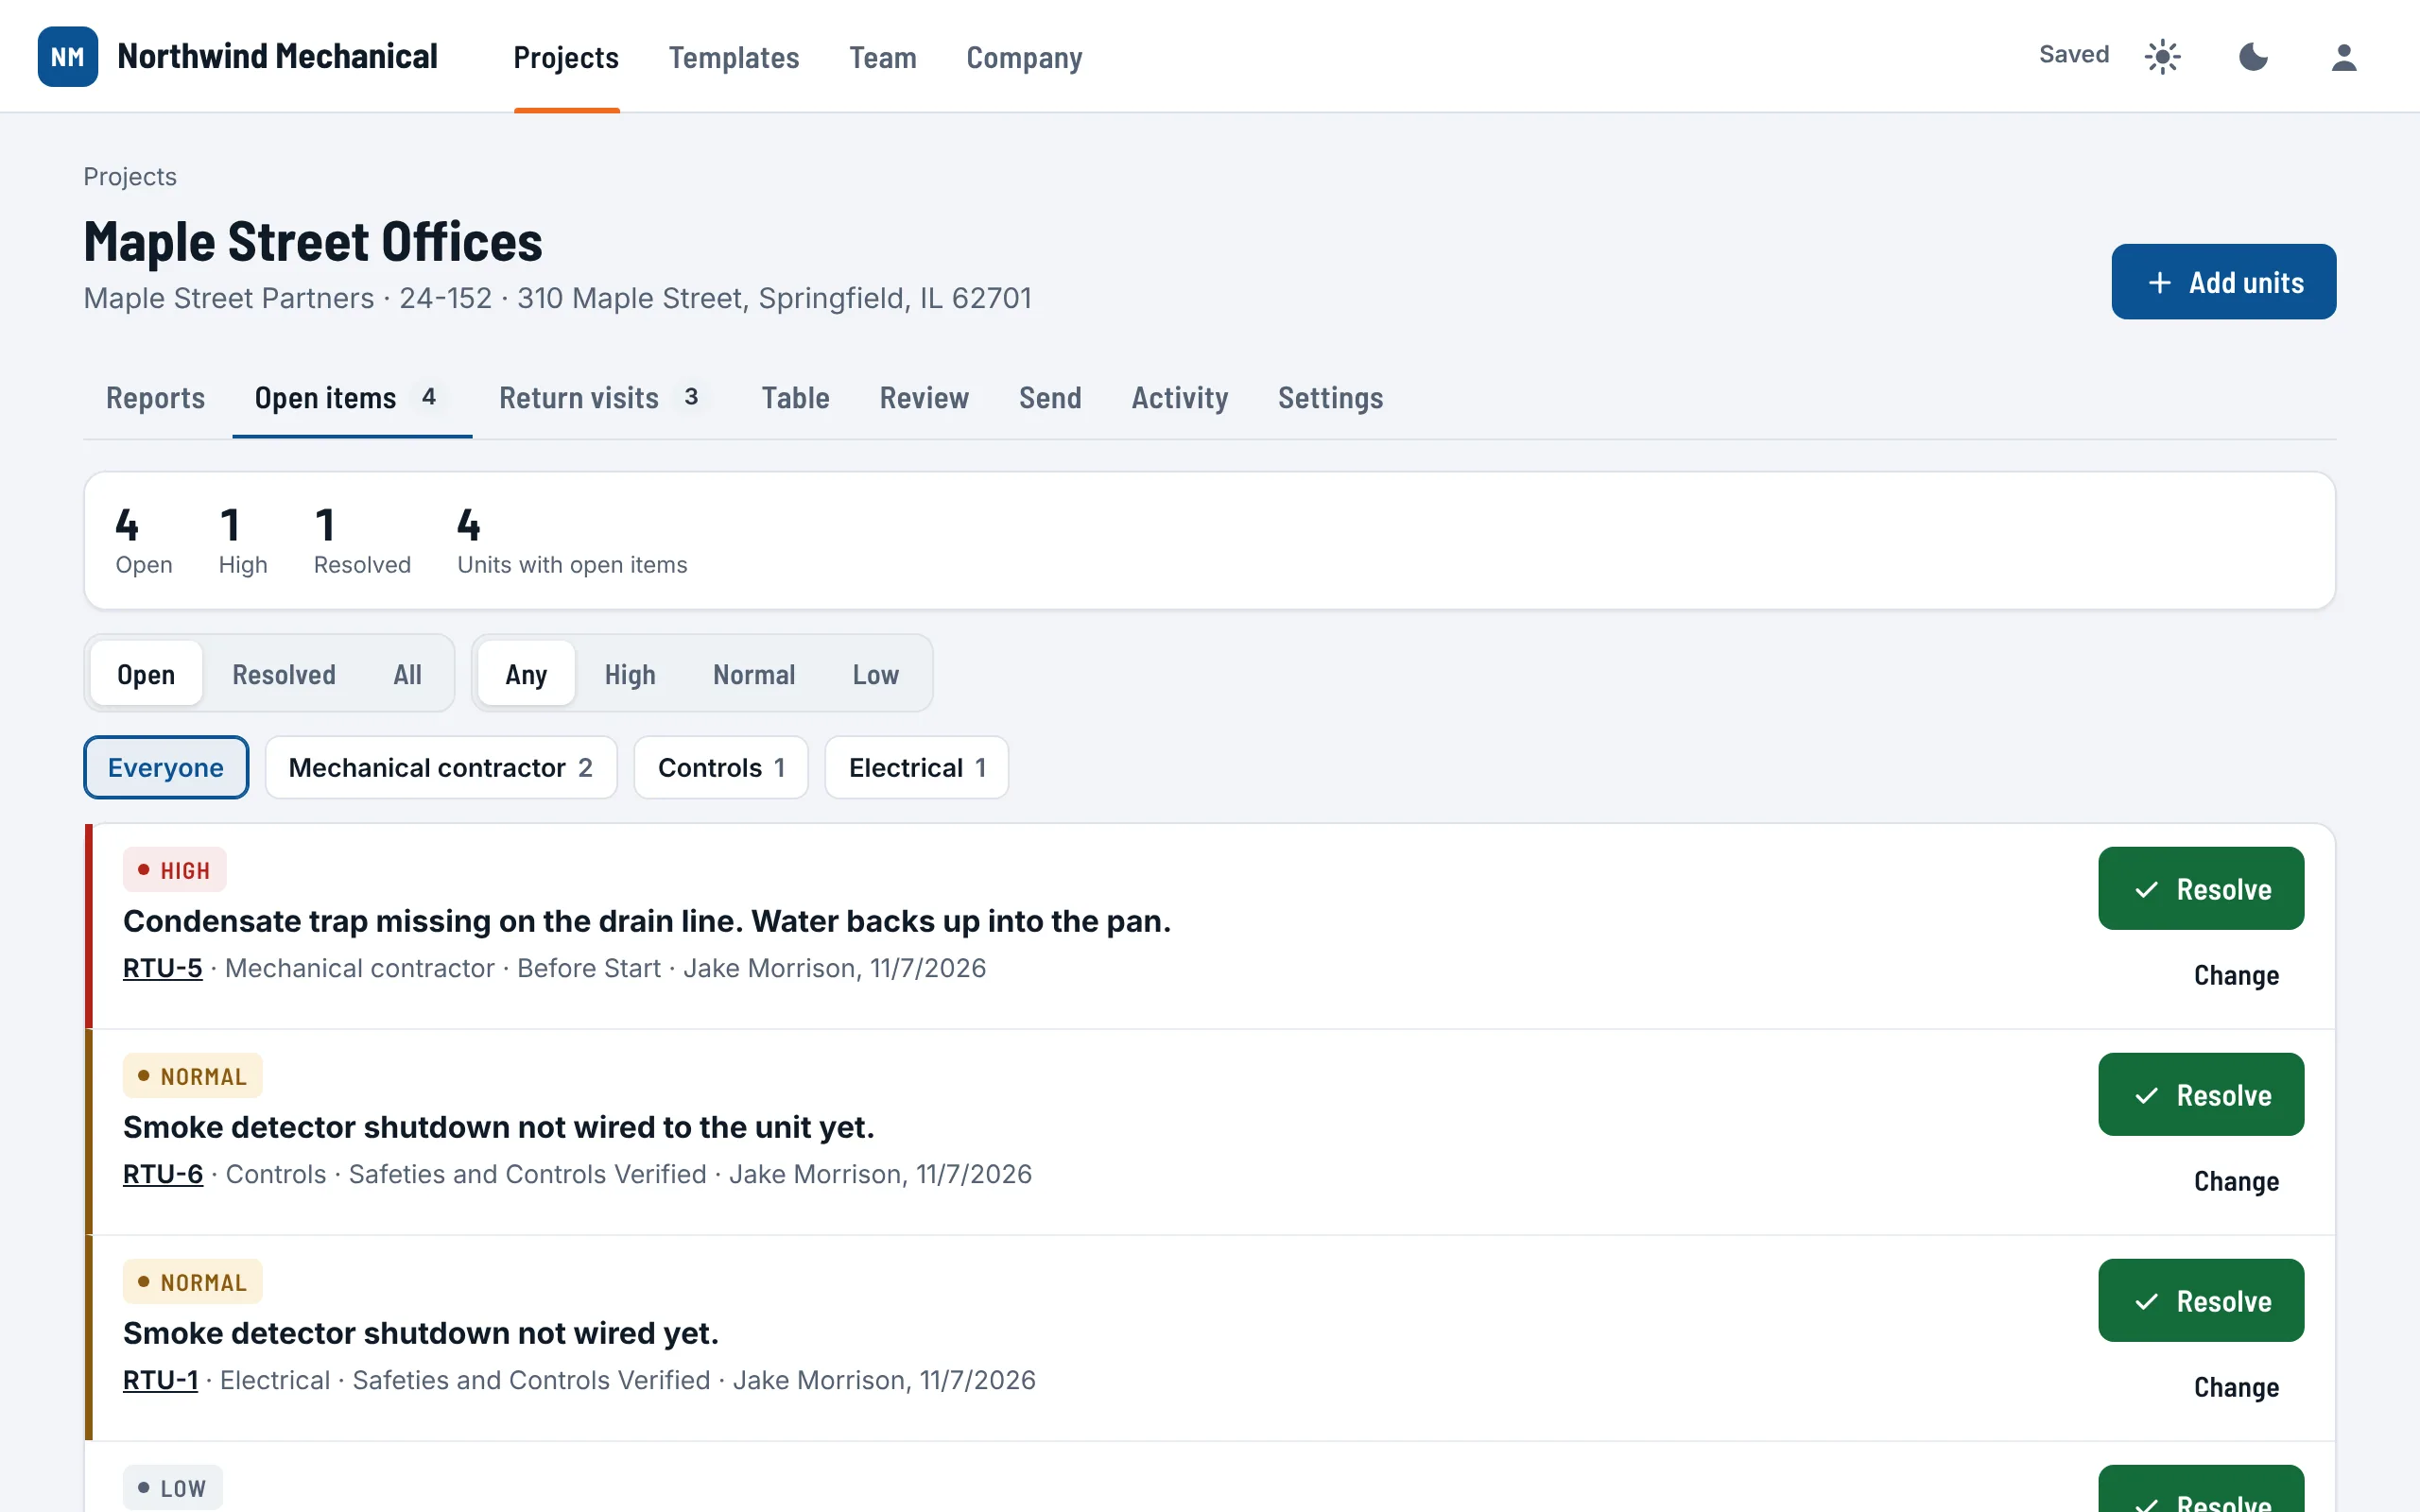
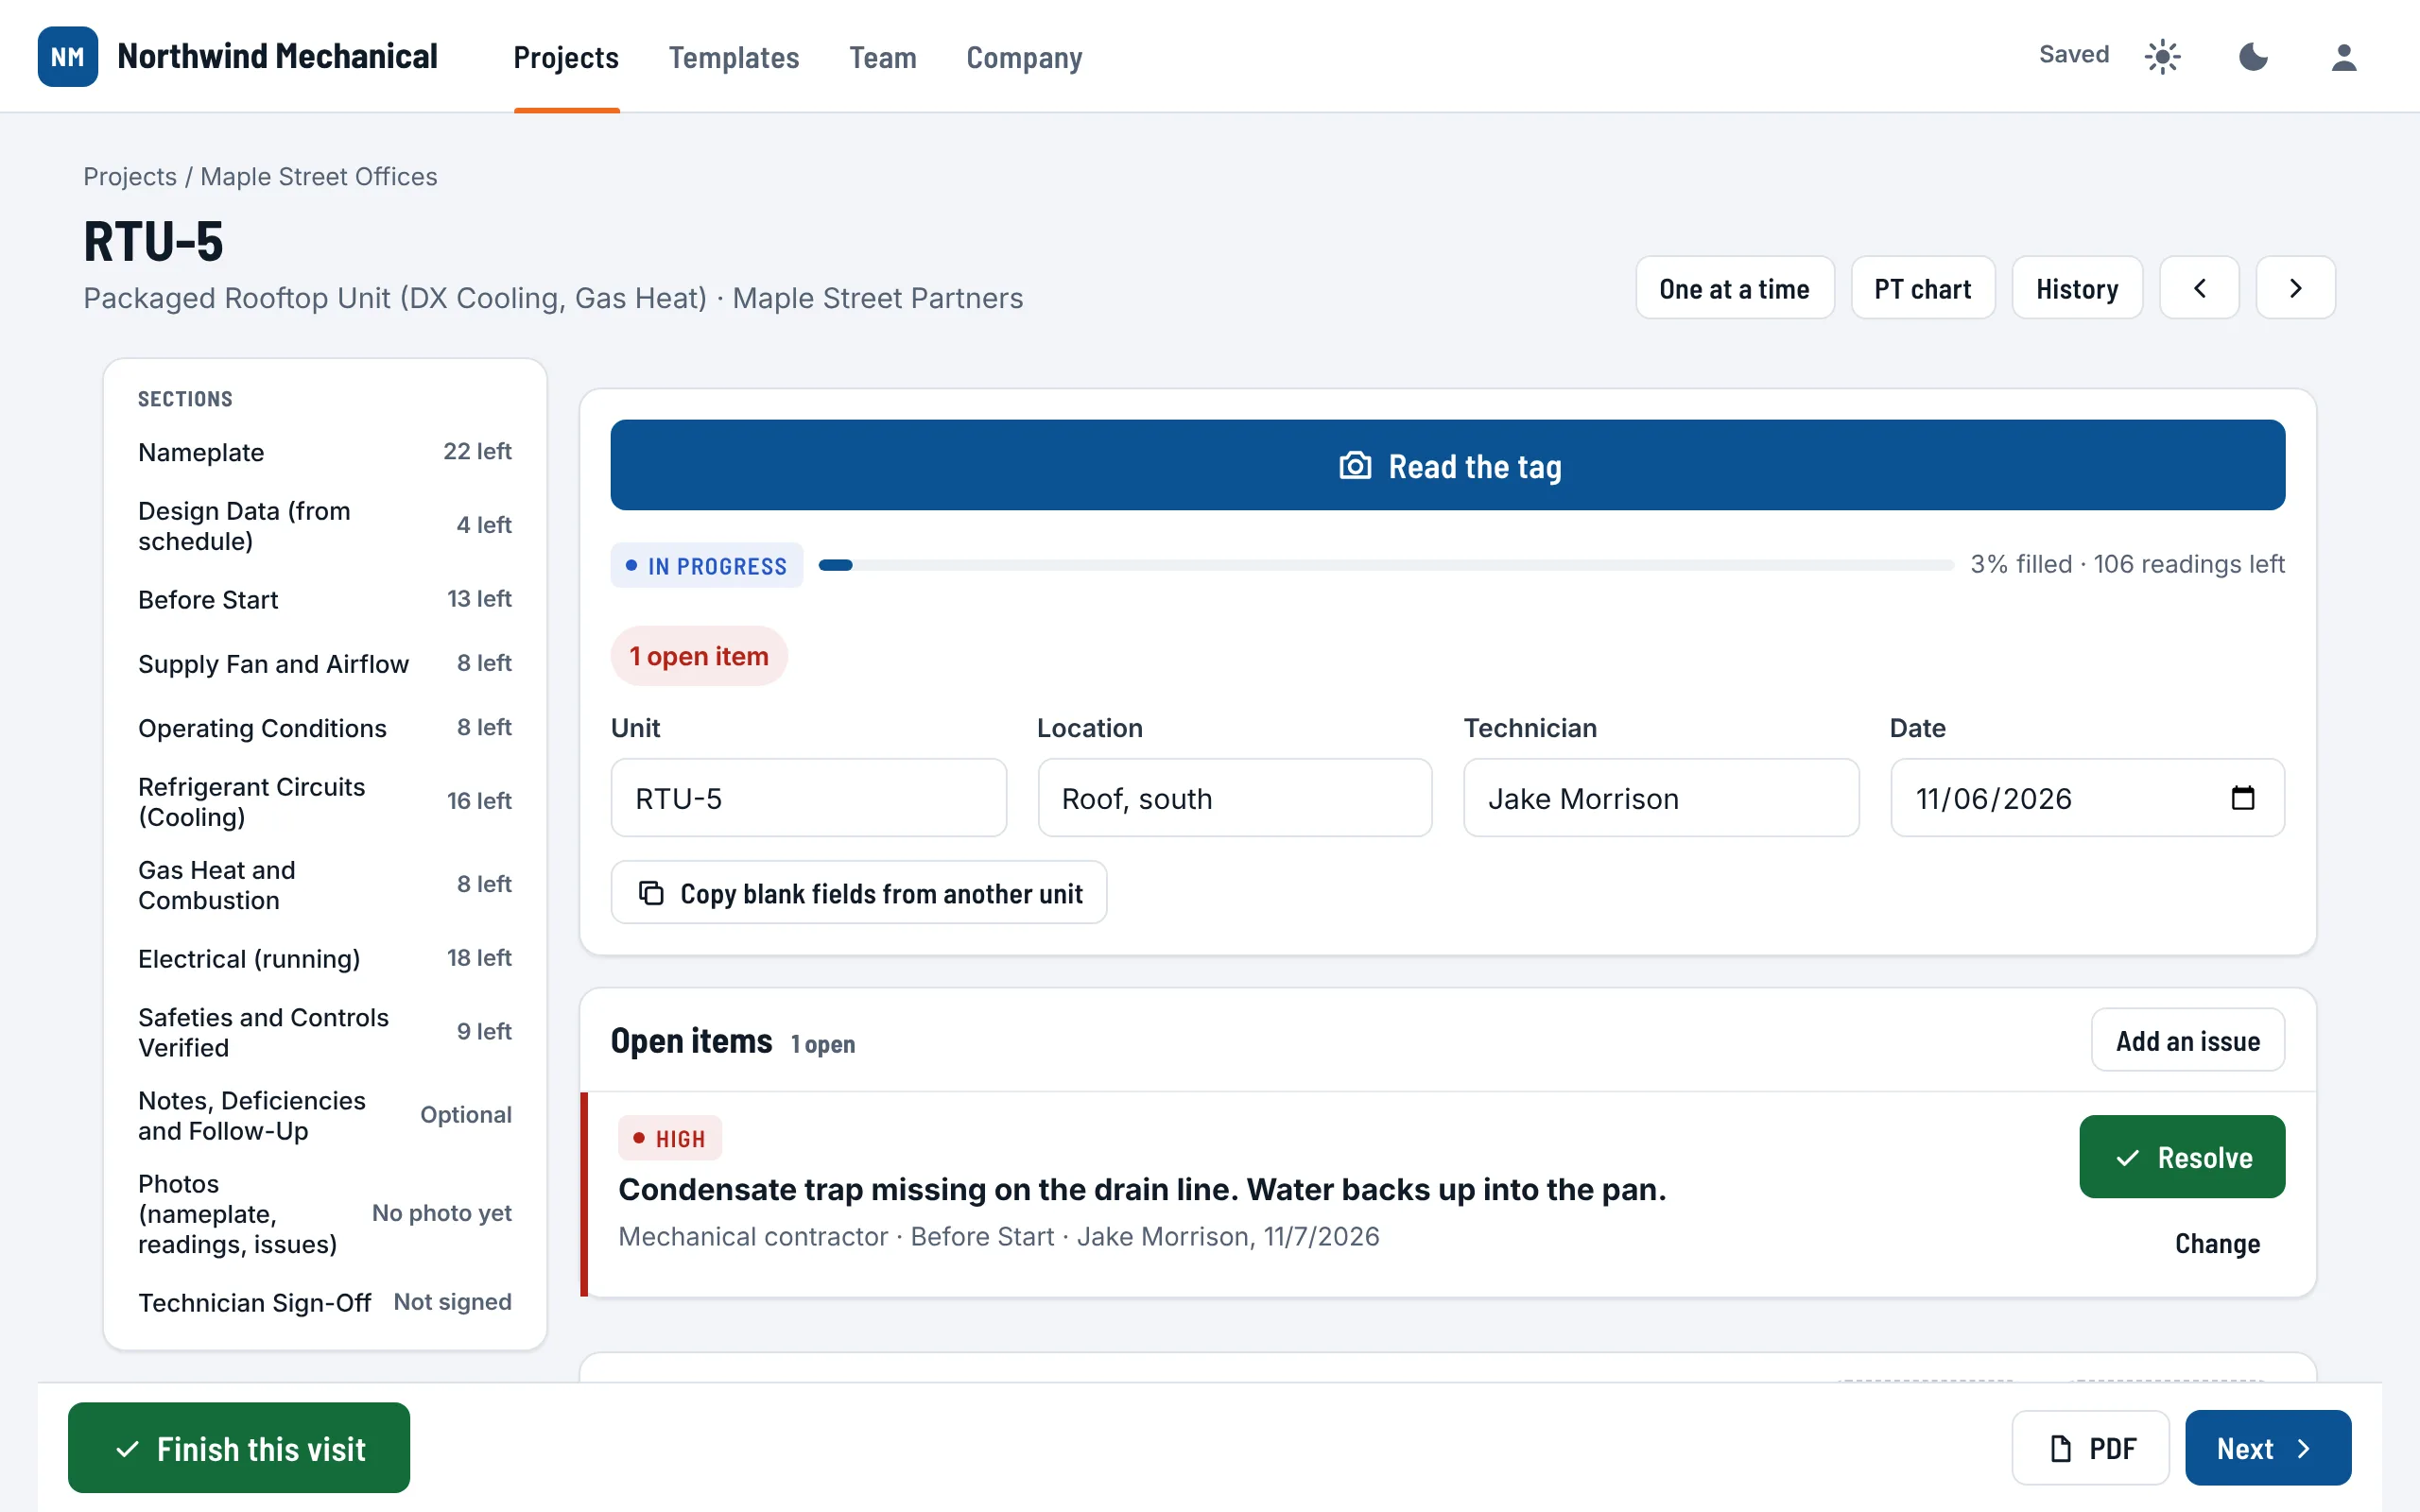
On the report itself the open items sit in their own card and inside the section they are about.
Return visits
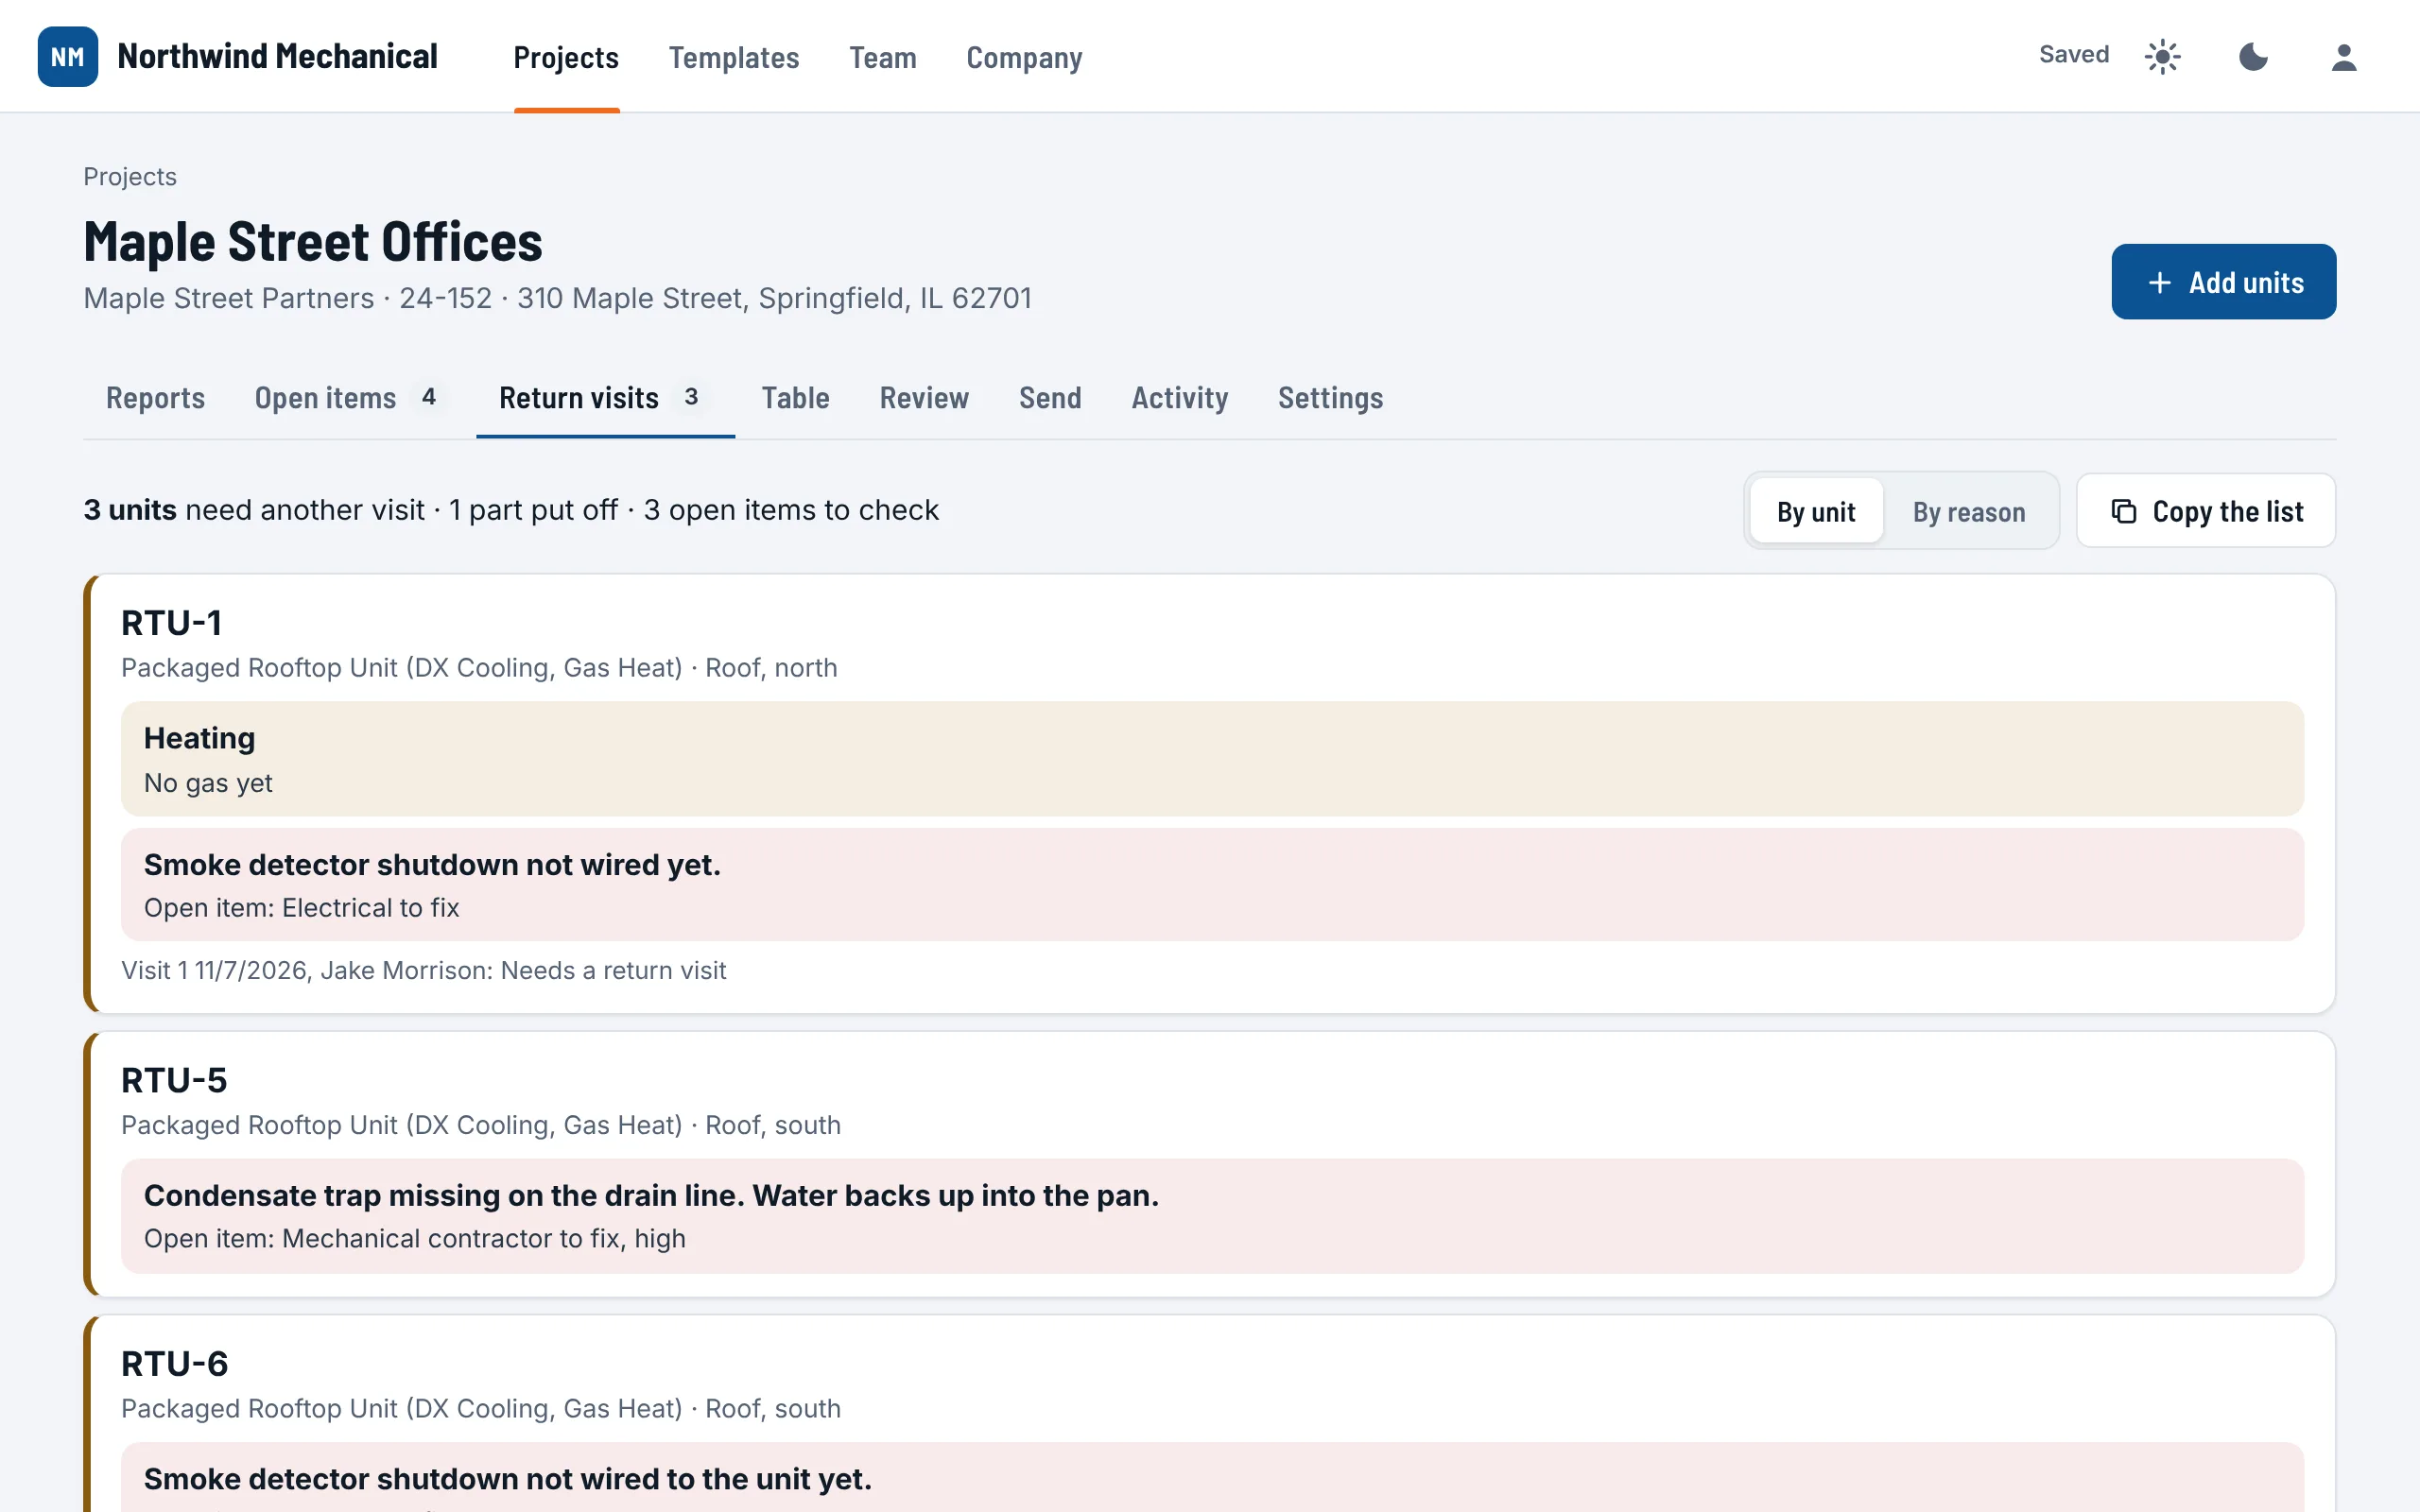
The project's Return visits tab is the list to plan the next trip from: every unit that needs another visit, and why. A part put off with its reason, an open item to come back and check, a visit that ended partial, or a return visit already under way, with the last visit's date and tech.
- By unit or By reason ("No gas yet: RTU-1, RTU-4").
- Copy the list copies it as plain text to paste into a message or an email to the crew.
- The Reports list marks each of these units Needs a return visit (or Return visit under way) beside its status.
On the phone, the job shows the same list as Come back for, and the unit opens at a card that says what is left, with Start the return visit.
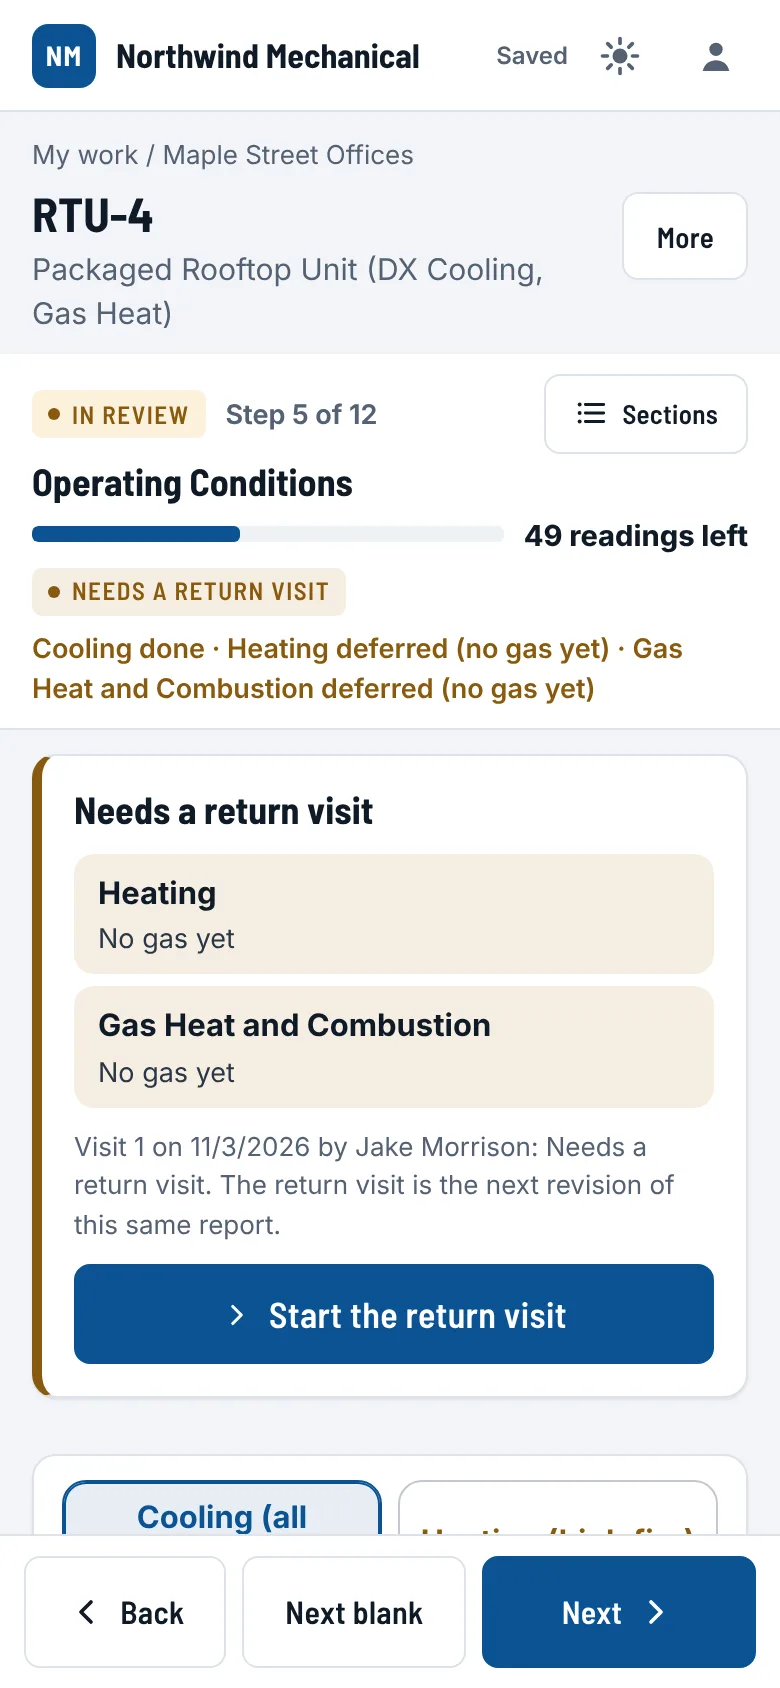
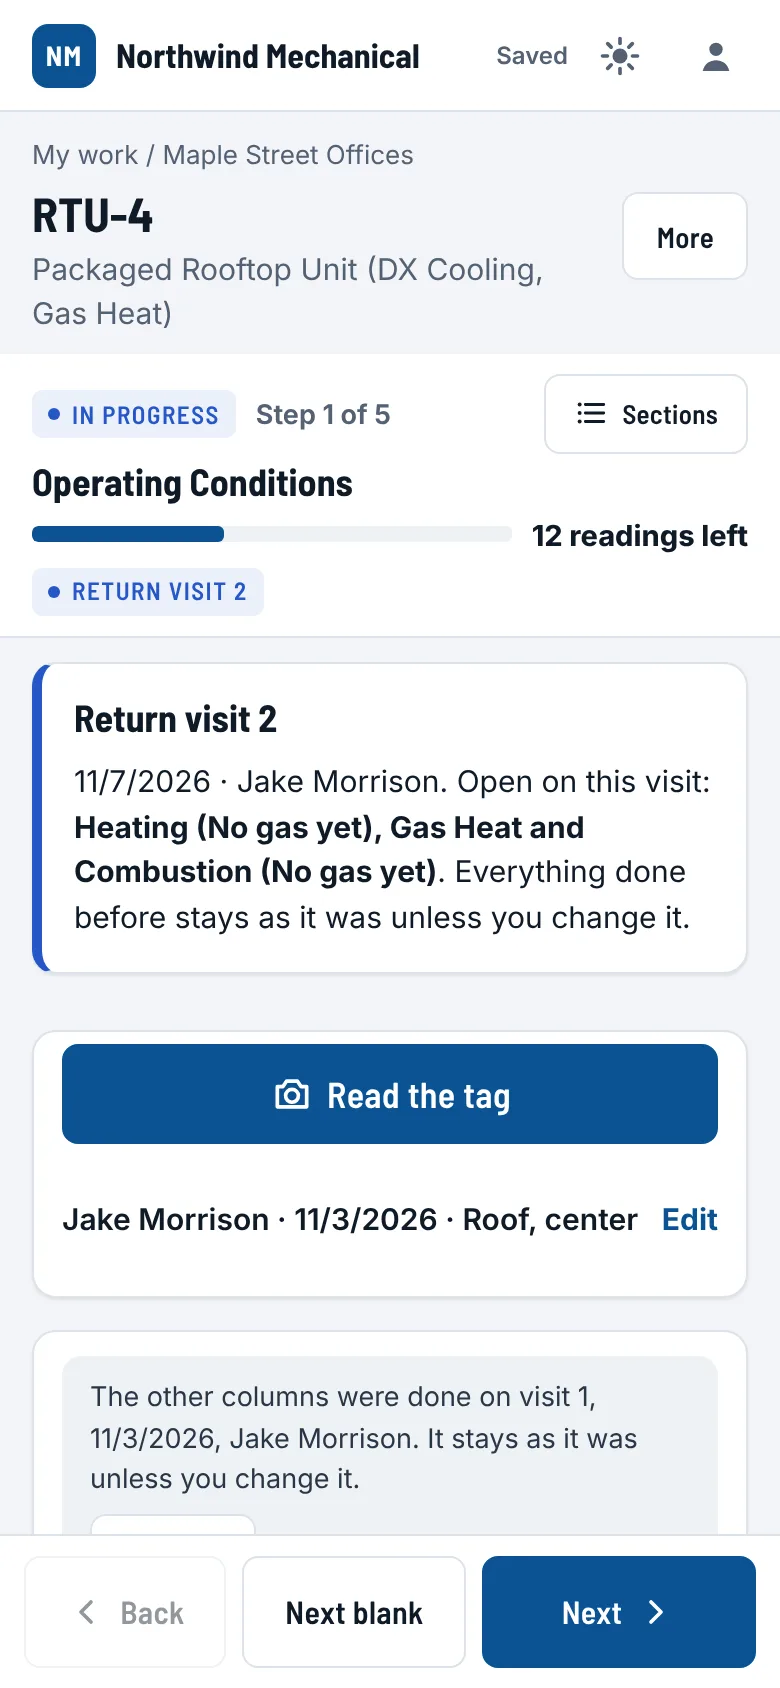
- Start the return visit opens the next visit of the same report. Only the parts put off open; everything done before stays as it was and is listed as Done before.
- Anything done before can still be changed with Change it. The change shows on the report as made on this visit, and the old value stays in the history.
- The tech signs for this visit; earlier visits keep their own signatures. Then Finish this visit, as always.
- Started one by mistake? Undo in the message right after takes it back, and nothing changes.
- On a report that is approved, with the Cx provider or sent, a tech can start a return visit only for parts put off or open items to check. Any other change is the office's: Reopen, with a reason.
One report, revised by each visit
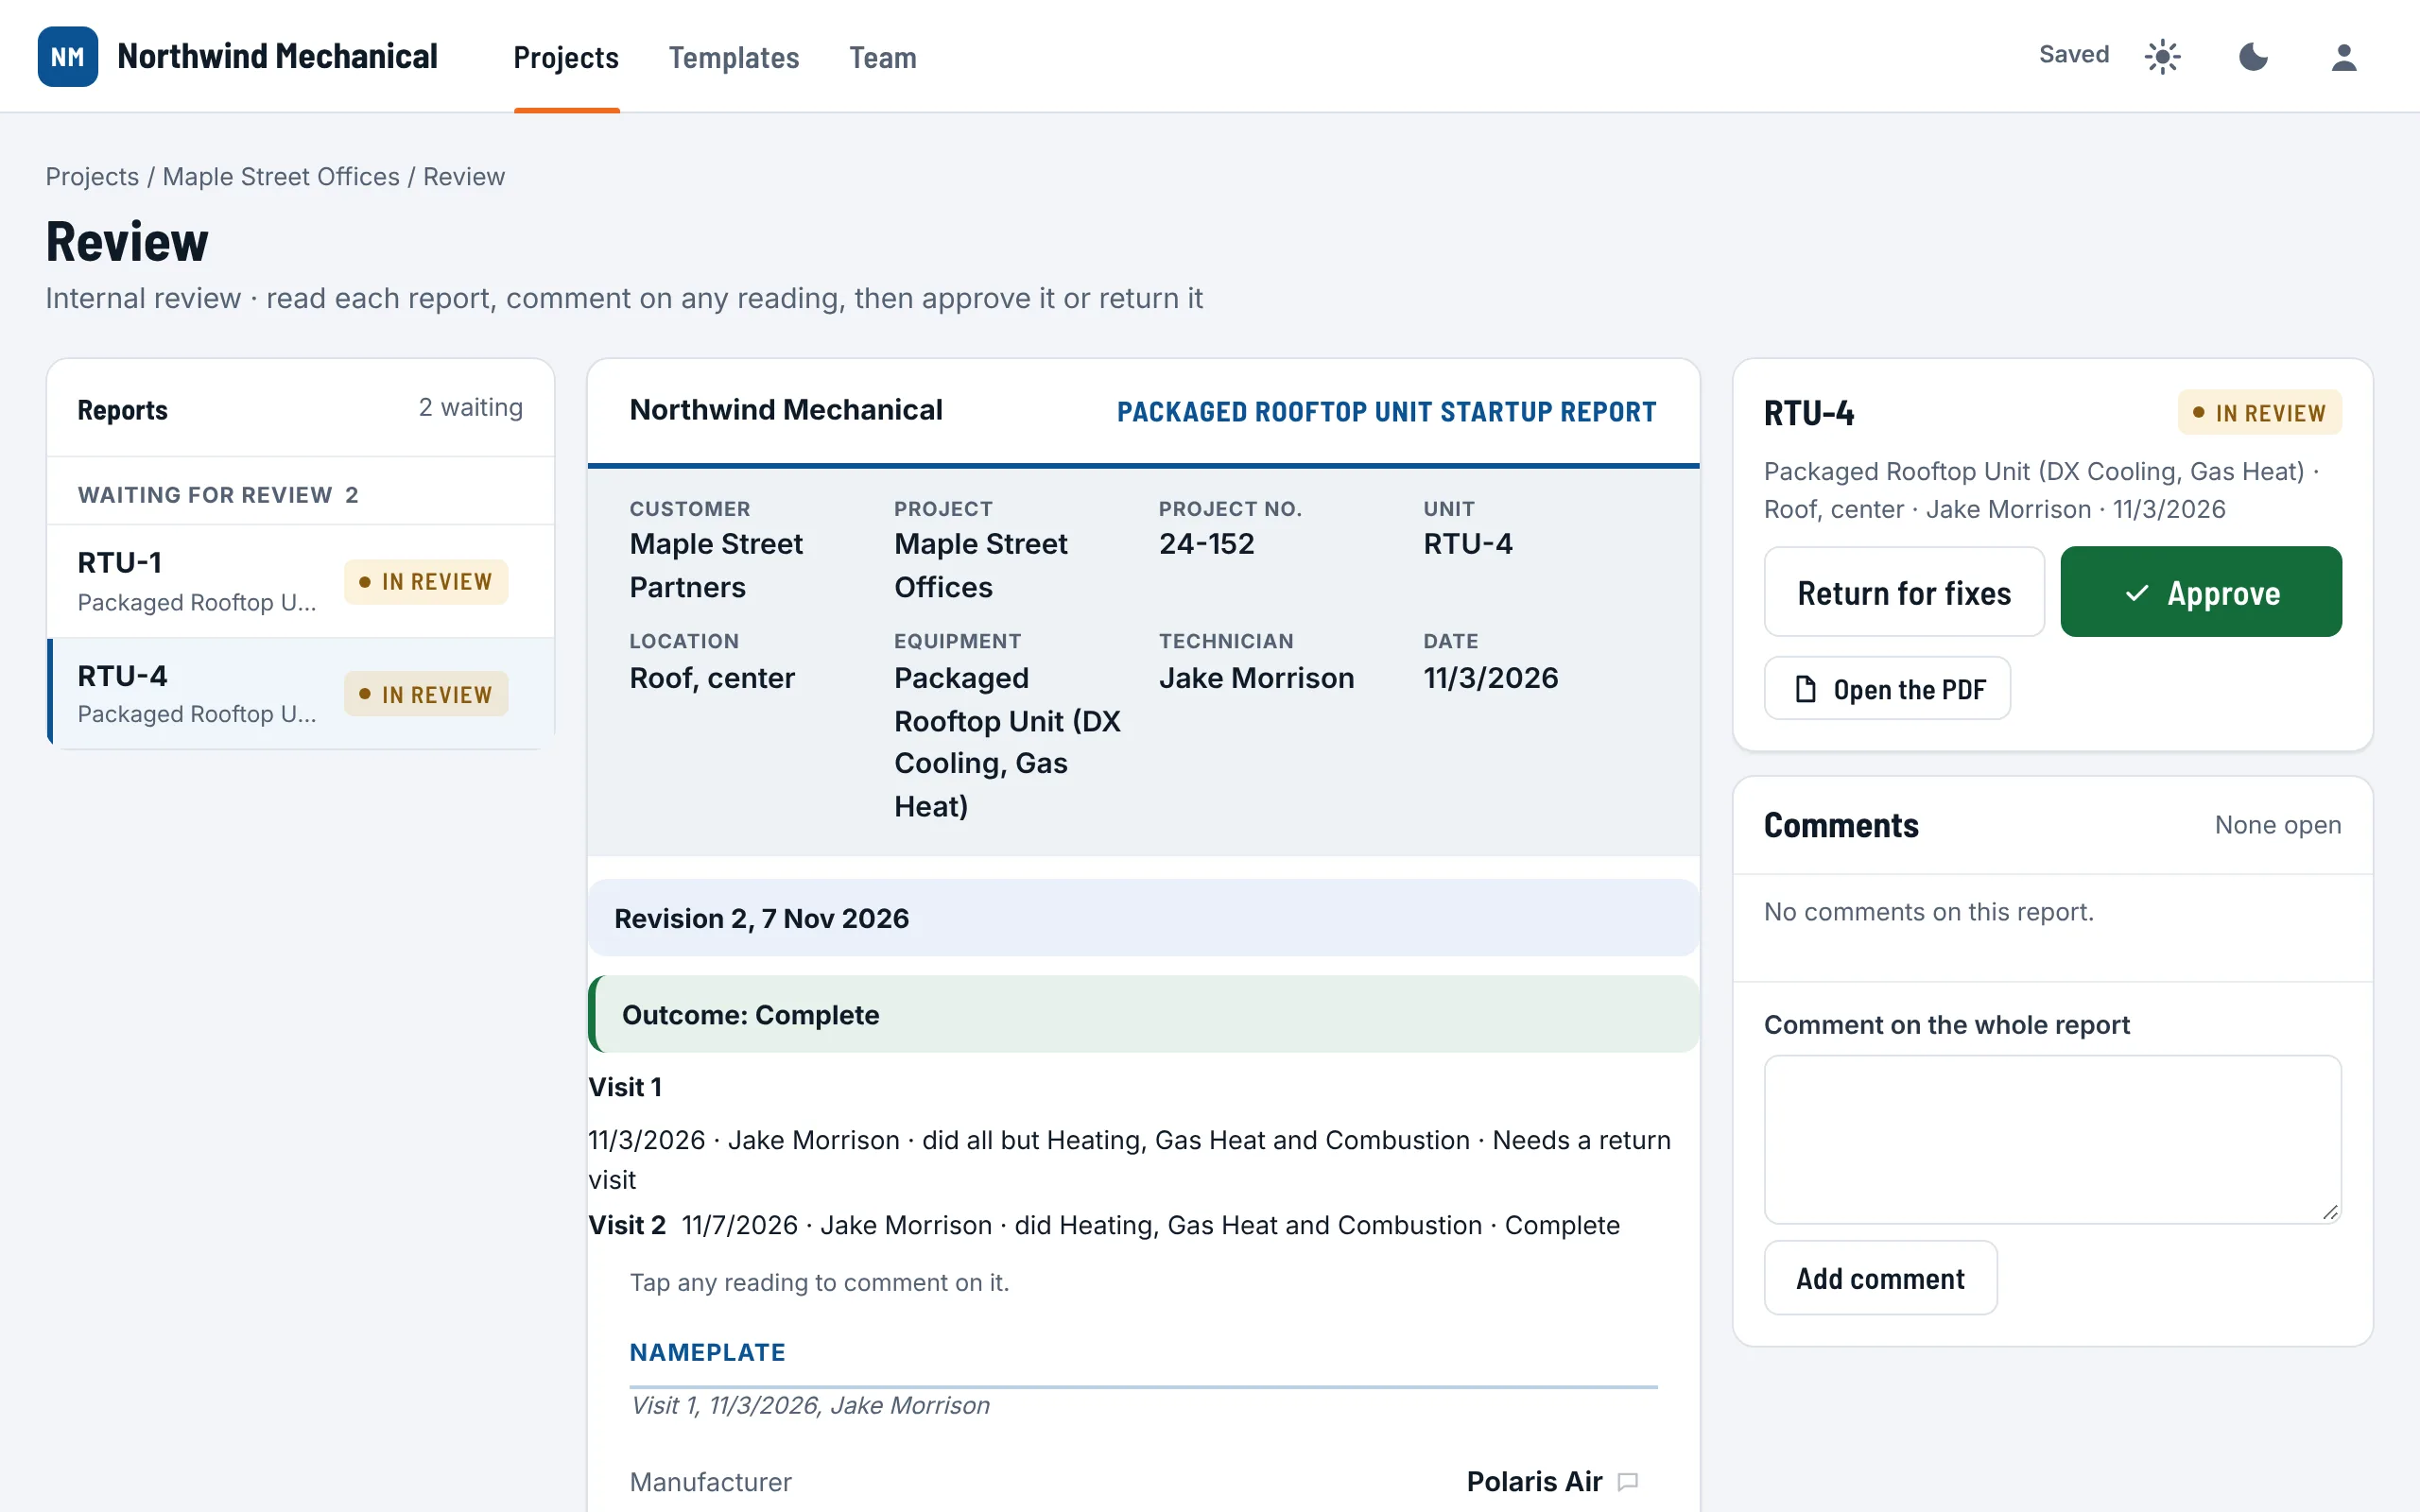
A return visit never makes a second report. The unit's report is revised, and the PDF is one combined report:
- How the visits stand: "Outcome: Partial" with "Come back for: Heating (No gas yet)", or Complete, or Complete, with open issues.
- Each visit, when there was more than one: its date, the tech, what it covered and how it ended, and a sign-off line per visit.
- A quiet line under each section says which visit it came from; a value a later visit changed shows as changed on that visit.
- The Open items box: each issue with who fixes it and how bad, resolved ones marked with how they were fixed.
- The revision at the top: "Revision 2, 14 Nov 2026 (first sent 7 Nov)". The file name ends in "Revision 2".
When a revised report is sent again, the email says which reports are revised and that each one replaces the report sent before. The review screen shows the same revision, visits and open items.
Review before it goes out #
Each company picks how reports are checked before they go out, and each project can pick its own.
| Choice | What happens |
|---|---|
| PDF only (the default) | Completed reports are ready to send as PDFs. No review step. |
| Internal review | Your reviewer, office or admin approves or returns each report before it can be sent. |
| Cx review | The commissioning provider reviews each report through a link, with no account, then you send the PDFs. |
| Internal, then Cx | Your own reviewer approves first, then the commissioning provider reviews through a link. |
Set the company's choice on Company (Defaults for new projects) and a project's own in its Settings.
Reviewing a report
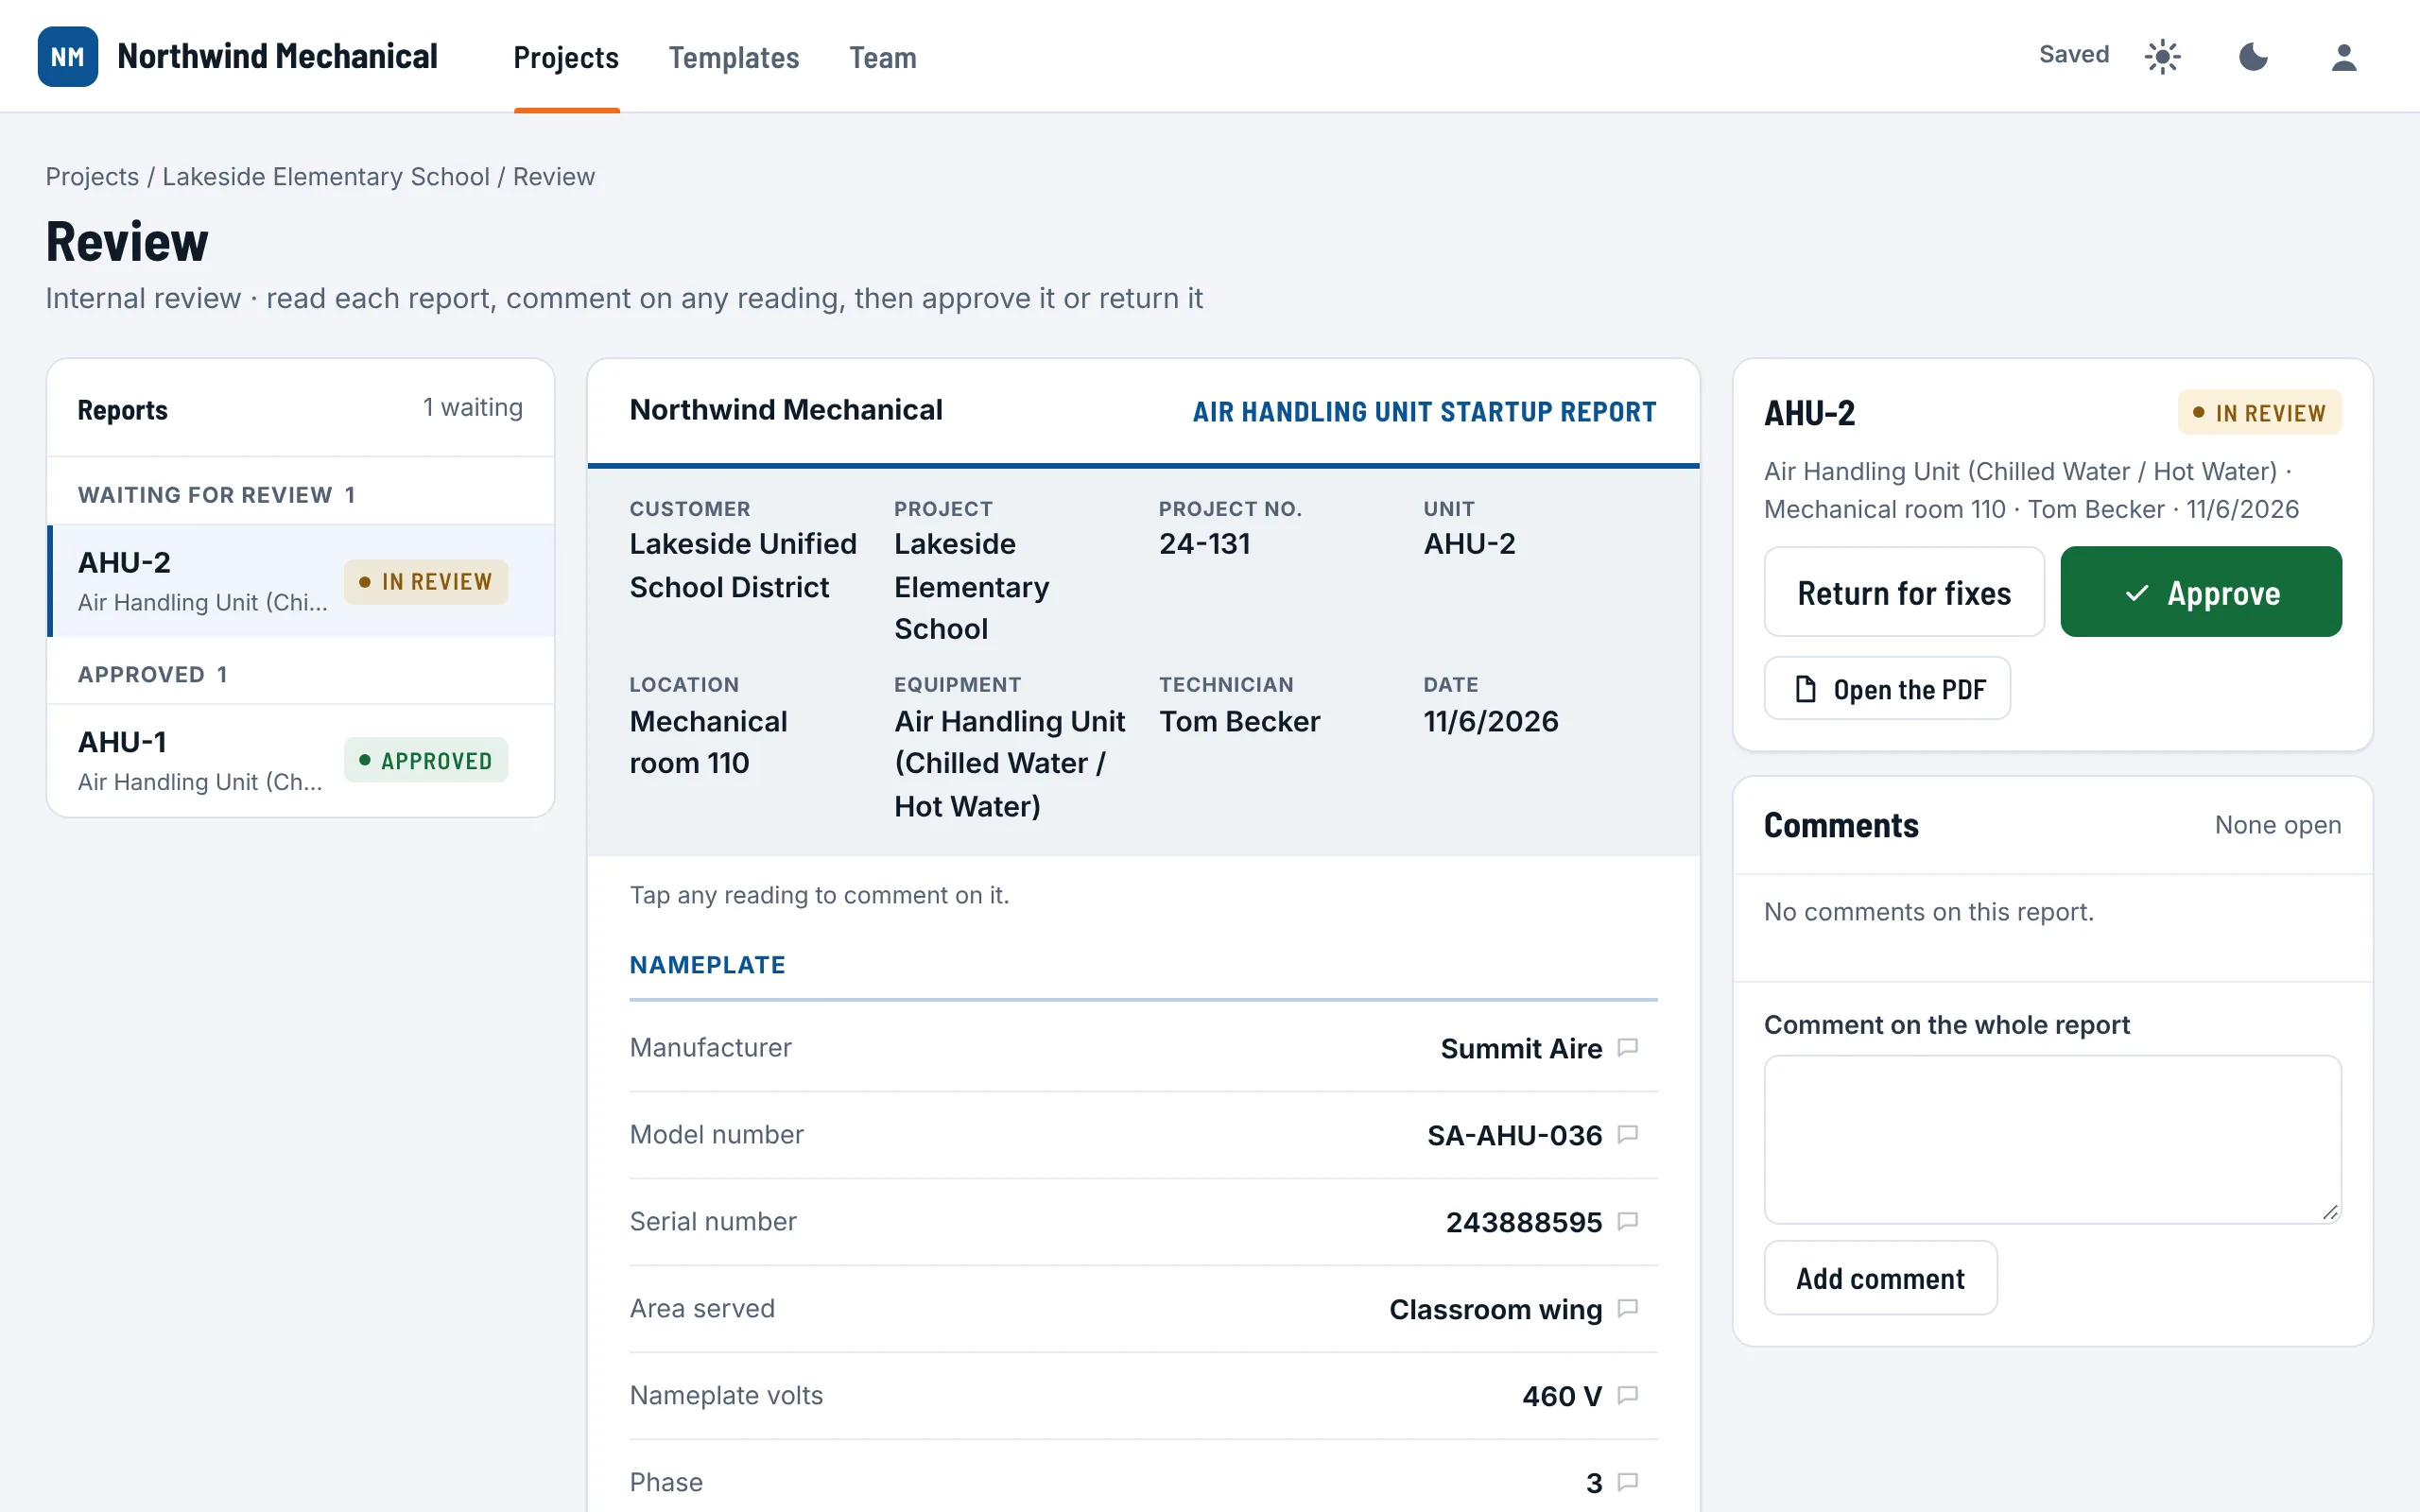
The review screen is the same one the commissioning provider uses, so what you approve is what they see.
- Open the project's Review tab and choose Start reviewing, or click a report waiting for review.
- Read the report. The list on the left groups the reports: waiting for review, with the Cx provider, returned for fixes, approved. Move with the arrows at the top.
- Click any reading to comment on it. Pick a ready-made comment ("Recheck this reading and update it." or "Out of the expected range. Retest and explain."; for a blank, "This is blank. Fill it in.") or write your own. For the whole report, use the box under Comments.
- Choose Approve, or Return for fixes with a note. The next report waiting opens by itself.
- Changed your mind? Change my decision puts it back to waiting for review, and Undo is in the message too.
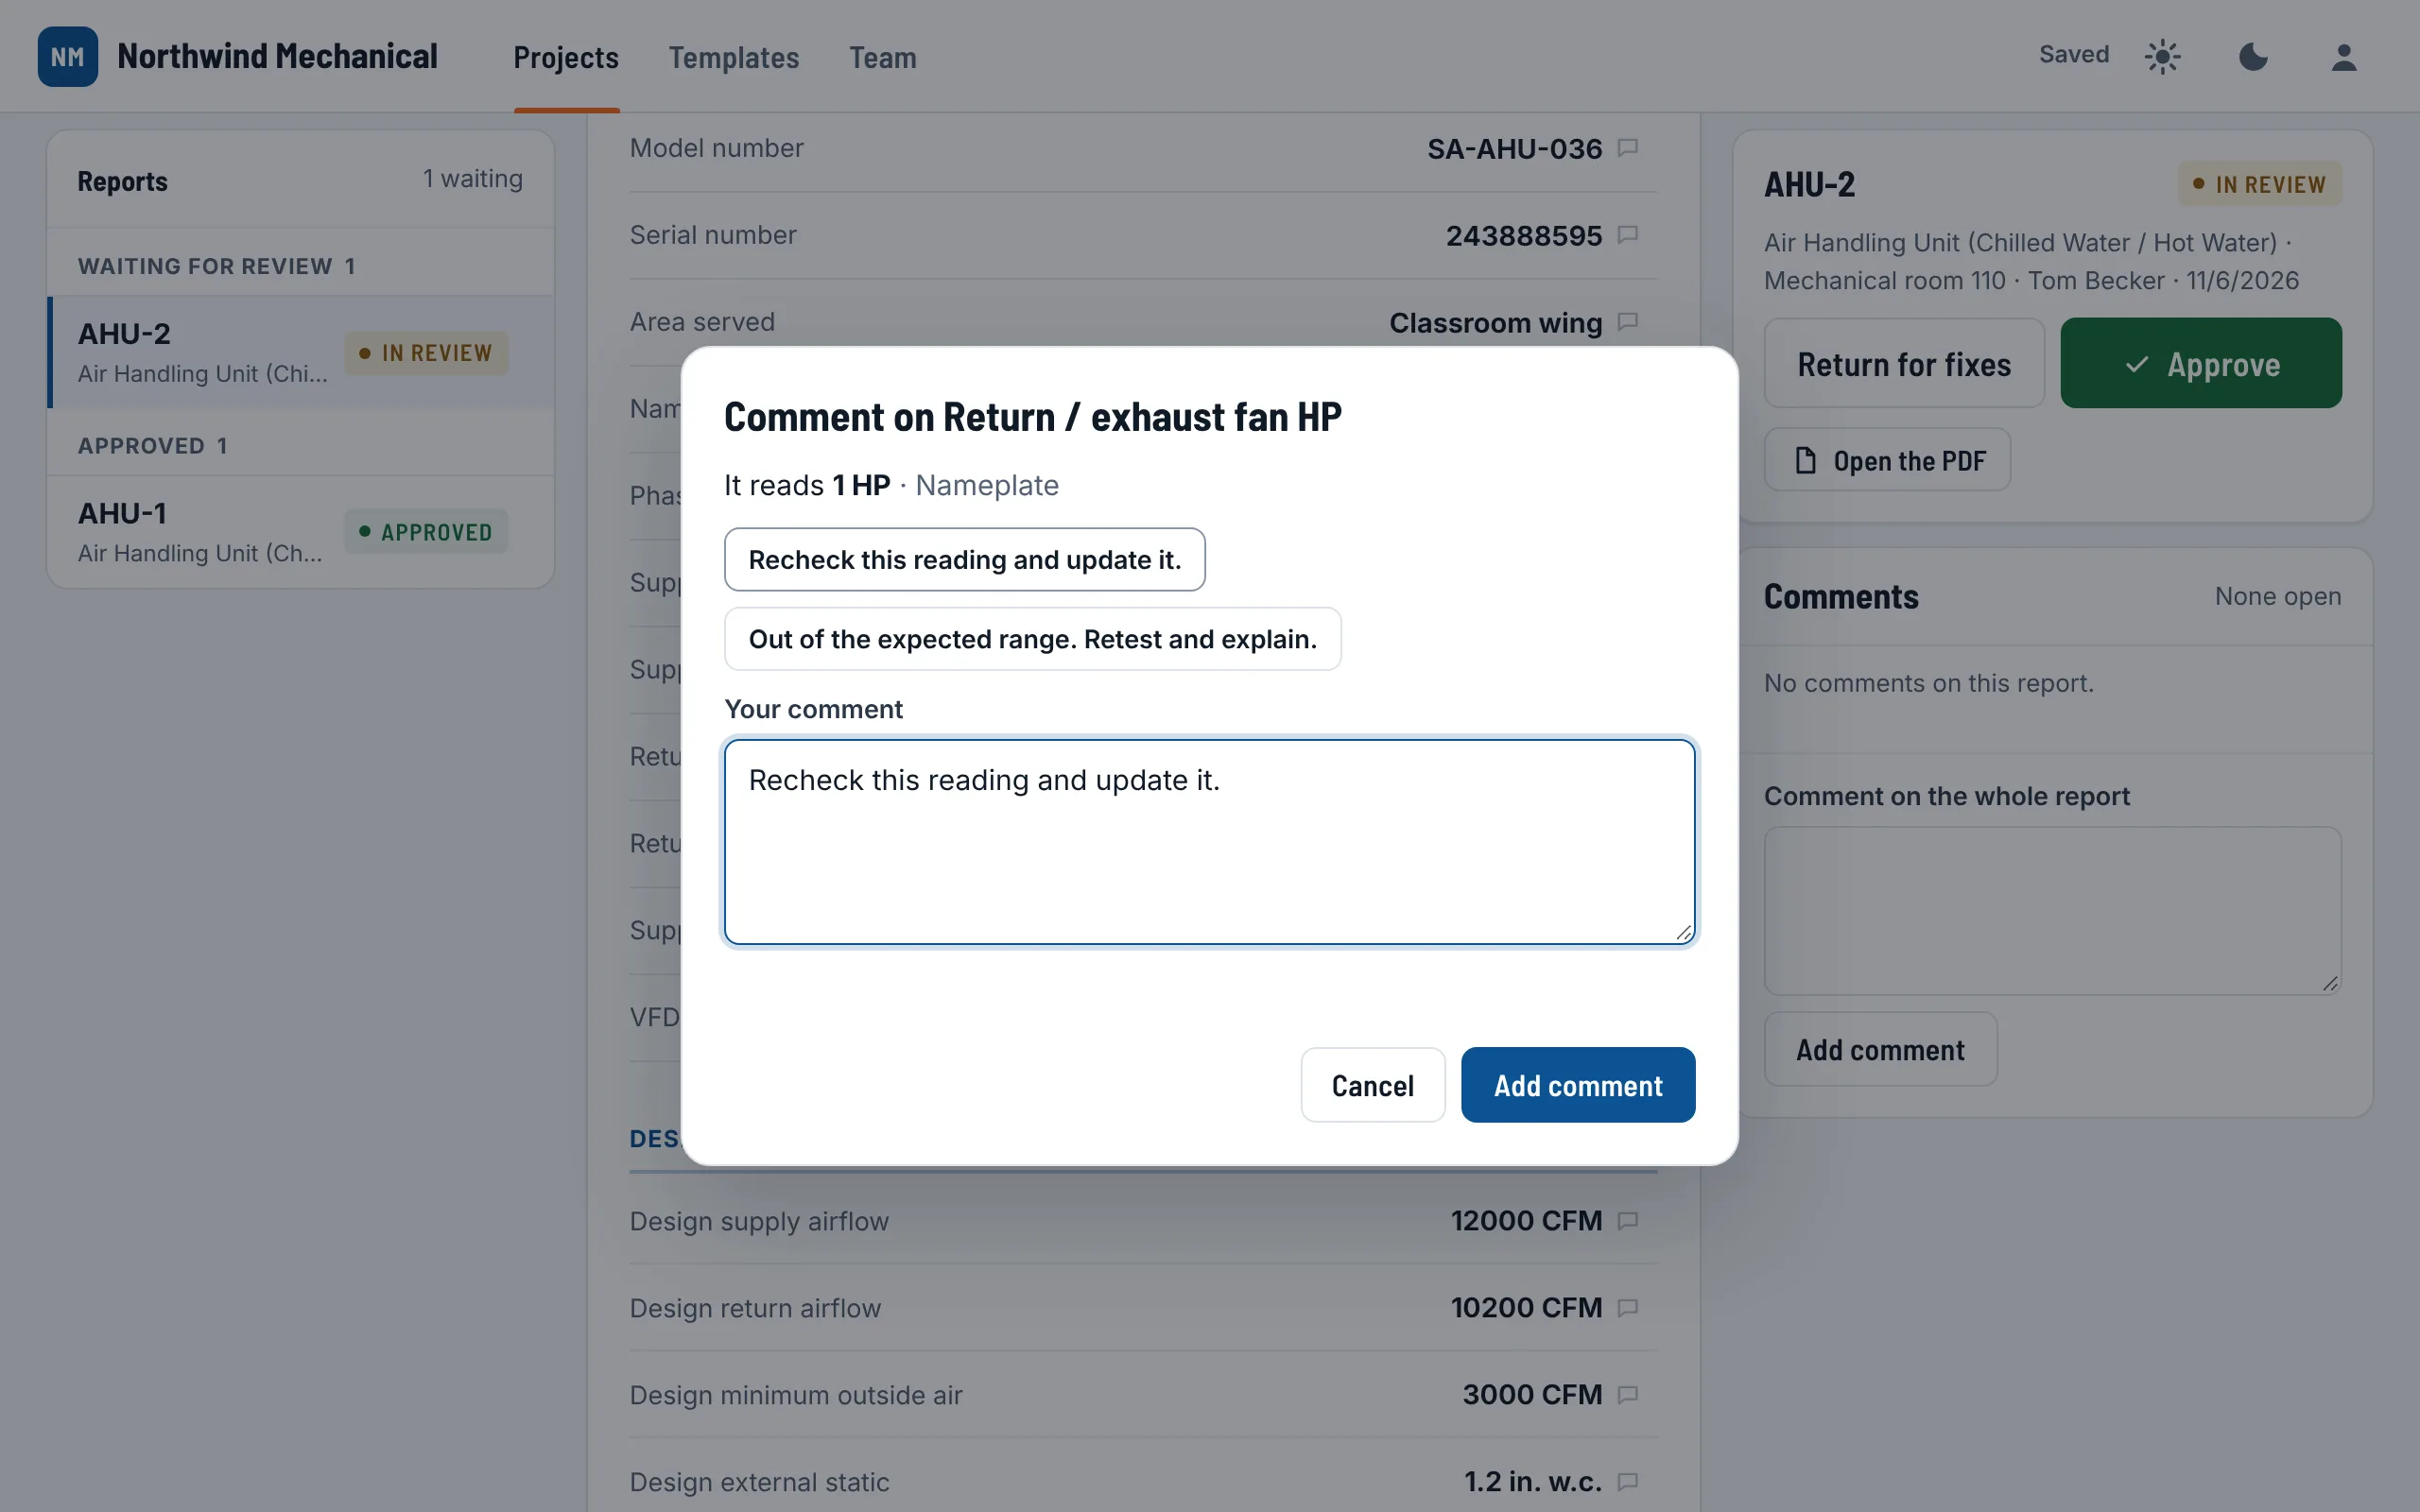
Nothing on the review screen changes a reading. Open the PDF shows the report as it prints.
Sending to the Cx provider #
With Cx review, the commissioning provider reviews the reports through a review link: no account, no password, only this project's reports that you sent them.
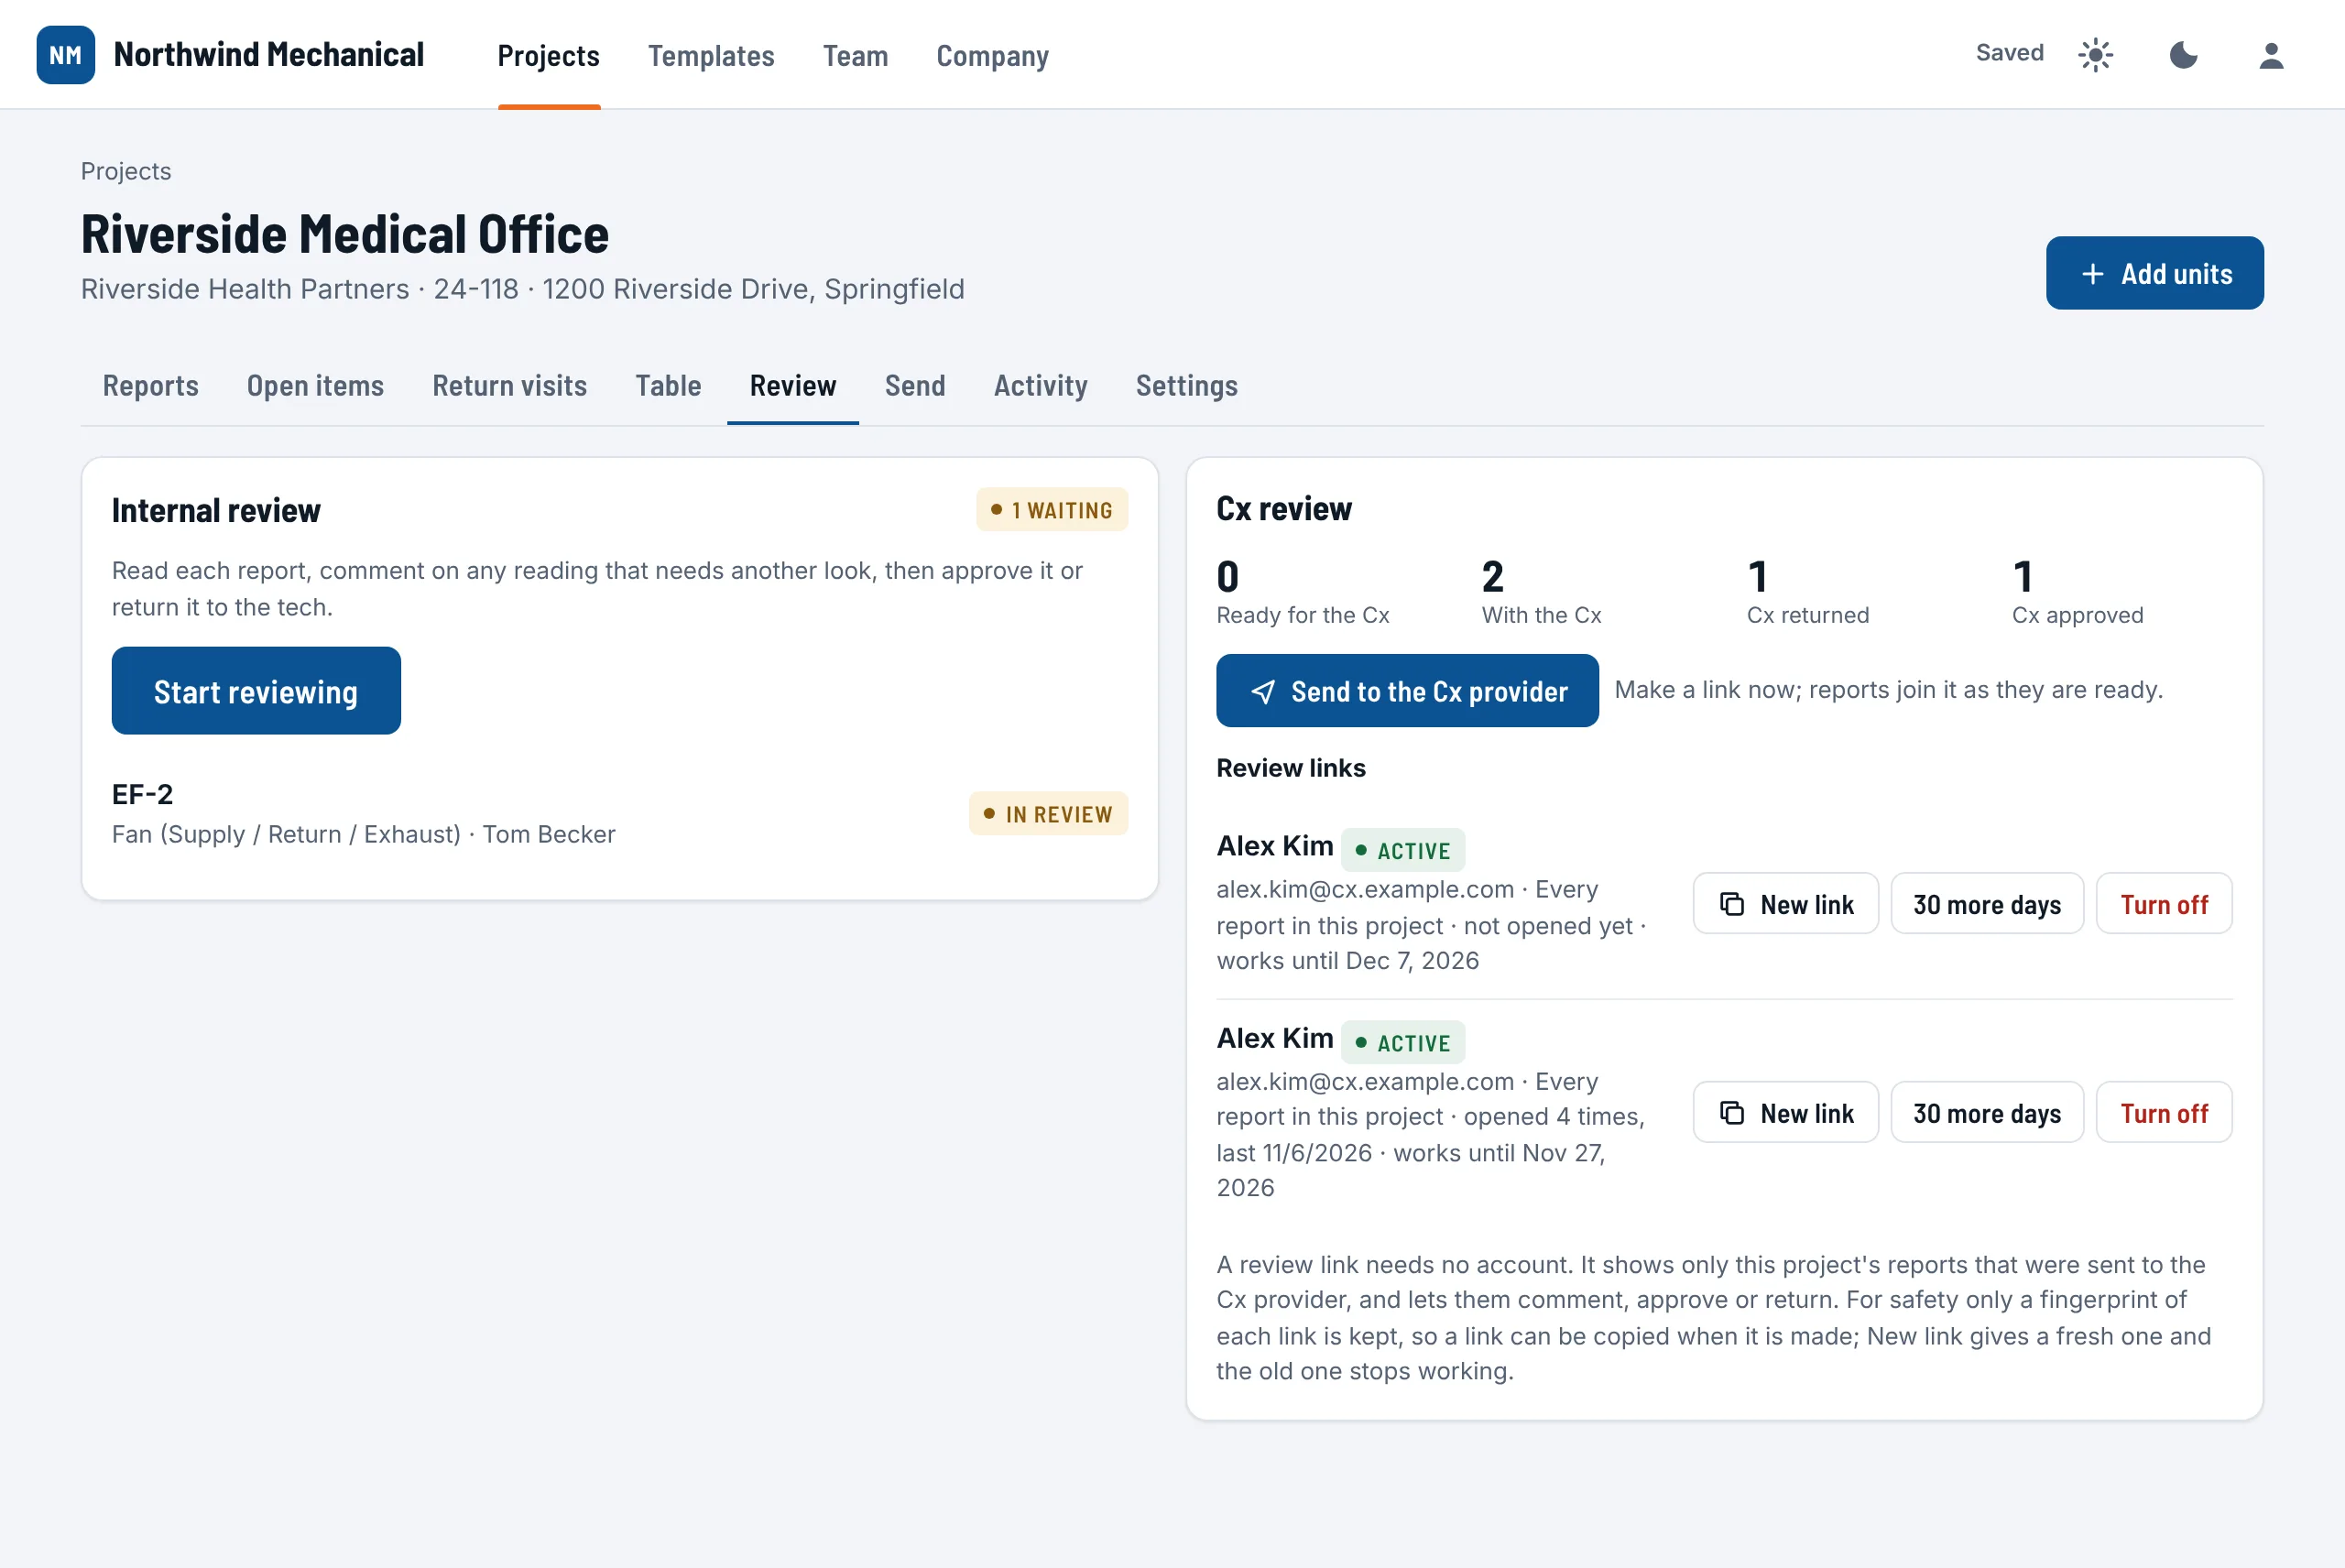
Send reports for Cx review
- Open the project's Review tab and choose Send to the Cx provider, or tick reports on the Reports list and choose To the Cx.
- The first time, make a link: type the provider's name and email, pick what it shows (Every report in this project, or only the ones ticked), how long it works (14, 30, 60 or 90 days) and an optional message. Leave Email the link to them ticked.
- Choose Send. The link is shown once, with Copy link, in case you want to send it yourself.
- Next time, send into the link they already have: the reports join it, and they see them the next time they open it. Nothing to email.
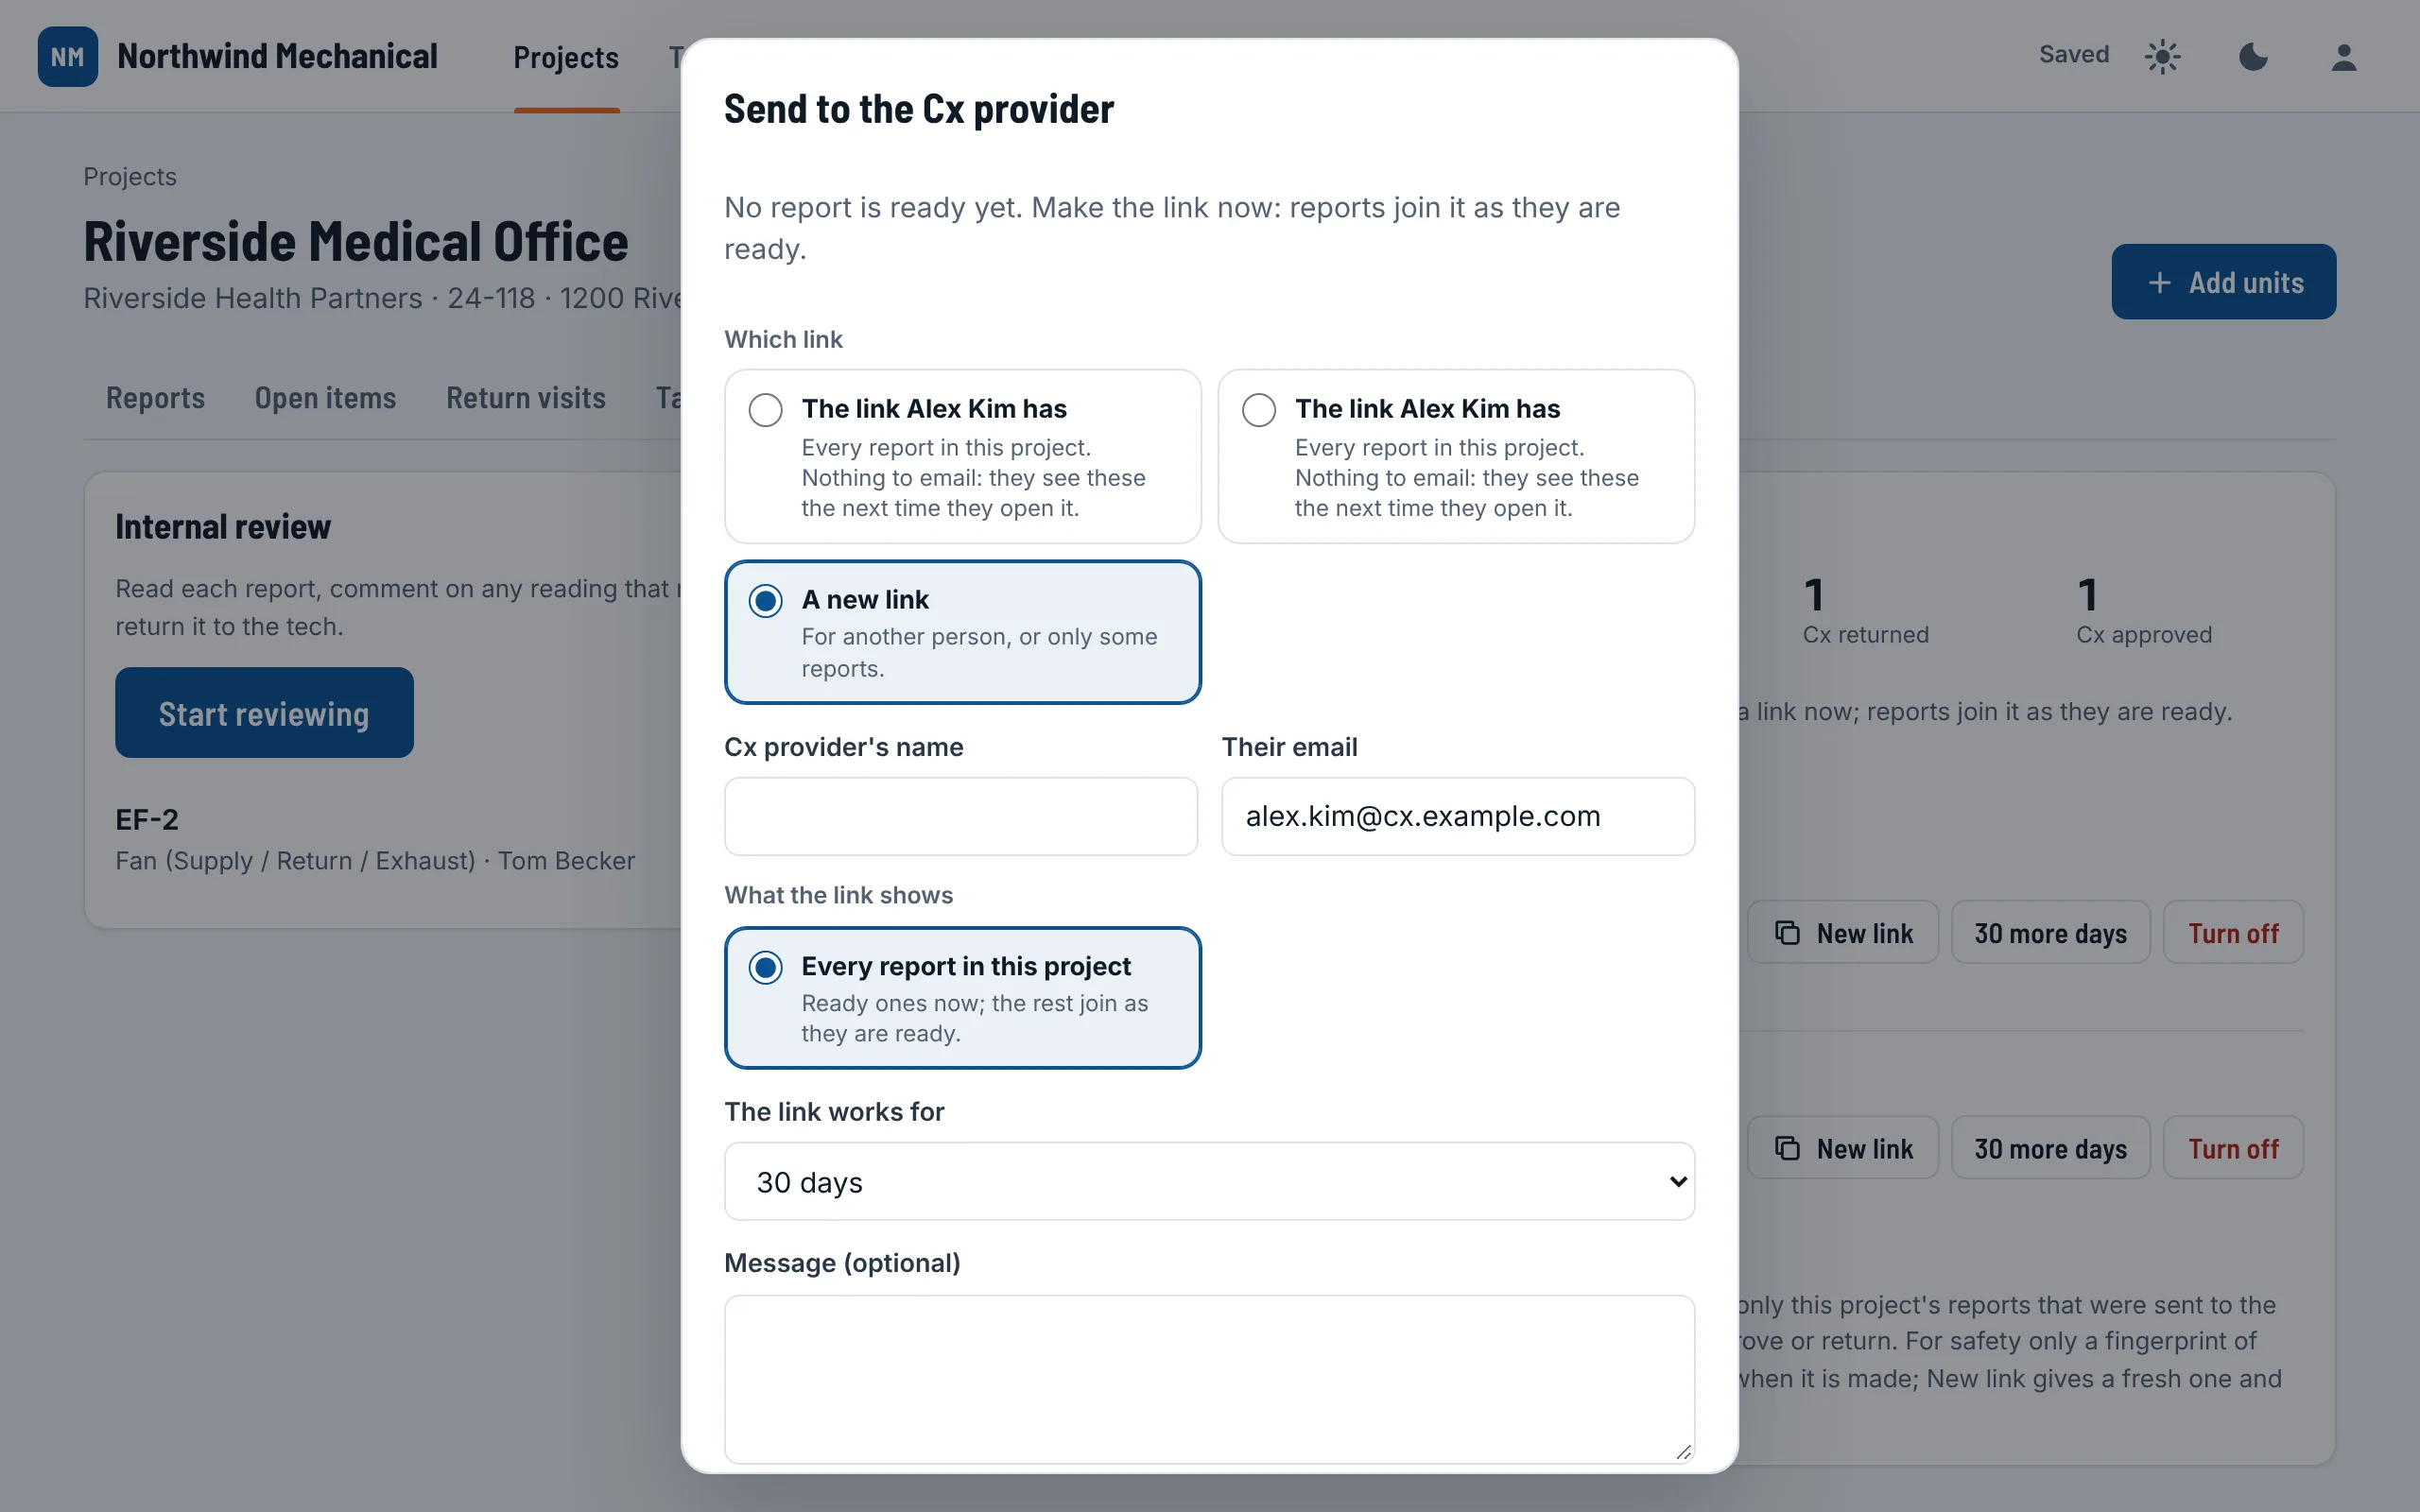
With Internal, then Cx, a report goes to the provider after your own reviewer approves it. With Cx review only, a complete report can go straight away. A link made now, before any report is ready, takes each report as it is sent.
Review links
The Review tab lists every link: who it is for, whether it is active, how many times it was opened and when, and when it ends.
- 30 more days extends it.
- Turn off stops it at once.
- New link makes a fresh one (and emails it, if you like). The old one stops working; comments and decisions stay.
For safety StartupSend keeps only a fingerprint of each link, so a link can be copied only when it is made. Lost it? Make a new one.
What comes back
The provider comments on readings, then approves each report or returns it for fixes. Their comments and decisions show on your Review tab and on the report; a returned report goes to the top of the techs' My work with their comments on the exact readings. When they approve, the report is ready to send. The Cx provider guide shows their side.
Comments and returns #
- A comment sits on one reading, or on the whole report. It shows to the tech at the top of the report and right under the reading it is about, with Show me to jump there.
- A returned report goes to the top of every tech's My work, under Sent back to fix, with the note. The tech fixes it and finishes the visit again; it then comes back to review.
- When a reading changes after a comment, the comment says so: "was 3, now 9".
- Approving resolves the comments on that report. Resolved comments stay, folded under the open ones.
- Take back removes a comment you made while the report still waits for review.
- Your own comments are never shown to the Cx provider's link.
To change a report that is approved, with the Cx provider or sent, open it and choose Reopen (admin and office). Say why it needs changing; the reason goes in the report's history. It goes back to the techs as open. Parts put off and open items do not need a reopen: the tech starts a return visit.
Sending the finished reports #
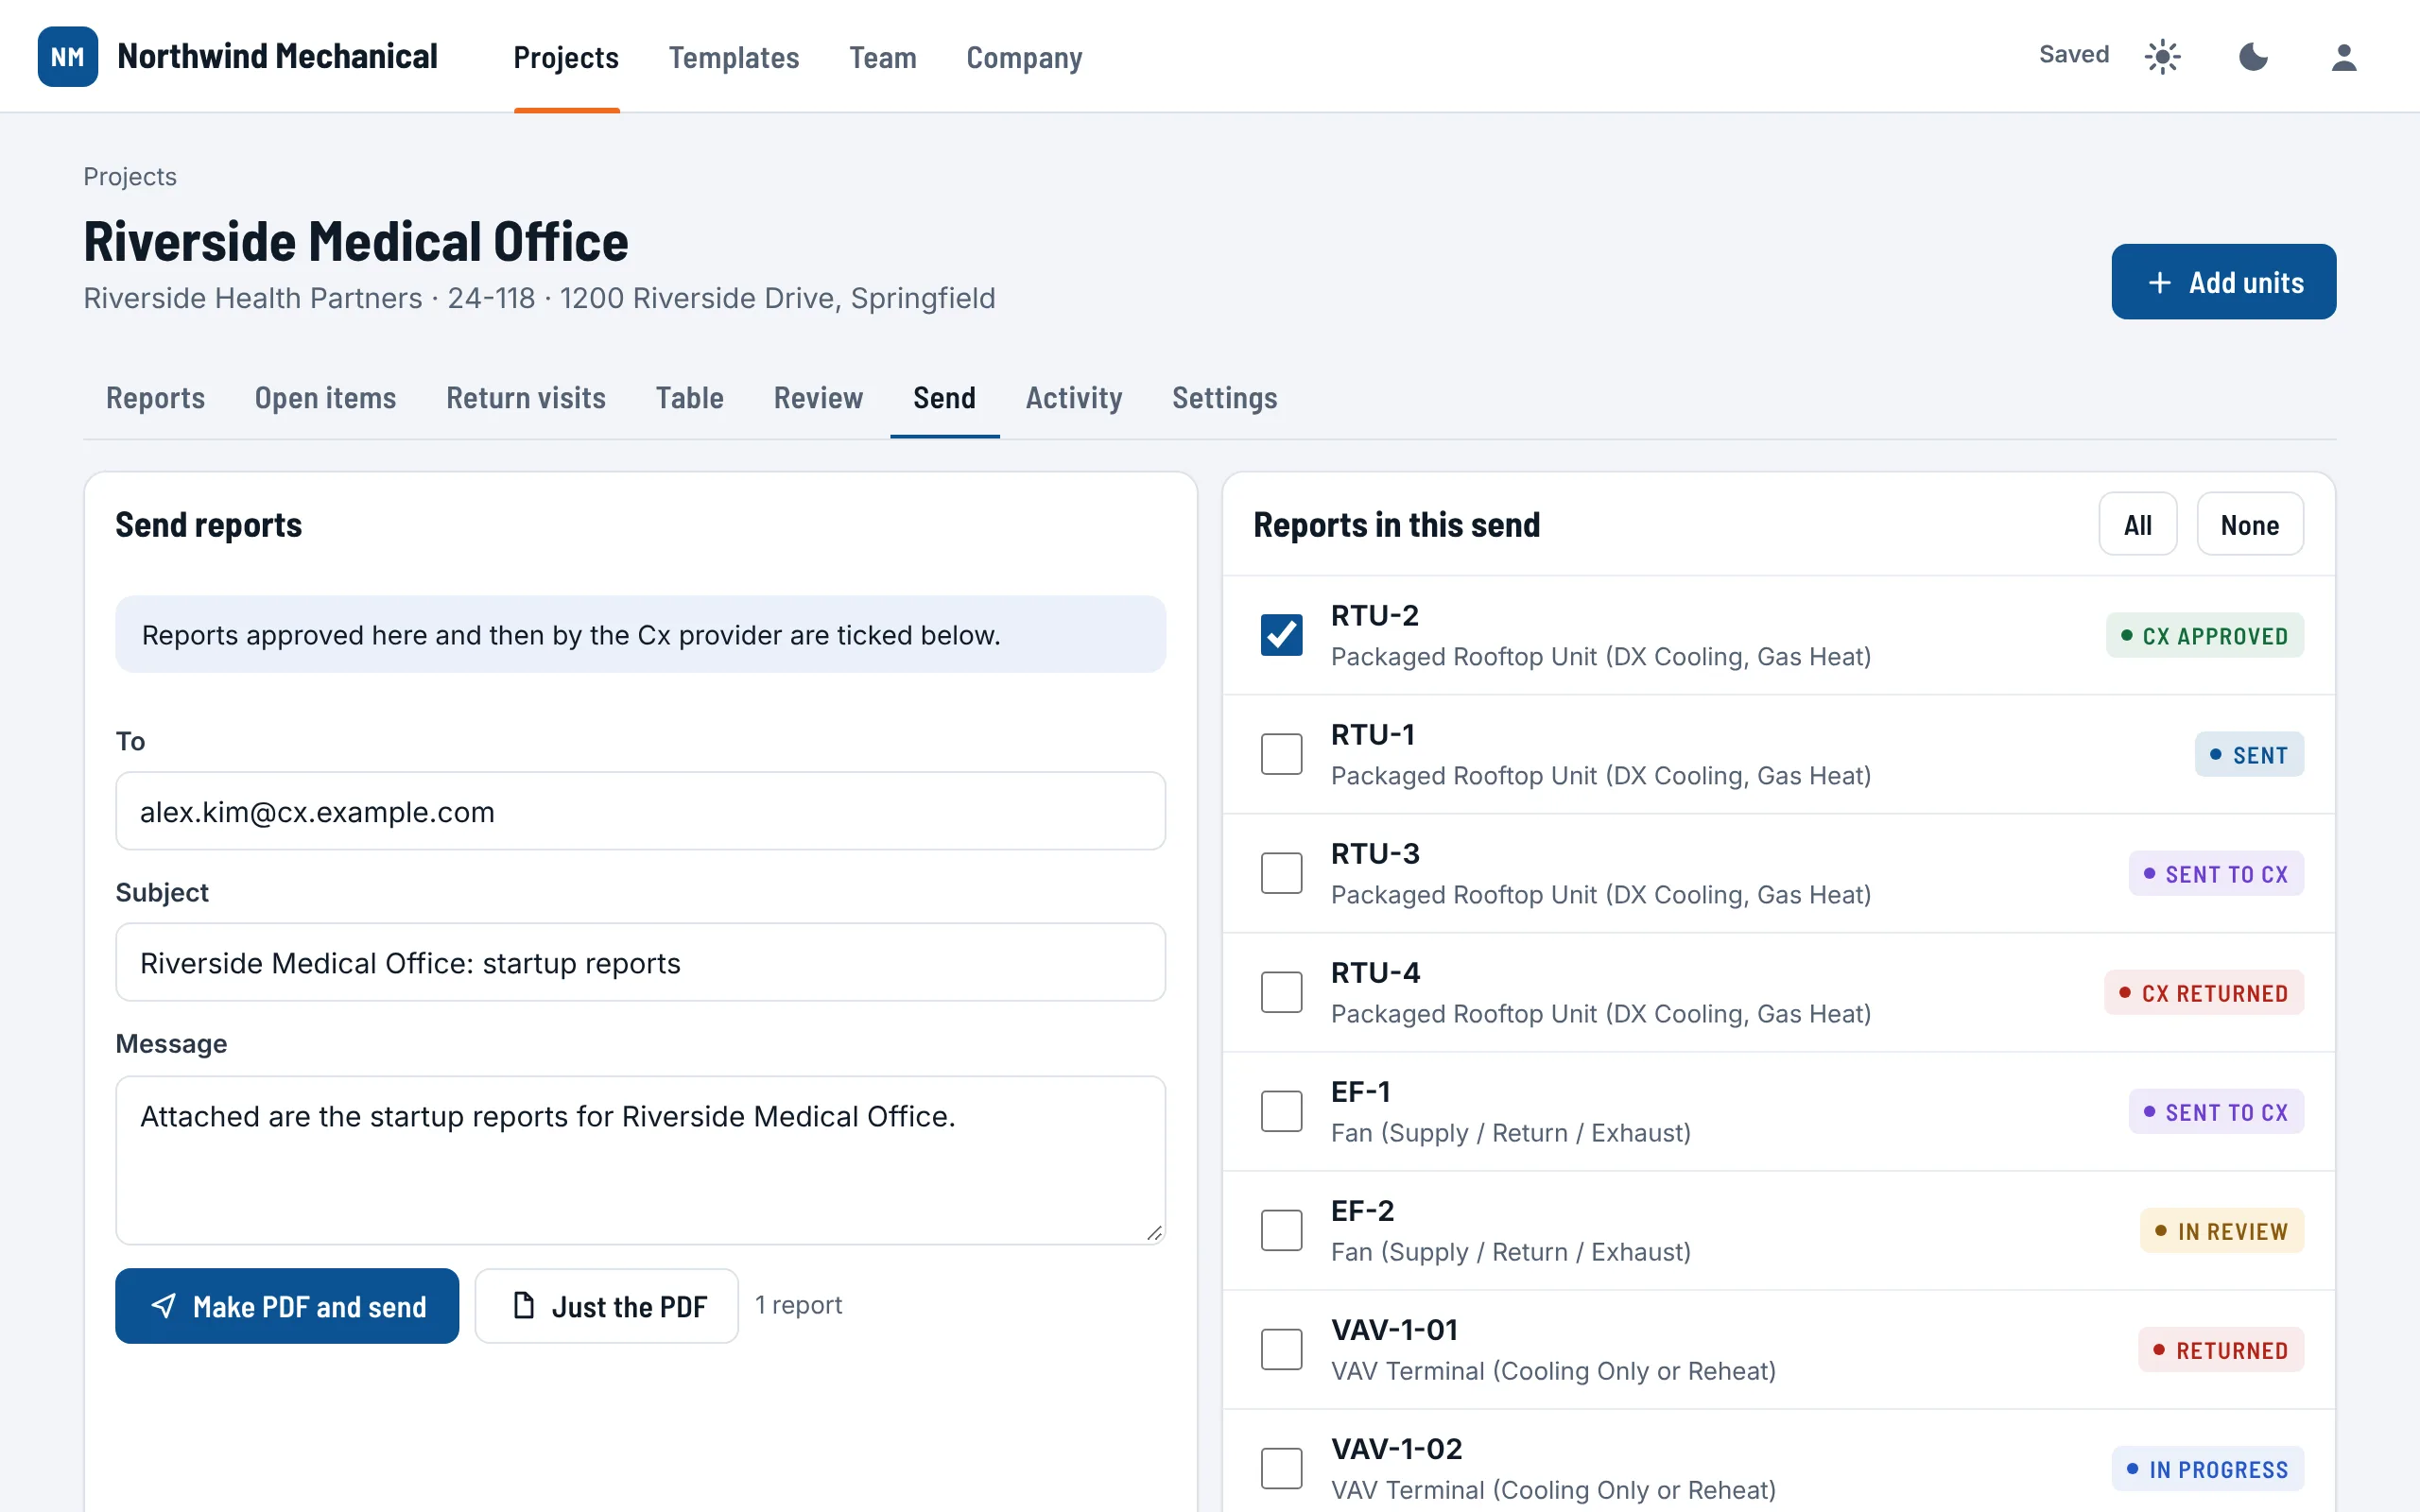
- Open the project's Send tab. The reports ready to send are ticked already: complete ones with PDF only, approved ones with review, Cx approved ones with Cx review.
- Check To, Subject and Message. Tick or untick reports (All, None).
- Choose Make PDF and send. The reports become one PDF, made on your computer in your design, and go by email from StartupSend. They are marked Sent.
- Sending a report that is not ready asks first.
- Just the PDF saves the file without emailing it.
- Sent before keeps every PDF that went out, with who sent it, when and to whom. Download any of them again.
- Send automatically the moment a report is approved (project Settings) sends each one as soon as it is approved.
- The archive copy address gets each report the moment it is completed.
- A report a return visit revised goes out as one file that replaces the one sent before, and the message says so.
Exports and PDFs #
| What | Where | What you get |
|---|---|---|
| One report as a PDF | The report: PDF (on a phone: More, PDF of this report) | The report in your design, with how its visits stand, each visit, and its open items. |
| A set of reports | Reports list: PDF, or tick reports and choose PDF | One PDF with a cover page and a contents list (unless your design turns the cover off). |
| A sample | Templates, Company and Report design: Sample PDF | A template filled with typical readings. |
| The equipment list | Table: Download for Excel | One equipment type, every unit and every field, as a CSV file. |
| PDFs already sent | Send: Sent before | The exact file that went out. |
| All your company's data | Company: Download all data (admin) | Every project, unit, reading, change, comment, send and template, as one JSON file. |
PDF file names say the project and the unit or the set. A PDF is made on your own device, from the report as it is at that moment.
People and roles #
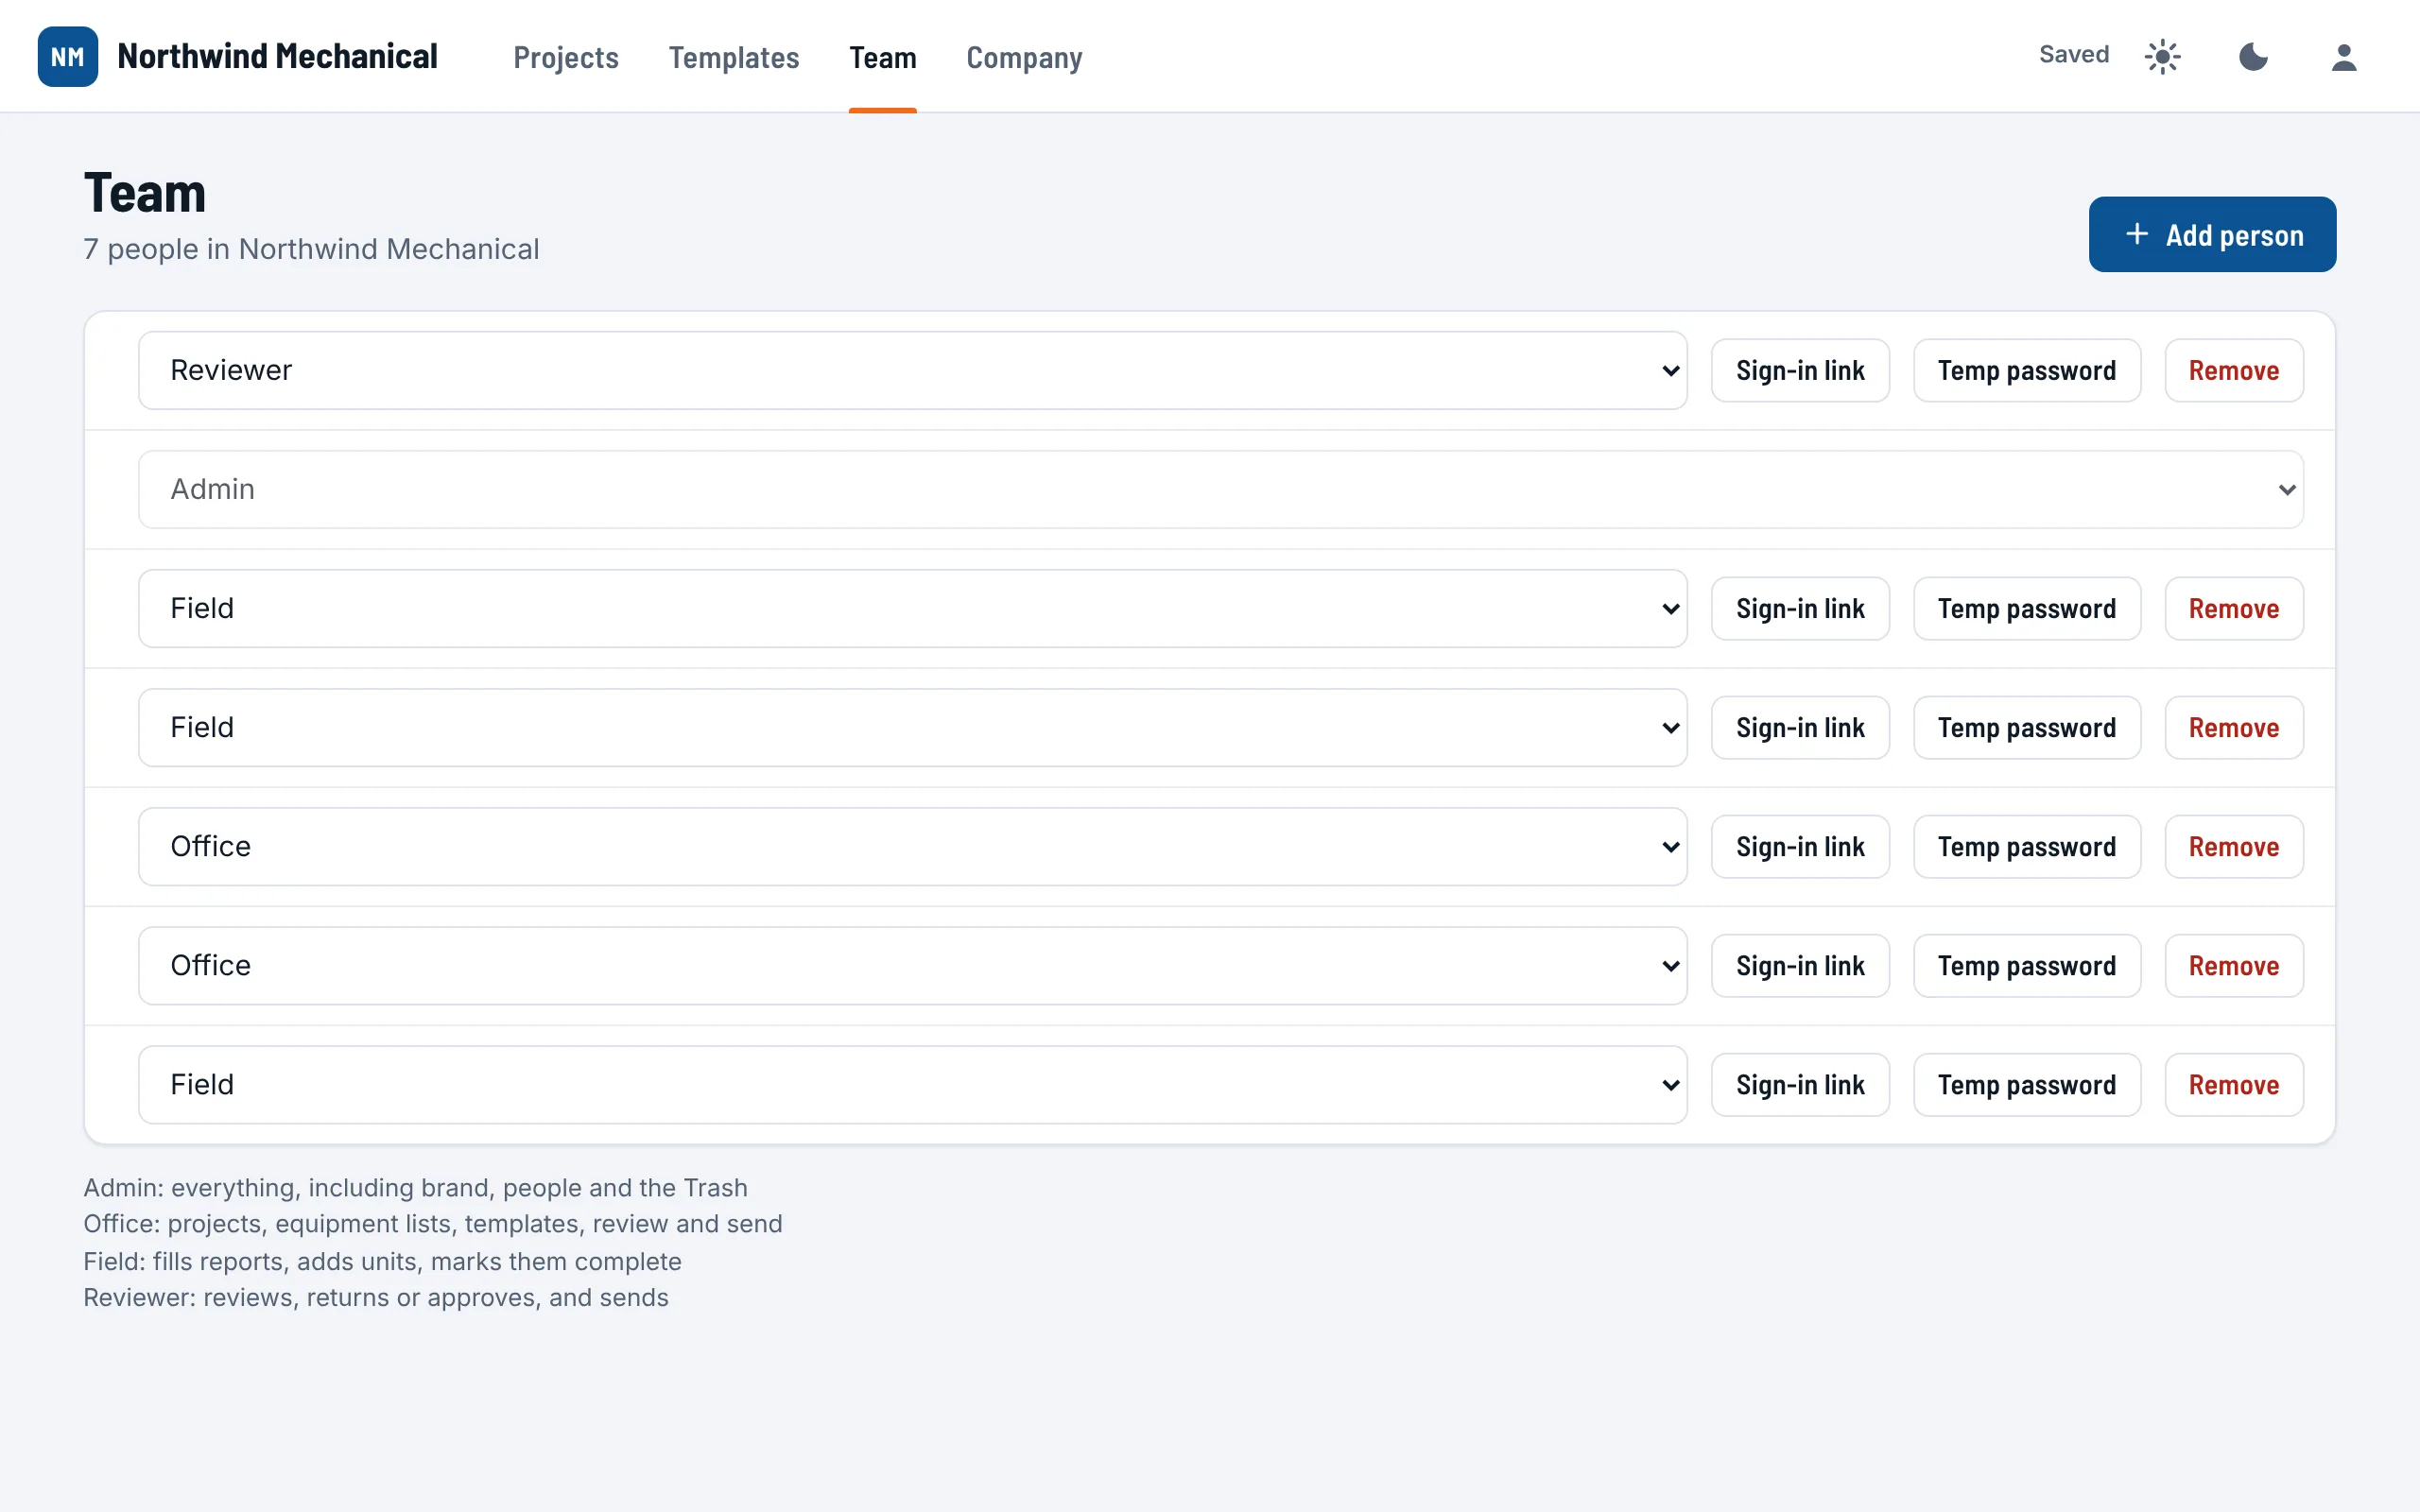
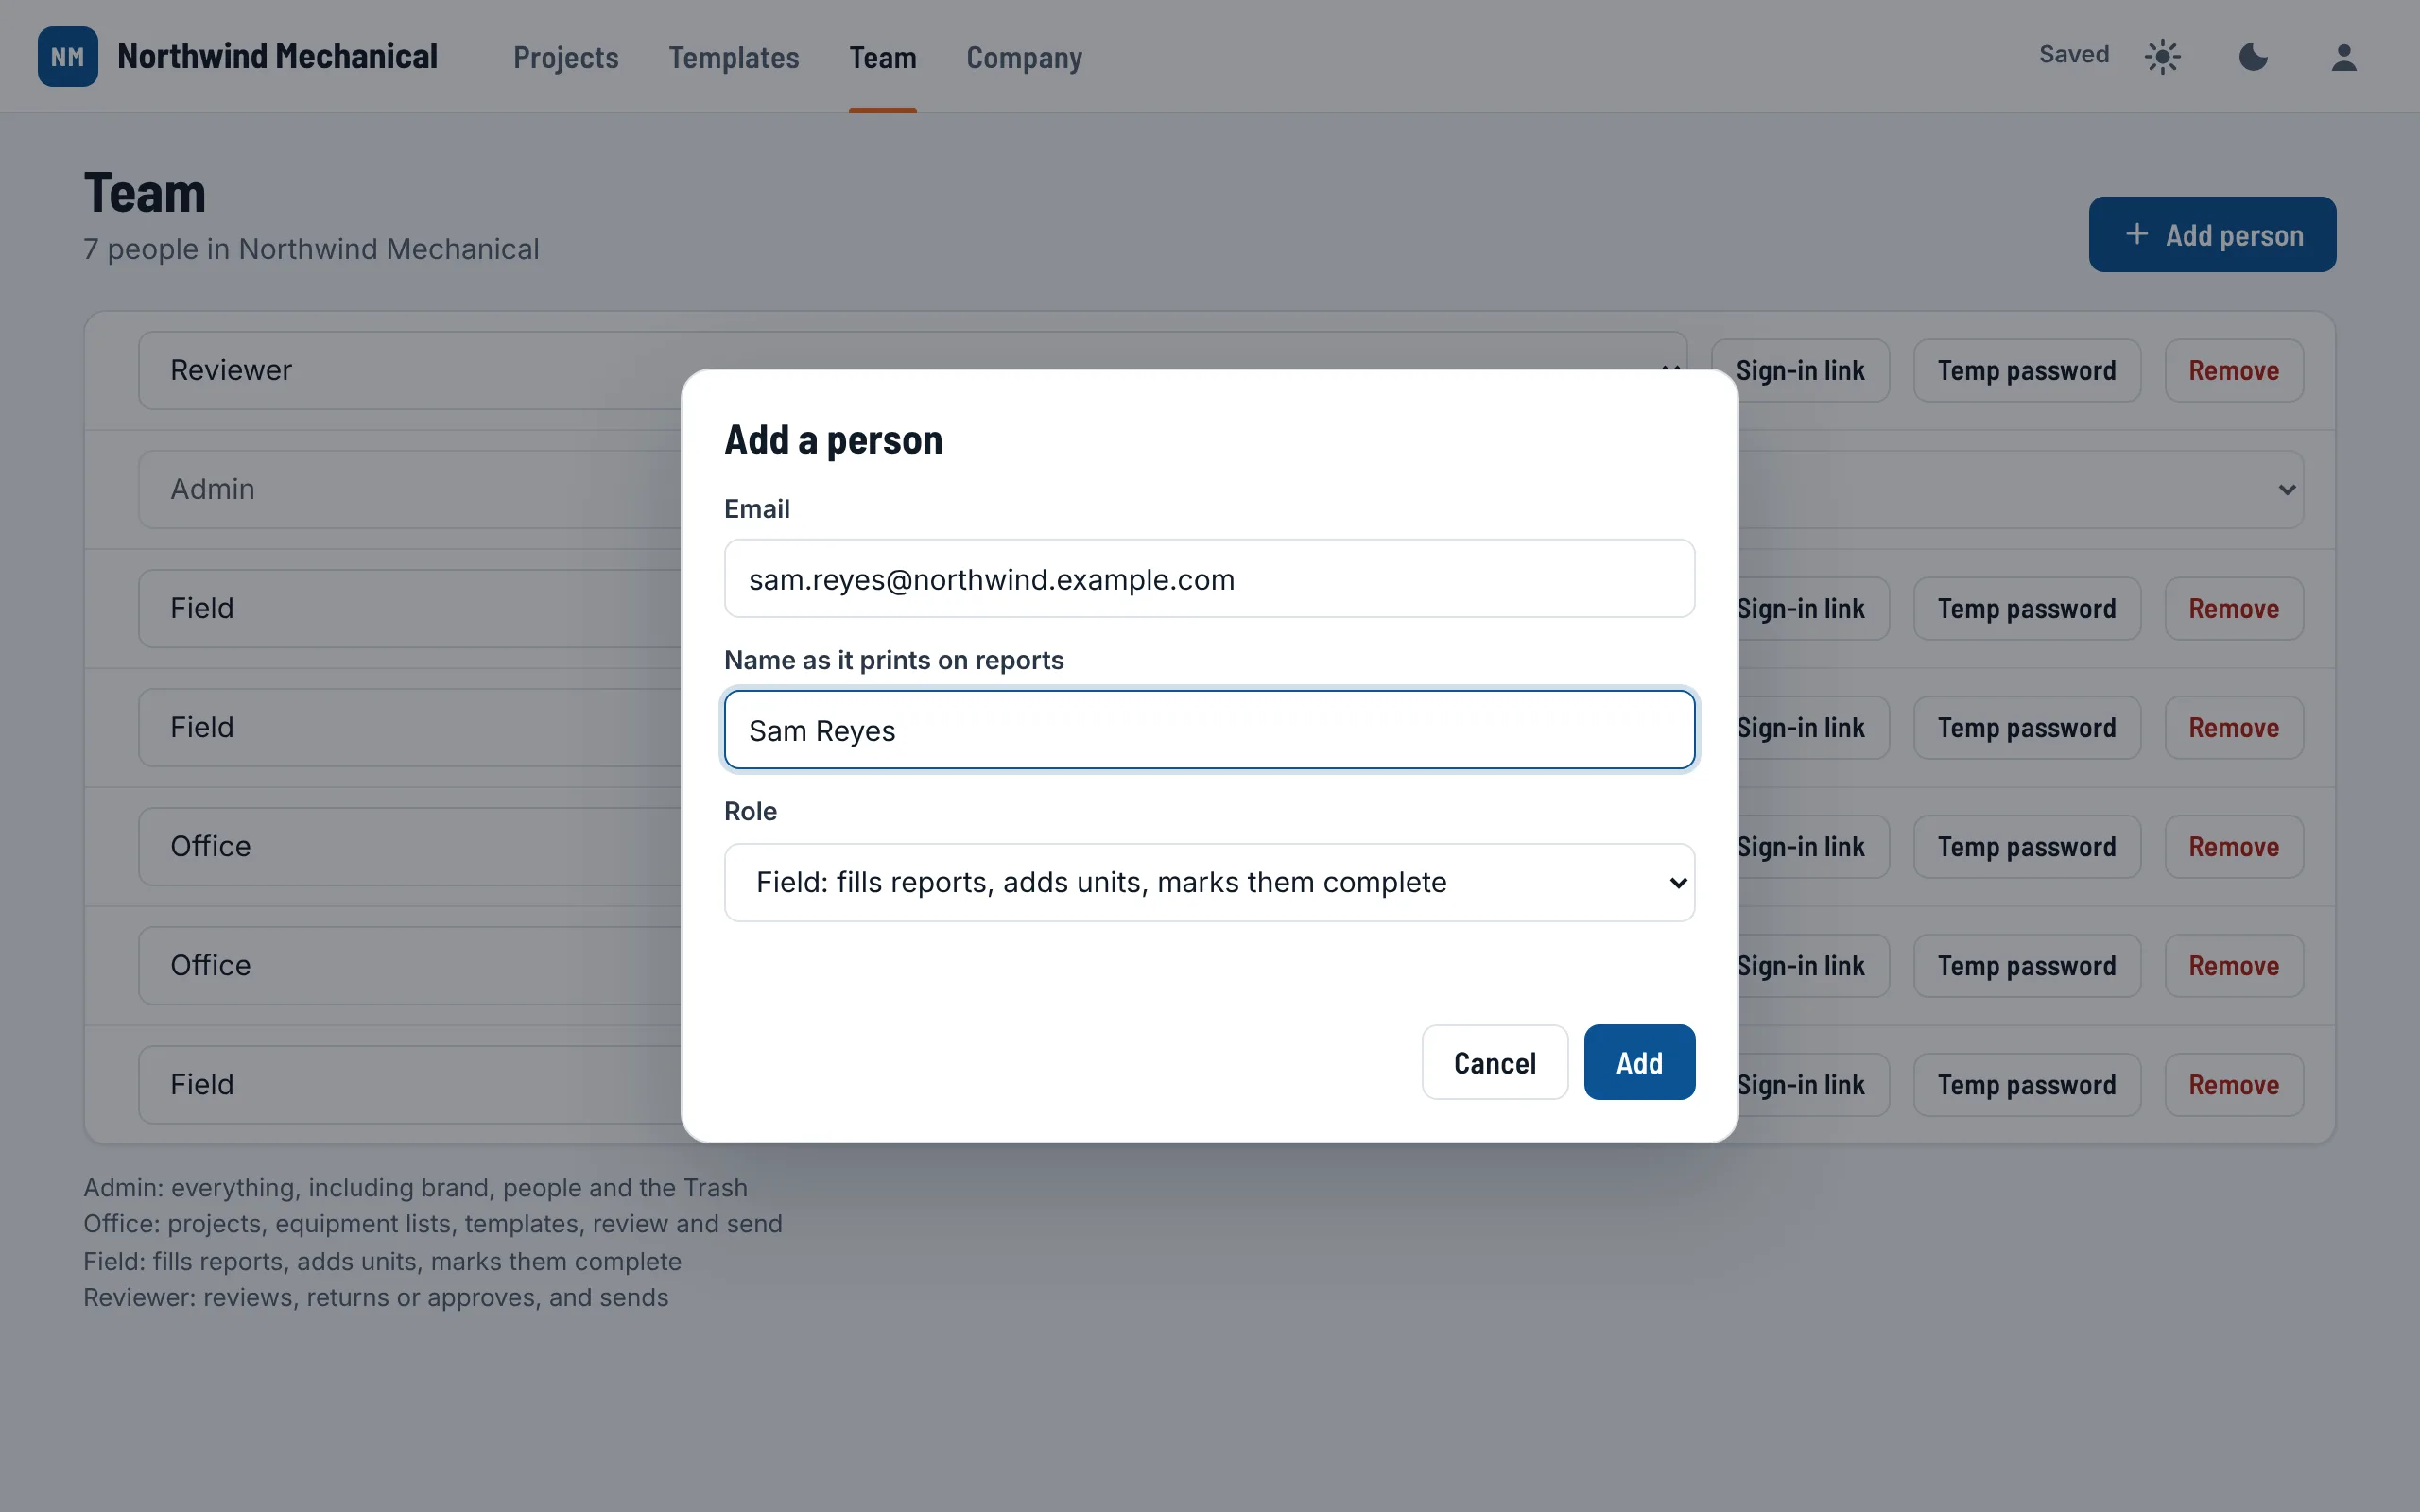
Add a person
- Open Team and choose Add person.
- Type their email and their name as it prints on reports. Pick the role (the roles are explained at the top of this manual).
- Choose Add. StartupSend emails them a sign-in link; the dialog also shows it, with Copy, so you can text it. It works once and lasts 7 days.
Change, help or remove someone
- Role: pick a new one in their row. It changes at once. You cannot change your own.
- Sign-in link: a fresh link for someone who lost theirs.
- Temp password: handy on site. Tell them in person or by text; they choose their own the first time they sign in.
- Remove: they can no longer sign in, and their reports stay. Restore brings them back.
Office staff and reviewers can see the Team page; only an admin changes it.
Billing and your plan #
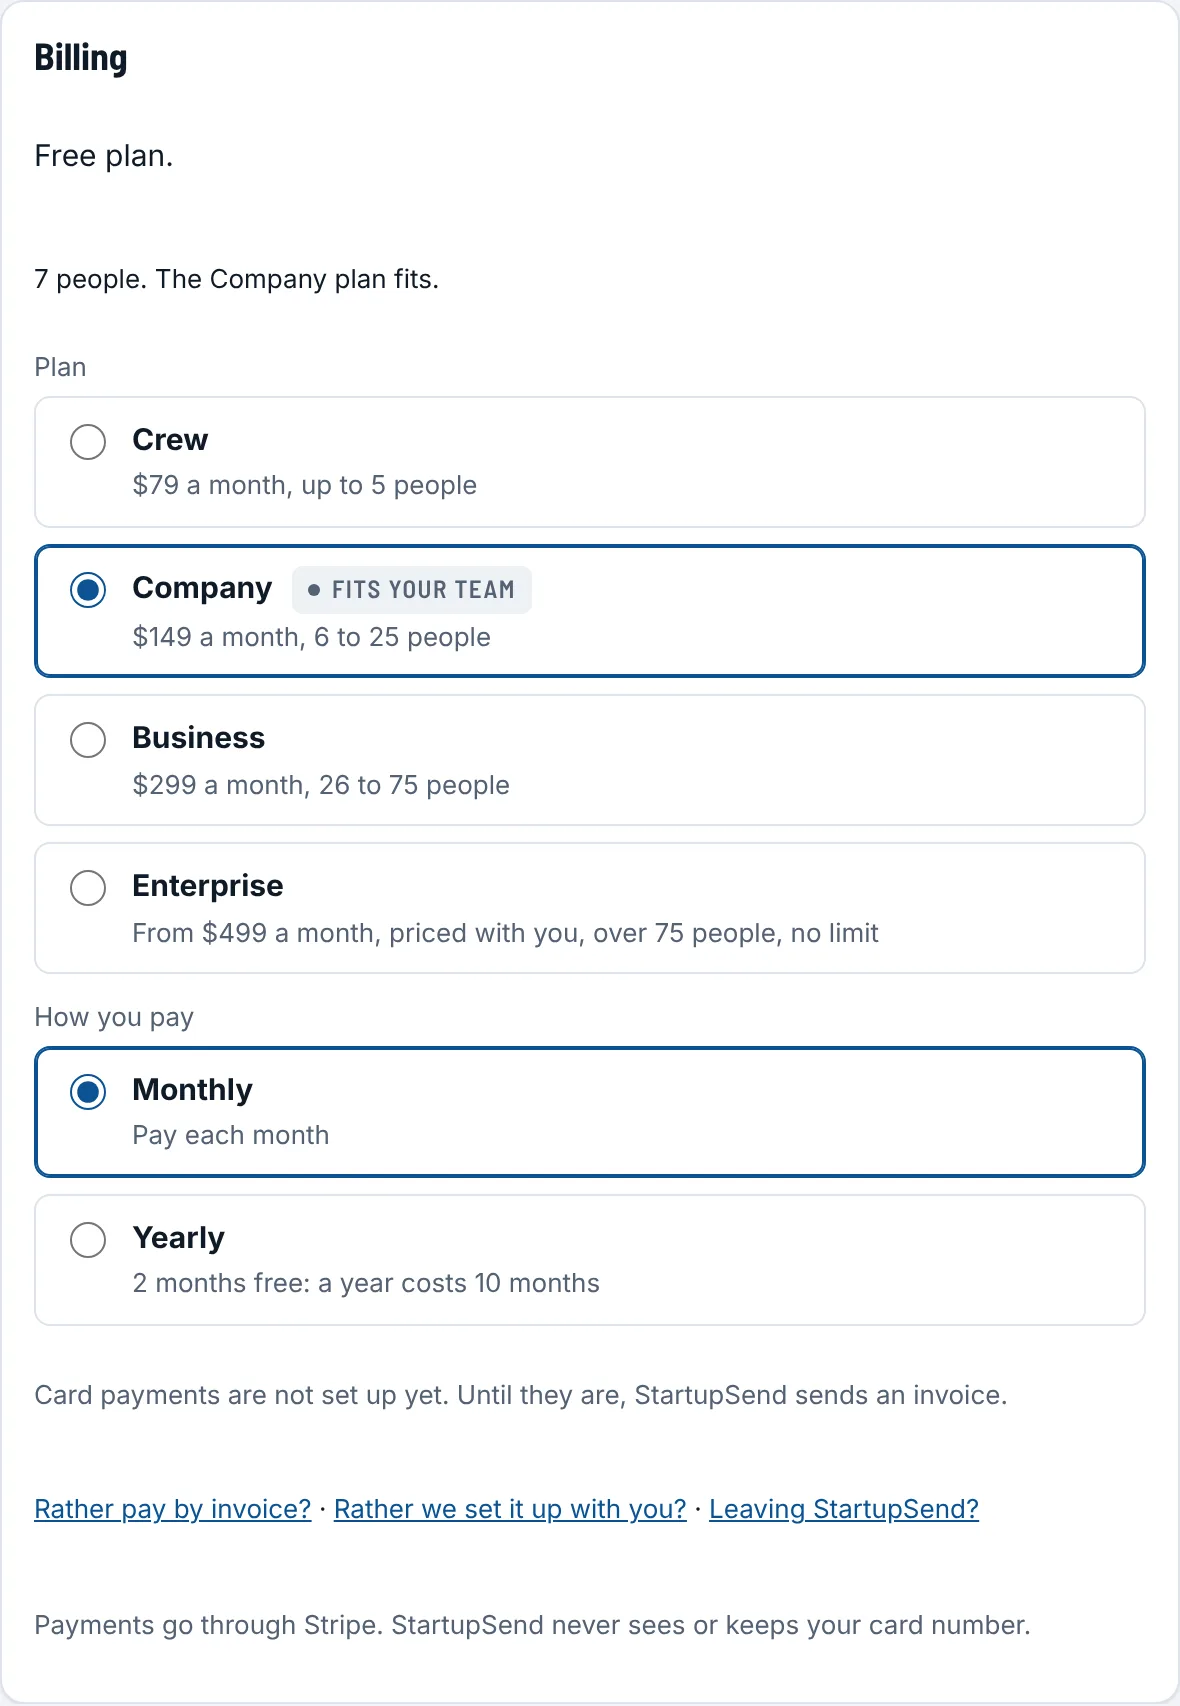
The Billing card on the Company page shows your price, where your payments stand and the one next step:
- Free trial until a date: you can keep working; Subscribe by card is there when you are ready, and you are not charged until the trial ends.
- Card on file or Paid by card, with the next charge date. Manage card and receipts opens Stripe's page to change the card or download receipts.
- The last payment did not go through: update the card to keep reports going out.
- A plan billed per project is invoiced; a plan with no price yet is set up with StartupSend.
Pick your plan on the card, and Monthly or Yearly before you add a card: a year costs 10 months, so 2 months are free. AI is included in every plan; extra AI tag reads you allow with pay as you go go on the same card, on the next invoice (see pay as you go).
Payments go through Stripe. StartupSend never sees or keeps your card number. Questions about your plan: contact us.
AI included Parts being finished #
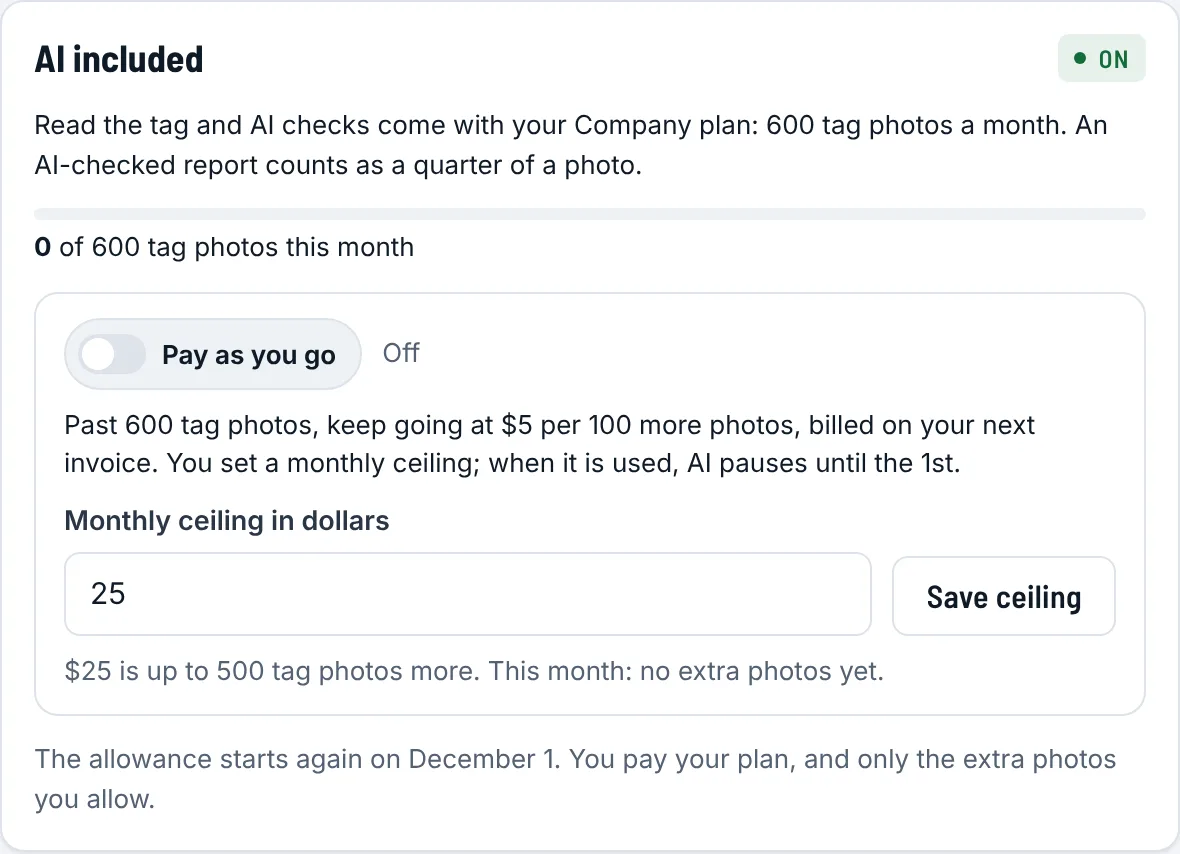
Every plan comes with AI: reading the tag from a photo, and AI checks. Each month your plan includes a number of AI tag reads (one per unit, however many photos it takes); past them, your admin can switch on pay as you go. Nothing about AI ever holds up a report.
Reading the tag from a photo
The nameplate step of a report has a big Read the tag button. It opens a tray: the tech takes as many photos as the tag needs (the whole plate, close-ups, a motor's or compressor's own plate), removes any they don't want, and taps Read. The photos are read as one job, in the background: the tech is back on the form at once and keeps working, and a bar at the top of the form says how it is going, then Tag read: 14 values to check. StartupSend reads the values the sheet needs: manufacturer, model, serial, refrigerant, volts and phase, MCA and MOCP, RLA and LRA, FLA, charge.
- Each value is read once, from the photo that shows it best: a close-up beats a far photo, and a close-up of part of the tag is fine. A value that runs off the edge of a photo is never taken from it.
- Each plate fills only its own values: a motor's plate gives the motor's FLA and horsepower, never the unit's MCA or a compressor's RLA.
- Values read well start ticked. Values it is not sure of say Check this, show the part of the photo they came from and which photo, and wait for the tech to tick them. When two photos read a value differently, nothing is filled: the tech picks one.
- Only empty fields are filled. Anything already typed, or typed while the tag was being read, stays as typed.
- With no signal, the photos wait on the phone and are read when the signal is back.
- On a job with several units of the same model, the tray offers to read only what changes (like the serial number) and to offer the rest from the unit read before, for the tech to tick. It ticks that offer itself only when this unit's tag names the same model: the model typed on this unit, a barcode on the first photo, or a quick read of the model on the first photo, and then it uses the most recent unit of that model. Otherwise the offer is there unticked, and every value is read.
- The photos stay on the report, and the history notes which values came off which tag photo.
- After the tag is read, StartupSend offers those values to the other units of the same type still blank.
- When this month's AI tag reads are used, or if reading is down, the sheet says so in plain words and the tech types the values in.
AI checks
See AI checks in the Checks console.
Your monthly allowance
- Crew: 3,000 AI tag reads a month. Company: 10,000. Business: 30,000. Enterprise: set with you. One read is one unit, however many photos.
- An AI-checked report counts as a quarter of a photo. A tag read again with nothing changed costs nothing and does not count.
- A very hard photo can count as more than one: the allowance also has a cost limit underneath, so the AI never runs up a bill.
- The allowance starts again on the 1st of each month.
The AI included card on your Company page shows this month's tag reads against the allowance and who used the most. Admins get an email at 80% and at 100%.
More than your allowance: pay as you go
- On the Company page, in AI included, switch on Pay as you go. It needs a card on file (see Billing and your plan).
- Set the Monthly ceiling in dollars ($25 to start) and choose Save ceiling.
Past your allowance, AI carries on at $1 per 100 more tag reads, billed on your next invoice with your plan. When the ceiling is used, AI pauses until the 1st. With pay as you go off, AI pauses when the allowance is used: the tech sees "AI tag reading is paused for this month" and types the values as usual. Only an admin of your company can switch it, never StartupSend support or a Claude connection.
Claude or ChatGPT #
Ask your AI assistant, Claude or ChatGPT, to set up a job, add the equipment list, fill in readings or tell you what is left on Riverside. It works as you, with only what your role can do.
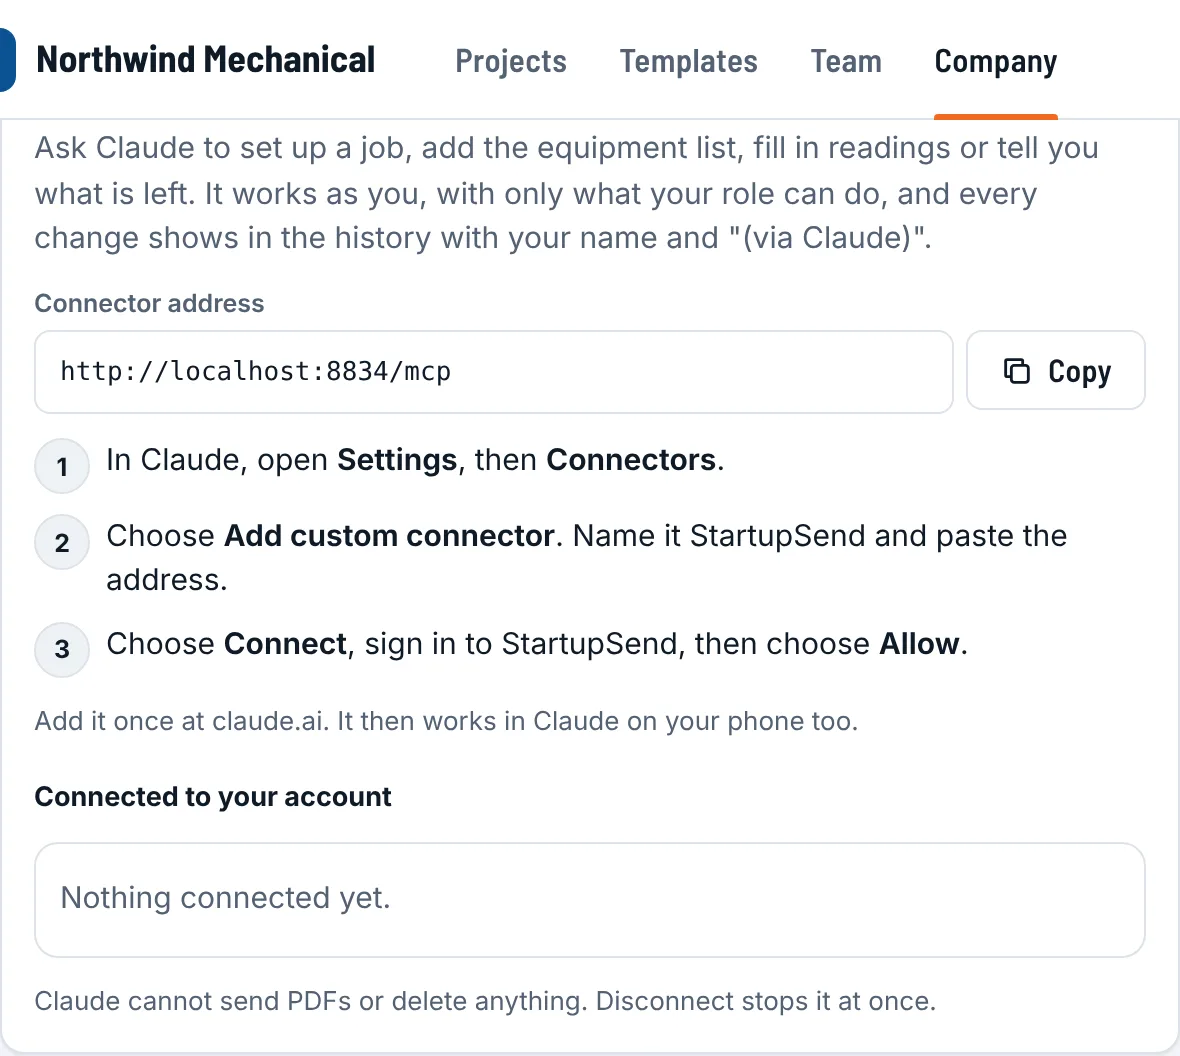
Copy the connector address from Connect Claude or ChatGPT (on the Company page, or in your menu): https://startupsend.com/mcp.
In Claude
- Open Settings, then Connectors.
- Choose Add custom connector. Name it StartupSend and paste the address.
- Choose Connect, sign in to StartupSend, then choose Allow.
Add it once at claude.ai and it works in Claude on your phone too.
In ChatGPT
- Open Settings, then Apps and connectors. Under Advanced settings, turn on Developer mode.
- Choose Create. Name it StartupSend, paste the address, and pick OAuth to sign in.
- Choose Create, then connect it: sign in to StartupSend and choose Allow.
ChatGPT may need a paid plan with developer mode for its own connectors.
What it can and cannot do
- It can list and open projects, make and change projects, add units, open and fill reports, finish, approve, return or reopen them (as your role allows), list, raise and resolve open items, read a report's history, look through templates and the library, make your own copy of a template, and, for an admin, read and change the company's brand and defaults, the team and the Trash, and export the data.
- It cannot send PDFs: a PDF is made on your own device, so sending is done in StartupSend.
- It cannot delete anything. Nothing in StartupSend is deleted for good.
- Every change it makes shows in the history with your name and "(via Claude)" or "(via ChatGPT)", whichever app made it.
Your connected apps are listed under Connected to your account. Disconnect stops it at once.
Your data and privacy #
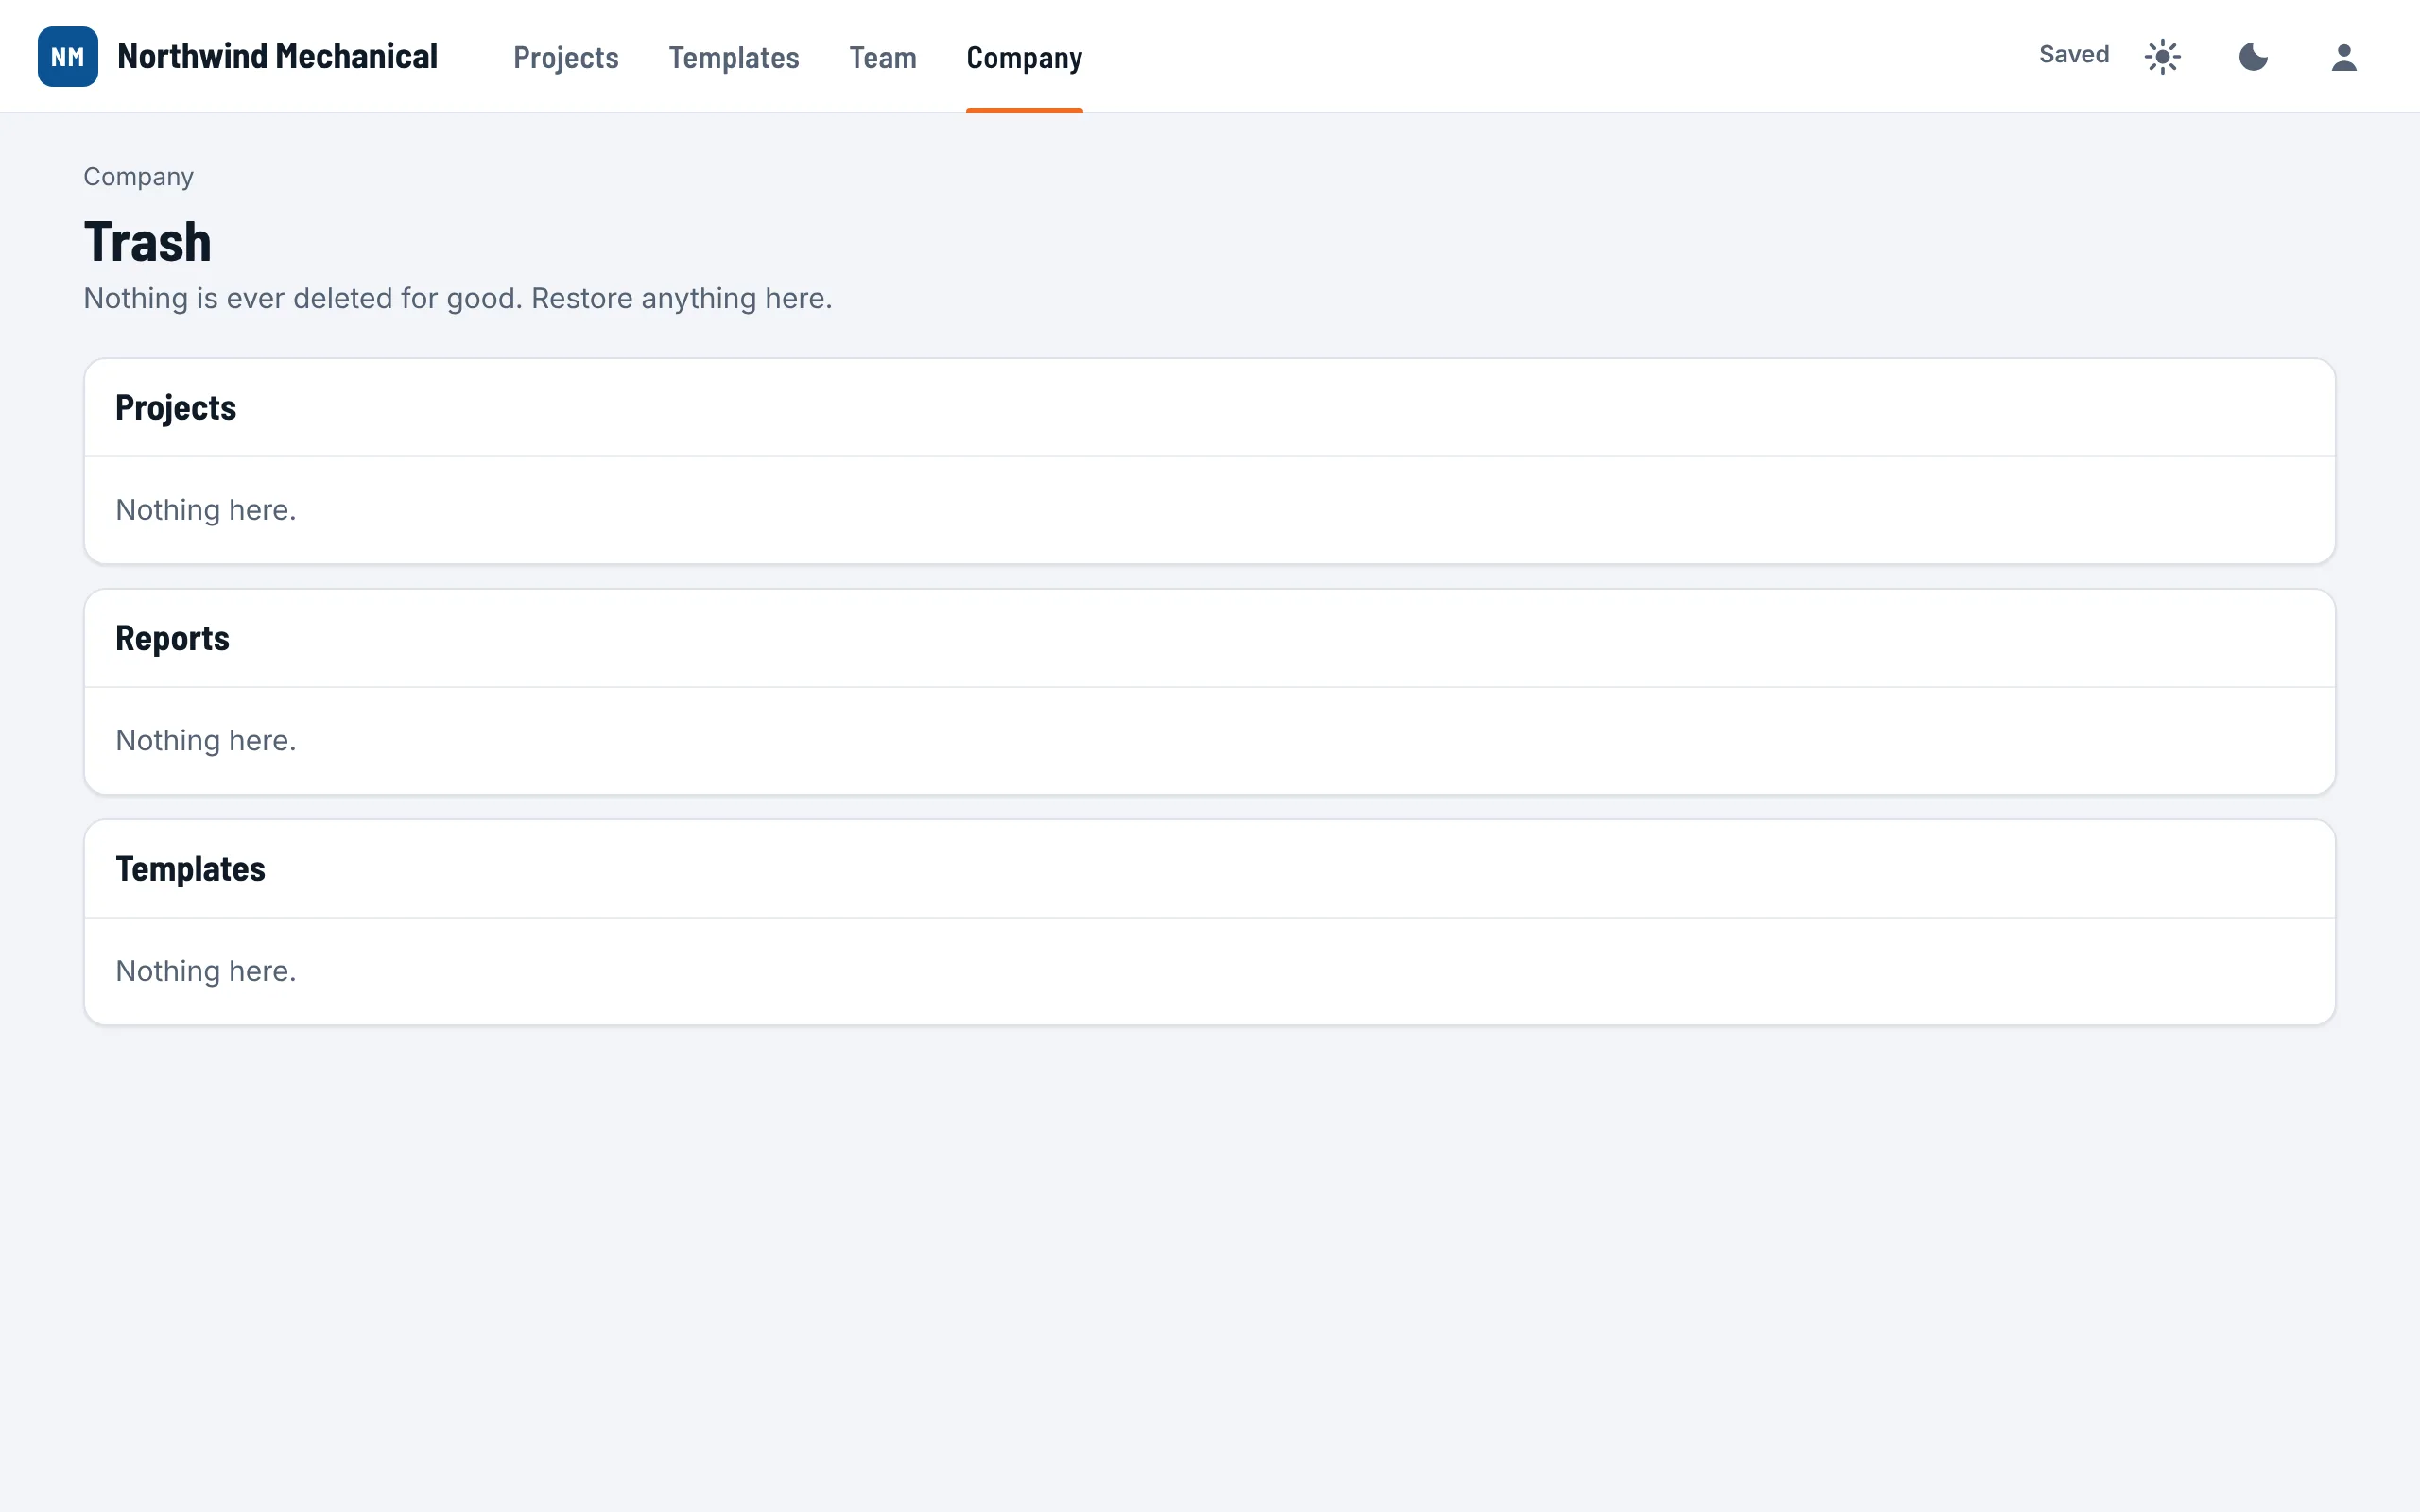
- Nothing is deleted for good. Removed projects, reports and templates go to the Trash (Company, Trash) and can be restored. Removed people can be restored from Team.
- Every change is kept with who made it and when: each report's History, each project's Activity.
- A full copy of your company's data is saved every night. The Company page says when the last one was made.
- Your data is yours. Download all data gives all of it, any time.
- One company never sees another's. Every report, photo and file belongs to your company alone.
- Review links show only the reports you sent, of one project, until they expire or you turn them off. Only a fingerprint of each link is kept.
- Location: the phone's location is asked only when the tech taps Use my location for the weather, it is rounded to about 1 km, and it is not kept. The weather otherwise comes from the job's address.
- Cards go through Stripe; StartupSend never sees the number.
- AI sends a tag photo, or a report's photos and notes for AI checks, to the AI services that read them, only when that helper is used.
The full privacy policy and terms are on the website.
Help and what's new #
- What's new in your menu lists what changed in each version.
- Problem or idea? in your menu sends it straight to the people who build StartupSend.
- For your plan, a demo or anything else: contact us.
- For the techs: the field tech guide prints as a pocket guide. For your commissioning provider: the Cx provider guide.
See it with your own jobs.
Set up one project, send a tech out with a phone, and judge the report that comes back.